
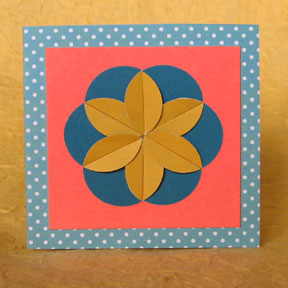
 The geometric flower on this gift tag is made from folded circles, with the tabs forming a ring of inner petals that add dimension. Its best to use double-sided paper to show off the petals, but you can make your own double sided paper if you dont have any available. Simply punch or cut pairs of circles in two different colors, and stick them back to back with a glue stick.
 You will need:
* Single-sided patterned paper, 3 by 6 inches
* Colored card stock, 2-1/2 by 2-1/2 inches
* Double-sided paper, enough to make six or seven 1-inch circles
* Circle punch, 1-inch (or 1-inch circle template)
* Pencil
* Ruler
* Scissors
* Glue stick
* Brad, button, or flat-back gem (optional)
Measure, mark and cut the patterned paper to the specified size. Score and fold it in half to form a square card. Measure, mark and cut the colored card stock to the specified size, and stick it to the front of the card.
Punch (or trace and cut) six 1-inch circles from the double-sided paper. To make a petal, fold a circle so that the edge touches the center of the circle. Make another fold at a 60-degree angle from the first fold; the tabs will overlap. Repeat with the other circles, seeing to it that the petals are the same size. Check to see that the petals fit snugly when arranged side by side in a circle with the points together. Depending on how wide or narrow the petals are, you may have to discard or add a petal.
Next, find the center of the square background and make a light mark with the pencil. Using the glue stick, attach the petals one at a time to the background, with the points meeting at the center of the square. Arrange the tabs on the petals so that they are all facing the same direction; that is, all left tabs are under and all right tabs are on top. If theres an even number of petals, you can also arrange the tabs so that adjacent tabs form pairs that are alternately above and below each other (see photo).
If you wish, you can embellish the flower by gluing on a button, brad, or flat-back gem to the center of the flower.
