
Materials
* Scraps of fabric, whatever color or pattern you like.
* Matching thread
* Polyfil stuffing, again a very small amount will work
* A pencil with an intact eraser, a clean chop stick or a pair of surgical clamps; these are for turning the very narrow arms right side out.
* Straight Pins, needle, scissors, etc.
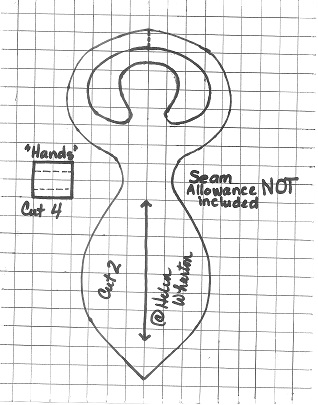 The pattern is shown on a 1/2 inch grid. The cutting of this pattern is a little different than my usual directions. Cut it out of the paper you print it on, using the outline of the pattern pieces. This pattern for the doll body does not include a seam allowance. Place the pattern on your fabric and trace around it onto the fabric. Do this twice. When you cut it out cut the fabric about 1/4 inch away from the traced line, this is your seam allowance. Cut the arms in the center, where the dotted line is on the arms, so that you have two separate arms. Cut one line between the arms and the body, around the head, to facilitate stitching the arms together. See the left side of the photo at left to see how to cut this one line. The "hands" may be cut out at the lines of the pattern, the lines of dashes on the hands piece is your sewing line.
With right sides facing, pin the body pieces to the hand pieces on the side of the hand pieces where there are no dashed lines. Stitch them together and press the seams open. Pin both body pieces together, with right sides facing. Stitch them together, leaving about 2 inches open at the bottom to turn and stuff. Also leave the ends of the "hands" open.

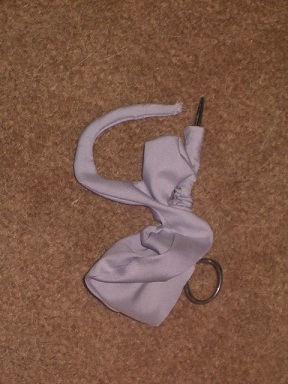
Using the clamps, chop stick or pencil, turn the arms and body right side out. Be patient, this is easier said than done on such a narrow arm. :) Trim the seam allowances and clip all curves. In the photo at left you can see the left side is has not been trimmed and the right side has.
Fold the hand on 1 arm to the inside of the arm, at the seam to connect hand to arm. Insert the other hand inside the folded back arm and stitch around the arm using the Ladder Stitch. Stuff the doll, starting with the arms and work your way down. When the doll is completely stuffed, close up the open seam, again using Ladderopen.
 Stitch.
Next week we will look at some different ways to decorate and personalize your doll.
