
This doll was found at a resale shop by my daughter-in-law and her Mom, thank-you Bethany and Kathy! As soon as they saw it they knew she had to come home to me. Since this is not my design, and she is not signed, so I have no idea whom to credit with her creation, I can not give you directions or specifications. That being said, I think anyone with some wood and craft paint could come up with a version of their own.
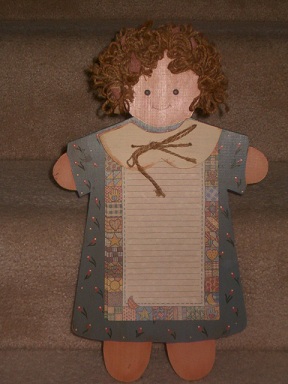
As you can see, in the photo at right, this doll is so cute! She is about 12 inches tall. The collar on her dress is attached by twine that goes through holes drilled in the doll and the collar. This twine also holds the paper in place. What appears to be her apron, is actually a quilters notepad. The paper I already had and thought it was a perfect fit for this piece.
Since she did come from a resale shop, her hair is not in perfect condition, but I like her the way she is. The hair is bundles of the same twine used for the collar, wrapped in torn bits of calico "ribbons." Everything about this sweet doll is Shabby Chic, which is my favorite style for decorating, and lends itself so well to anything doll related.
For another idea to decorate with doll related wall decor check out Doll Studio Wall Decor
Making and Dressing Cloth Dolls
Ebook with patterns and instructions to make 5 cloth dolls as well as chapters on general doll making techniques.The book includes 21 inch Lalena Doll, 21 inch David Doll, Bear Dolls, 9 inch Destiny Doll and 15 inch Annie Doll, all together in one handy book. 53 pages.Making and Dressing Cloth Dolls.
