
And the final instructions for accurately machine piecing the 4½” star.
Having already made the Flying Geese units in the last article, now it is time to put the three rows together.
There are some hints and tips for improving your accuracy when machine piecing and I will be highlighting them here.
Firstly, it would be a good idea, to lay the star out, as it will look in the finished block. Lay it out in rows as you will be sewing like this:
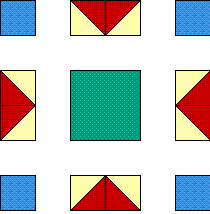
Top Row:
The top row is sewn together first. Take the left square and place it on the flying geese block. Have it sitting exactly on the left side of the flying geese unit, right sides together. Using a run-on, stitch these two units together. Use a run-off and cut the thread.
Take the right square and place it on the flying geese block. Have it sitting exactly on the right side of the flying geese unit, right sides together. Using a run-on, stitch these two units together. Use a run-off and cut the thread. Take this top row to the ironing board, and setting the seams first, iron the squares away from the flying geese unit.
Bottom Row:
Take the bottom row and repeat all the instructions for the top row. Iron the squares away from the flying geese unit.
Middle Row:
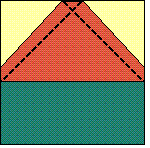
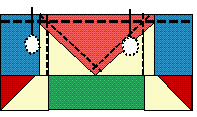
The middle row requires more attention for accurate machine piecing. The two side flying geese units will be sewn to the square. Place the left flying geese unit onto the square, with right sides together. This is how it should look:
Here is a diagram to illustrate what needs to be done:
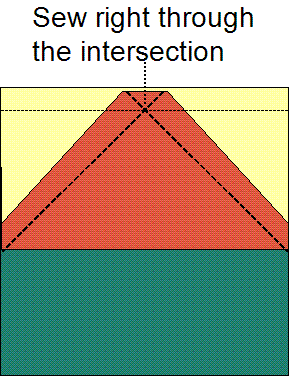
Sew using a run-on, then stitch directly through the intersection and to the end. Finish with a run-off.
By sewing directly through the intersection, the integrity of the triangle will be kept and a nice sharp point will be created. Following the instructions for the middle row, do likewise with the right side flying geese unit.
Take the middle row to the iron, set the seams first, and then iron the centre square away from the flying geese unit.
Sewing Top Row and Middle Row together.
This is one of the rare times that I use pins. I prefer flower pins as they generally can be sewn over with the sewing machine, without damage to your needle shank. Another old tailor’s trick is to always pin before you reach a major intersection, not after it.
There is not much point in placing a pin after the intersection, the needle will already have traveled over the intersection and done its work. It is important to hold the two units together so there is no movement as the needle sews directly through the intersection.
Place the top row and middle row right sides together. I disregard the edges at this point. It is much more important to have the two inner intersections meeting exactly. The edges will take care of themselves, as they’ll be part of the seam allowance.
Firstly line up the first intersection on the top row with the first intersection of the middle row. You will notice because of the way the units were ironed, that each intersection seam sits in opposite directions. This allows for the intersection to “lock in” to place. Pin about ¼” before the first intersection. Match the second intersections, feel for the “lock in” and then place a pin about ¼” before the second intersection. You have now ensured that the units will not move as they are being sewn together, and you can concentrate on sewing right through the intersections. This is how it will look:
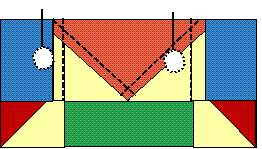
Sew using a run-on, directly over the pins and right through the first and second intersection. Finish with a run-off and cut the thread. This is how it should look:
Following the instructions sew the bottom row to the middle row.
Finally, take the block to the iron. Set the seams, and then press the seams to the inside square. Press firmly, without stretching. You may want to give it a teeny spray of spray starch.
Congratulations, your block is finished. It should measure 4½” x 4½”. How did it go? Are you happy with the accuracy?
My final advice for this series, is to take your time. Rome wasn’t built in a day and neither was a masterpiece quilt. If you take your time and not rush, there’s every chance that you will end up with a delightfully accurately cut and machined pieced quilted masterpiece.
The forum that was set up at the beginning of this series is still posted if you’d like to make a comment about this series of instructions. I’d like to know if (a) you enjoyed the articles and (b) if you’d like me to do the same with another technique.
