
You will need:
* Sturdy cardboard cut into squares measuring 1x1 inch and 2x2 inches
* Decorative paper scraps
* Small embellishments such as punched paper shapes, vintage photos, cutouts from magazines or gift wrap, charms, stickers, stamped images, appliqué, bits of ribbon and lace
* Page from old book or magazine
* Ruler
* Pencil
* Craft knife and cutting mat
* Scissors
* Craft glue
* Black or brown stamp pad or black marker
Make an inchie:
Look through your paper and embellishments and choose a few items that go well together. For a simple inchie, I chose a bold printed background, a flower cut out from gift wrap, and the word happy from an old book.
Measure and cut the cardboard into a 1x1 inch square. This is your canvas. Stick the decorative paper to the cardboard; this is your background.
Now take your main image or focal point, and see where you would like to position it on the background, but don't stick it yet. Here, I've put it in the corner.
Take the text and see where to best put it. When youre happy with the arrangement, glue down the elements. To give the inchie a finished look, ink the edges with a black marker. There you go a mini work of art!

Make a twinchie:
For this example, the focal point is a vintage image of a girl. Lets match it with vintage-style floral paper, pink brocade-like paper, and pink vellum, plus a bit of lace. We might need some text later as well.
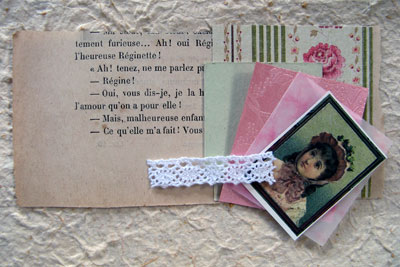
Take a 2 x 2 piece of cardboard, cover it with the floral paper and trim the excess.
In the following steps well arrange the focal point and embellishments, so dont glue down anything just yet. Cut out the image of the girl and position it on the background.
To ground the image so that it doesnt look like its floating, add a thin strip of the pink brocade-like paper to the bottom. Move the girl to the right to make the composition more dynamic.
Add the ribbon to the twinchie. The light background doesnt quite show the detail of the ribbon, so lets add another strip of the pink paper under the ribbon for some contrast.
The girl stands out a bit, so lets tone down the image by adding a piece of torn vellum over the image.
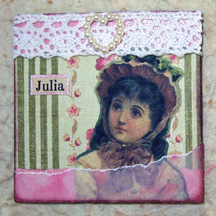
Our twinchie looks good so far, but it needs something on the left to balance the girl on the right. Adding some text might do the trick - the name Julia was cut out from an old book.
At the last minute Ive decided to add a dainty heart to the ribbon.
Now arrange the focal point and embellishments on the background until youre satisfied with it. Glue down the pieces, trim off any excess, and let dry. Lastly, finish the edges with brown ink. Voila! Another work of art!
More tips:
Use thick, sturdy cardboard. It adds heft to the inchie/twinchie. Two or three layers of thin cardboard stuck together also works.
Experiment with backgrounds. Try painting the cardboard, or use different materials for texture, like sandpaper, cork, candy wrapper, etc.
Layer paper to add depth to your work and make it more interesting.
Keep an eye out for small elements you can use from junk mail, catalogs, note paper, food labels, postage stamps, etc.
Make your own text. If you cant find any suitable text in a book or magazine, you can write it by hand with a gel pen, print it out on a computer printer, or stamp it.
Most of all, have fun!
