
Quilling paper is usually sold as 24-inch strips, but if you cut your own paper strips, simply glue enough strips end to end come up with the required length.

You will need (for two cupcakes):
* 1/8-inch wide quilling paper:
- 3 strips (each 24 inches long) in violet for the base
- 2 strips (each 24 inches long) in light pink for the top
- 2 strips (each 24 inches long) in dark pink for the top
- 2 strips (each 2 inches long) in white for the whipped cream
* 2 red seed beads
* 2 1.5-inch headpins
* 2 jump rings
* 2 ear wires
* White glue
* Quilling tool or cocktail toothpick
* Marble or round bead
* Scissors
* Round-nose pliers
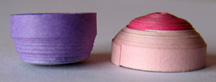
To make the base, cut one of the violet strips in half. Glue the end of the half strip to one end of a whole violet strip with a 1/4 inch overlap, forming a long strip. Roll the strip into a tight coil with the help of a quilling tool or tooth pick, and secure the end of the strip with glue. When dry, hold the violet coil between the thumbs and middle fingers of both hands, and gently push out the center of the coil with your thumbs until the coil now resembles the base of a cupcake. You may have to flatten the center with the flat end of a pencil or similar object. Coat the inside and outside of the base with glue to help the base keep its shape. Set aside to dry.
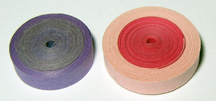
To make the top, glue the end of a light pink strip to the end of a dark pink strip forming one long strip. Starting from the end of the dark pink paper, roll the strip into a tight coil and secure the end with glue. When dry, take the coil in one hand and gently push out the center with the marble or bead to form a dome. When you're happy with the shape, coat the inside and outside of the cupcake top with glue and let dry.
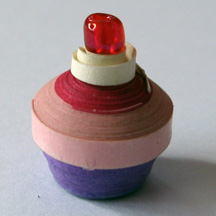
To make the whipped cream, take the two-inch strip of white paper and taper one end of the strip by cutting it at an angle from one corner to the midpoint of the long side opposite. Make a loose coil starting from the non-angled side of the paper. Set aside.
Apply glue to the rim of the cupcake base and attach it to the cupcake top. When dry, glue the white coil to the cupcake top.
At this point, the cupcake is nearly complete. If you are making earrings, then continue on to the next step. If you want to keep the cupcake as a miniature sculpture, then as a last step simply glue the red seed bead to the top of white coil.
Repeat the above steps to make a second cupcake.
To make an earring, insert the headpin through the hole at the bottom of the cupcake so that the end sticks out at the top. Add the red seed bead to the pin so that it rests above the white coil, then loop the headpin with the round-nose pliers. Open a jump ring, thread it through the loops of the headpin and the ear wire, and close the ring. Repeat for the other earring.
Tip: Try sprinkling on some micro-beads or glitter when you coat the cupcake top with glue. You can also cut some tiny slivers of quilling paper or make tiny coils from 1-inch strips to glue onto the cupcake. Have fun!
