
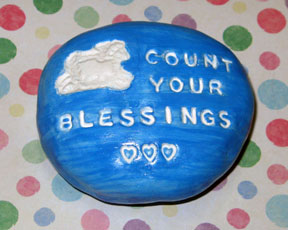
 Our project for today is a paperweight made of paper clay. Now this sounds a bit strange when you consider that paper clay is a lightweight material that can hardly be expected to hold down a stack of paper. The trick is to use a stone to provide the necessary weight; the paper clay simply serves as a cover which you can decorate with rubber stamps.
 A note on rubber stamps: Choose a simple design with well-defined lines. This will help ensure that the impression on the paper clay comes out clear. Its a good idea to try out your stamp on scrap paper clay before stamping the actual paperweight.
Bonus tip: Cookie stamps work wonders for paper clay! Just be sure not to use them any longer for food once youve used them for clay.
Are you ready? Lets get going!
You will need:
* Smooth stone (river stones make good paperweights)
* Paper clay, enough to cover the stone
* Cylindrical bottle or rolling pin
* Rubber stamps (one image stamp, and word or alphabet stamps)
* Ink pads (optional)
* Acrylic paints
* Sealant, like Mod Podge or acrylic gel medium
* Paint brush
* Container of water to wash the brush
Wash and dry the stone. Take a lump of paper clay, enough to cover the stone, and flatten it out with a bottle or rolling pin to a thickness of at least 1/8 of an inch. Wrap the stone with the paper clay, making sure to completely cover the surface. Smoothen out the surface if needed you can moisten your finger with water and use this to smooth over any cracks and uneven surfaces.
Using the image stamp, carefully stamp onto the paper clay to make a clear impression. If you want, you can ink the rubber stamp first before stamping the clay. Stamp the text next spell out words using individual alphabet stamps, or use ready-made word stamps. You can also add decorative marks around the edge of the paperweight using everyday objects like toothpicks, bottle caps or buttons.
Allow the paper clay to dry. At this point you can leave it in its natural color and simply seal it by brushing on some Mod Podge or gel medium, or you can color it with acrylic paints, using a fairly dry brush. If you opt to paint it, color the front first and let it dry completely before painting the back. Do the same when sealing the paperweight.
