
I recently created a portable Design Wall for my sewing room and its been such a hit, I thought I might share it with you.
Often during my creative process, I am looking for somewhere to lay out my blocks as I audition them, prior to sewing together. Ive found over time, that by simply placing the blocks on my cutting table, and viewing them up close, isnt enough to be able to see the whole picture. Because I cant get distance between me and the blocks, some errors can slip through.
I have needed a solution to be able to audition the blocks, from a distance. This would enable me to get rid of any fabric that doesnt suit, or redesign an appliqué that doesnt quite fit into its surroundings, and it would save a lot of time and heartache and lots of unnecessary reverse sewing.
Up until recently, the floor of my sewing room was the area I used to lay out my blocks. That was after I swept the floor, and put all the stuff away to create a large enough space to be able to view from a reasonable distance. But I find that viewing blocks on the floor, doesnt give an accurate picture you are not seeing the blocks head on as you would if you had them on a flat wall in front of you. Just take a photograph of a quilt on the floor and youll understand what Im saying.
So, why dont I simply get a design wall made? My sewing room is pretty large, but I dont have a scrap of wall space that could be set aside for a design wall just about every bit of space is taken up with furniture and shelving.
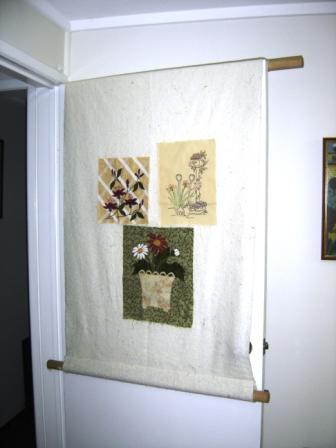
So to my solution. I have three doors in my sewing room. Two are the doors to the pantry that holds my fabric stash and the other is the entrance door to the room. Here was some space (not a huge amount of space, but enough for me to lay out my blocks and audition them from a good distance).
So I dug into my cotton batting stash (we all have bits of cotton batting left over Im sure), and I pulled a piece out that looked about the right size. I used cotton batting, because that seems to be the best surface to lay my blocks on and the cotton surface captures the blocks and they sit without even having to pin them.
I measured the area I wished to use, and resized my cotton batting accordingly. (Cutting and How To instructions to follow). I allowed extra for the pockets top and bottom. I got MD to cut me two thick dowel pieces to size. Thats it. My design wall is made. I slipped the dowel into the pockets top and bottom and I hung the top pocket over the door. The bottom pocket with dowel gives some weight to the bottom and helps the design wall to stay taut. And there you have it, a great design wall that I can stand back from and audition my blocks as I need to.
The very best thing about this particular design wall is that its portable. When MD and I go on holidays, I pack it into the trunk and just bring it out and hang it on a door in the holiday unit.
Im so happy with this solution to my problem, I havent had to give up a wall exclusively for a design wall, or go to the expense of getting one especially made for the space, and I can take it down when I dont need it, and take it with me when I do.
So heres the How Tos and Requirements for you. (Oh, together with a photo of my portable design wall).
Requirements:
Cotton Backing
2 lengths of dowel 1¼ diameter
Sewing machine and thread
How to:
Using a Tape Measure, measure from the very top of your door to 6 below the handle. My measurement is 60.
Turn the top and bottom ends over by 6 and sew down using a straight stitch. This will give you a rod pocket top and bottom and is big enough to slide the dowel into place.
Slip the dowel into the pockets top and bottom and hang one end over the door. Tadaaaa!!
I hope your find your Portable Design Wall as useful as I do.
