
 Add an element of interest (and surprise!) to an otherwise ordinary greeting card through the use of a window. Its fun to see how a single object glimpsed from outside the card blends into the whole scene inside the card.
 You will need:
* Cream or white cardstock, 8-1/2 by 5-1/2 inches
* Patterned paper with prints in pastel colors, two pieces each measuring 5-1/2 by 4-1/4 inches
* Scraps of matching patterned paper, four pieces each measuring 2 inches by ¼ inch
* Cardstock or text weight paper in pastel colors (lavender, peach, yellow)
* Bright blue cardstock
* Butterfly stamp, around one inch in size
* Black solvent stamp pad
* Dimensional glaze
* Glitter
* Flower punch
* Glue stick
* Pencil
* Ruler
* Craft knife
* Cutting mat
* Gel pen
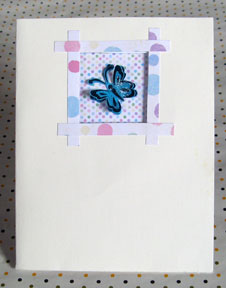
 Mark, measure and cut the cream cardstock to the specified size. Score and fold the cream cardstock in half crosswise to form the card. Measure, mark and cut a square measuring 1-1/4 inches on the front of the card, around an inch from the top.
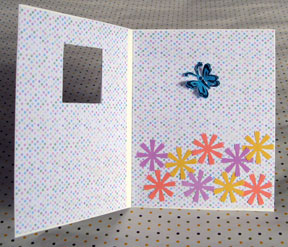
 Mark, measure and cut the patterned paper to the specified size. Attach them to the inside of the card. The back of the patterned paper will show through the window on the front of the card. Unfold the card and lay it flat on the cutting mat, with the front side facing up. Using the craft knife and ruler, carefully cut the patterned paper along the edge of the window and remove it. Take four strips of scrap patterned paper and cut them to the specified sizes. Glue them onto the front of the card, around the window.
Stamp two images of a butterfly onto blue cardstock and cut them out. Fold the wings of one butterfly upwards. Apply dimensional glaze and sprinkle with glitter. Set aside to dry.
Take the other butterfly cutout. With the card closed, glue the butterfly through the window onto the inside of the card. Glue the glazed and glittery butterfly onto the plain butterfly.
Punch out flowers from pastel-colored paper. Arrange them inside the card, below the butterfly, making sure that they dont show through the window. Glue them in place. Lastly, write your greetings with a gel pen.
Tips:
Instead of dimensional glaze, you can heat emboss the stamped butterfly. Use pigment ink, clear embossing powder and a pinch of glitter; emboss with a heat gun.
You can also skip the dimensional glaze and instead apply glitter glue to the butterfly.
