
(b) Folding the fabric into four layers in readiness for cutting.
The ideal size of fabric for cutting is approximately 20 inches by the length of your fabric (50cm by 112cm). Even if a large amount of fabric is required to be cut, cut it down to a manageable size. Otherwise the heavy weight of the fabric can cause the fabric to shift and consequently cause inaccurate cutting. Take hold of the fabric at its halfway point (wrong sides together) with the two selvedge edges hanging down roughly the same length. When holding the fabric in this manner, the fingers should be hidden under the centre of the fabric and the thumbs seen on the top of the centre of the fabric strip.
NOTE: Do not try to match the selvedge edges as most often they are not woven evenly, or wound onto the bolt evenly, and when the selvedges are placed together the fabric itself skews and doesnt sit flat.
Standing in front of the cutting board, lay the fabric (which is currently only 2 layers) onto the cutting board, fingers still holding the centre fold at the top of the board. Gently bring the fold down to the bottom of the board and place this folded edge on top of the selvedge edges. There are now 4 layers of fabric on the cutting board. Dont worry that the bottom edges are not even; this is not the edge that matters. It is the folded edge at the top that is all important. To ensure dog legs dont appear while cutting fabric strips, run your finger across the top crease at the top of the board, and you should only feel one crease even though there are four layers. If you feel two or more creases, it means that the fabric is not folded on the straight of grain. Unfold, and try again, until only one crease is felt.
Once there is only one crease to feel, gently move the fabric and place the creased line onto a corresponding horizontal line on the cutting board. Place the fabric into the middle of your cutting board. Only a few strips are cut it is important that there is room for your ruler to fit entirely on the cutting board, not half on and half off. Placing the ruler on an uneven cutting surface is another contributing factor to inaccurate cutting.
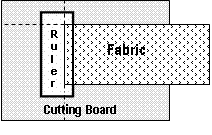
For right handed cutters, the fabric should sit to the right on the board, cutting ruler to the left.
For left handed cutters, the fabric should sit to the left on the board, cutting ruler to the right.
Place the fabric in the appropriate direction for right handers and left handers, means that when the trim piece is cut, the trimmed piece is removed, not the piece you have cut from. This means that the trimmed edge is not disturbed and in place, and the trimmed edge super accurate and untouched, ready for the first strip to be cut.
So lets do the trim cut. This is one of the few times the ruler is aligned with a corresponding line on the cutting board. Check the four layers of fabric in the bottom left corner (for right-handers) to make sure that the trimming will be covering all four layers of fabric.
Place the 12 x 6½ ruler with a corresponding vertical line on the cutting board, ensure that all four layers are going to be incorporating in the trim. Notice that when the ruler is placed over the fabric, there is what I like to call overhang. Overhang is the ½ or so top and bottom where the ruler is longer than the fabric (if 44 wide fabric is used). This ½ extra length of ruler at the top and bottom of the fabric ensures the rotary cutter starts to cut prior to getting to the fabric and continues to cut after leaving the fabric. This avoids the rotary cutter failing to cut the start and finish of the fabric. Here's an illustration of how the fabric and ruler are lined up with a corresponding line on the cutting board.
So, how is the left hand used? When the left hand is placed on the cutting ruler AS WELL as the cutting board, the ruler stays completely still. Place the left palm flat on the cutting ruler with the left thumb, left index and middle finger on the ruler. The left ring finger then becomes the chock that stops the ruler from moving. Jam the ring finger right next to the edge of the ruler. The left little finger is placed flat on the cutting board and helps to stabilize the ruler and stop any movement.
Take the rotary cutter and cut from the bottom of the fabric to the top of the fabric in one sweeping cut, using the same heavy pressure on the cutter from start to finish. Always, always, cut away from the body. These rotary cutters can be very, very dangerous, and even a fairly blunt cutter can still do harm.
After the trim cut, very gently remove the ruler and then carefully remove THE STRIP THAT HAS JUST BEEN CUT not the fabric piece that was cut from. By removing the trimmed piece that has just been cut, the rest of the fabric remains in tact and undisturbed ready for the first strip to be cut.
Congratulations. The fabric has been prepared and folded and trimmed ready to cut the strips and then shapes, from each of the fabrics.
Next time the full Cutting instructions and getting ready to machine piece.
If you have any questions about the instructions in this article, please go to the forum titled "Accurate Rotary Cutting and Machine Piecing", where you can post your question and I will answer it promptly.
