
Washi Tape Cards

With washi tape and patterned paper, making greeting cards is easier, more fun, and more colorful! For this project we'll make a batch of 3-inch by 3-inch mini cards, which are wonderful additions to gift bags and boxes. So round up your patterned paper and washi tape, and let's begin!
You will need:
* Assorted washi tape
* Assorted patterned paper and plain cardstock
* Printed sentiments, stickers, or optional Dymo label maker
* Assorted pens: fine-point permanent markers, metallic gel pens, gold marker
* Ruler
* Pencil
* Craft knife and cutting mat
* Scissors
* Craft glue
For each card, choose some patterned paper and washi tape go well together, based on color and design. Geometric and floral prints are good choices, although whimsical designs will also work.
Measure, mark and cut the patterned paper or cardstock into a 6-inch by 3-inch rectangle, and fold it in half to form a 3 by 3 card.
To make the striped cards:
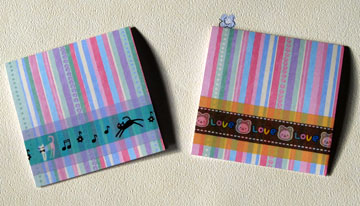
Cut a piece of striped patterned paper so that lines run along the long side of the paper. Fold this in half. With the fold at the top of the card, lay a strip of patterned washi tape across the bottom half of the card’s front. Trim the excess. Along both sides of the tape, lay a strip of plain, narrow washi tape. Trim off the excess.
To make the torn washi tape cards:
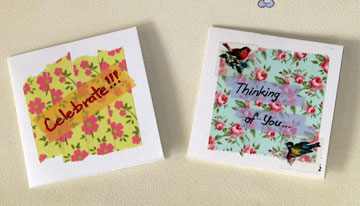
Cut a piece of white cardstock and fold it in half. Using a tape dispenser or your fingers, tear strips of floral washi tape and lay them side by side vertically on the front of the card, leaving a border around the tape. Tear some plain, light colored washi tape and lay it across the floral tape. Using a permanent marker, write the sentiment on the plain washi tape. You may also add additional elements if you have washi tape with other designs, such as birds in the corner of the second card.
To make the window cards:
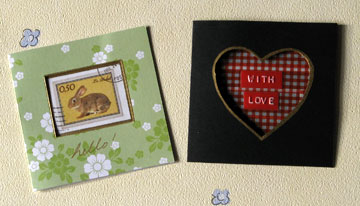
Cut a piece of patterned paper or cardstock and fold it in half. Draw a shape onto the front of the card and cut out a window using scissors or a craft knife. Fold the card again and using a pencil, lightly trace the shape of the window onto the inside of the card. This is where the image will go.
For the rectangular window card, choose wide washi tape that has big images, like this rabbit postage stamp. Cut the tape to include the whole image, and stick it onto the inside of the card so that it shows through the window. Outline the window with a gold marker. Use a gold gel pen to write "hello" on the front of the card, just below the window.
For the heart card, cut strips of washi tape and stick them onto the inside of the card, making sure the tracing of the window shape is completely covered. Close the card, and stick the sentiment onto the tape so that it shows through the window. This card uses the words "With Love" punched on a Dymo label maker, but you can use whatever method you want to add text. Outline the heart-shaped window with a gold marker.
To make the cut-and-paste sentiment cards:
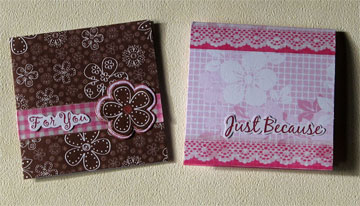
For the "For You" card, cut a piece of brown floral patterned paper and fold it in half. Lay a strip of pink washi tape across bottom part of the card's front. Cut out a flower from another piece of the brown paper, and glue this onto a slightly larger piece of pink patterned paper. Cut around the flower, leaving a border. Glue the flower onto the pink tape. With a pink metallic gel pen, trace around the brown flower, along the edges of the pink flower, and also around the tape and the flower. Color the center of the flower with the gel pen. Cut out the phrase "For You" and glue it onto the tape.
For the "Just Because" card, cut a piece of pink floral patterned paper and fold it in half. Lay a strip of white and pink lace-patterned washi tape across the top and bottom of the card’s front. Cut out the phrase "Just Because" and glue it to the front of the card.
You will need:
* Assorted washi tape
* Assorted patterned paper and plain cardstock
* Printed sentiments, stickers, or optional Dymo label maker
* Assorted pens: fine-point permanent markers, metallic gel pens, gold marker
* Ruler
* Pencil
* Craft knife and cutting mat
* Scissors
* Craft glue
For each card, choose some patterned paper and washi tape go well together, based on color and design. Geometric and floral prints are good choices, although whimsical designs will also work.
Measure, mark and cut the patterned paper or cardstock into a 6-inch by 3-inch rectangle, and fold it in half to form a 3 by 3 card.
To make the striped cards:
Cut a piece of striped patterned paper so that lines run along the long side of the paper. Fold this in half. With the fold at the top of the card, lay a strip of patterned washi tape across the bottom half of the card’s front. Trim the excess. Along both sides of the tape, lay a strip of plain, narrow washi tape. Trim off the excess.
To make the torn washi tape cards:
Cut a piece of white cardstock and fold it in half. Using a tape dispenser or your fingers, tear strips of floral washi tape and lay them side by side vertically on the front of the card, leaving a border around the tape. Tear some plain, light colored washi tape and lay it across the floral tape. Using a permanent marker, write the sentiment on the plain washi tape. You may also add additional elements if you have washi tape with other designs, such as birds in the corner of the second card.
To make the window cards:
Cut a piece of patterned paper or cardstock and fold it in half. Draw a shape onto the front of the card and cut out a window using scissors or a craft knife. Fold the card again and using a pencil, lightly trace the shape of the window onto the inside of the card. This is where the image will go.
For the rectangular window card, choose wide washi tape that has big images, like this rabbit postage stamp. Cut the tape to include the whole image, and stick it onto the inside of the card so that it shows through the window. Outline the window with a gold marker. Use a gold gel pen to write "hello" on the front of the card, just below the window.
For the heart card, cut strips of washi tape and stick them onto the inside of the card, making sure the tracing of the window shape is completely covered. Close the card, and stick the sentiment onto the tape so that it shows through the window. This card uses the words "With Love" punched on a Dymo label maker, but you can use whatever method you want to add text. Outline the heart-shaped window with a gold marker.
To make the cut-and-paste sentiment cards:
For the "For You" card, cut a piece of brown floral patterned paper and fold it in half. Lay a strip of pink washi tape across bottom part of the card's front. Cut out a flower from another piece of the brown paper, and glue this onto a slightly larger piece of pink patterned paper. Cut around the flower, leaving a border. Glue the flower onto the pink tape. With a pink metallic gel pen, trace around the brown flower, along the edges of the pink flower, and also around the tape and the flower. Color the center of the flower with the gel pen. Cut out the phrase "For You" and glue it onto the tape.
For the "Just Because" card, cut a piece of pink floral patterned paper and fold it in half. Lay a strip of white and pink lace-patterned washi tape across the top and bottom of the card’s front. Cut out the phrase "Just Because" and glue it to the front of the card.
You Should Also Read:
Geometric Flower Gift Tag
How to Make a Window Card
Washi Tape Jewelry Pins

Related Articles
Editor's Picks Articles
Top Ten Articles
Previous Features
Site Map
Content copyright © 2023 by Mia C. Goloy. All rights reserved.
This content was written by Mia C. Goloy. If you wish to use this content in any manner, you need written permission. Contact Mia C. Goloy for details.
