
How To Make A Gift Wallet

Here are the instructions for making a Tea Bag Wallet. My charity group made over 250 of these recently and gave one to every visitor to our Open Day. The purpose of this little “gift” is twofold. Firstly, It was a way to say thank you to our visitors for coming and secondly as a gentle reminder to hop onto the website and see what we do and how they could help us.
To further explain, we placed a teabag in the left hand pocket and a little note in the right pocket that read
“Thank you for visiting us during our Open Day, it was a pleasure to see you. Please take a little tea break, have a cuppa on us and hop onto our website https://sunshinelinusgroup.blogspot.com.au/ where you can see what we do and where it goes, and how you might be able to help us.”
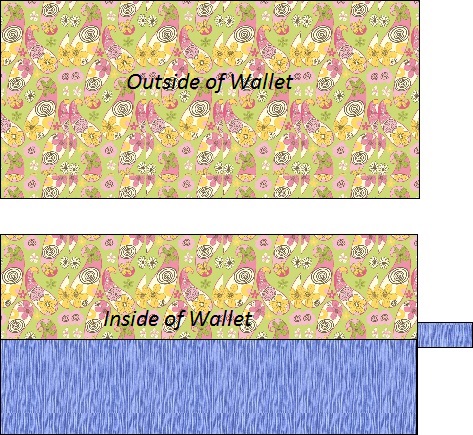
To make this little wallet two different complimentary fabrics are required, a piece of batting (I like to use the adhesive batting leftovers from my quilting) and a button (shank button is best).
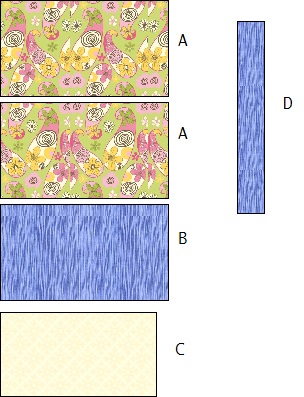
Cutting Instructions
Using the fabric chosen for the inside and the outside of the wallet,
Cut two rectangles 7” x 3”. (A)
Using the fabric chosen for the inside pocket of the wallet,
Cut one rectangle 7” x 3” (B)
Using the fabric chosen for the fabric loop of the wallet,
Cut one rectangle 6” x 1 ¼”. (D)
Using some batting
Cut a rectangle 3 ½” x 6 ½”. (C)
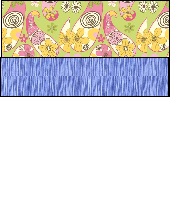
Preparing the inside pocket
Fold the pocket fabric in half and press so the right sides are showing. Place on the right side of one of the (A) pieces (this will be the inside pocket piece).
Making the fabric loop
To learn how to make a fabric loop Click here
Preparing the outside piece.
Place the batting on the wrong side of the outside piece of fabric. Iron the batting into place.
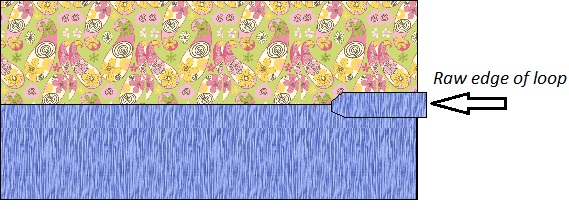
Preparing the inside pocket and loop
Place the loop with the raw edge to the right, onto the inside fabric with the pocket.
Preparing to stitch together
Place the inside piece with pocket and loop facing up. Place the batting piece on top of the inside piece, with the batting facing up.
Pin around the edges.
Stitching it all together
The next technique is called bagging, where the piece is stitched around the outside, with a little section (approx 2”) left open unstitched. Once stitched, carefully pull and turn the inside to the outside (right way out) and using a pointy tool (but not too pointy or it will piece the fabric), make the corners nice and sharp and at a 90 degree angle.
Hint: I reduce my stitch length on my sewing machine to very small stitches when stitching the whole thing together. By doing this there is less chance that the seams will come apart when using a pointy tool to make the corners nice and tidy.
Finishing
Once the wallet is turned neatly, press the piece well and press the 2” opening seam together in readiness for stitching.
Top sewing and stitch the opening at the same time
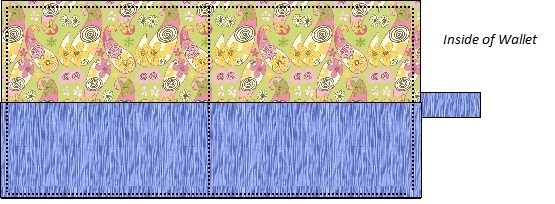
Start at the centre point at the opening, and top stitch (increase stitch length slightly for this part), around the whole outside, finishing at the centre point. Pivot the needle and run a stitch up the centre and back again to create two pockets.
To further explain, we placed a teabag in the left hand pocket and a little note in the right pocket that read
“Thank you for visiting us during our Open Day, it was a pleasure to see you. Please take a little tea break, have a cuppa on us and hop onto our website https://sunshinelinusgroup.blogspot.com.au/ where you can see what we do and where it goes, and how you might be able to help us.”
To make this little wallet two different complimentary fabrics are required, a piece of batting (I like to use the adhesive batting leftovers from my quilting) and a button (shank button is best).
Cutting Instructions
Using the fabric chosen for the inside and the outside of the wallet,
Cut two rectangles 7” x 3”. (A)
Using the fabric chosen for the inside pocket of the wallet,
Cut one rectangle 7” x 3” (B)
Using the fabric chosen for the fabric loop of the wallet,
Cut one rectangle 6” x 1 ¼”. (D)
Using some batting
Cut a rectangle 3 ½” x 6 ½”. (C)
Preparing the inside pocket
Fold the pocket fabric in half and press so the right sides are showing. Place on the right side of one of the (A) pieces (this will be the inside pocket piece).
Making the fabric loop
To learn how to make a fabric loop Click here
Preparing the outside piece.
Place the batting on the wrong side of the outside piece of fabric. Iron the batting into place.
Preparing the inside pocket and loop
Place the loop with the raw edge to the right, onto the inside fabric with the pocket.
Preparing to stitch together
Place the inside piece with pocket and loop facing up. Place the batting piece on top of the inside piece, with the batting facing up.
Pin around the edges.
Stitching it all together
The next technique is called bagging, where the piece is stitched around the outside, with a little section (approx 2”) left open unstitched. Once stitched, carefully pull and turn the inside to the outside (right way out) and using a pointy tool (but not too pointy or it will piece the fabric), make the corners nice and sharp and at a 90 degree angle.

Hint: I reduce my stitch length on my sewing machine to very small stitches when stitching the whole thing together. By doing this there is less chance that the seams will come apart when using a pointy tool to make the corners nice and tidy.
Finishing
Once the wallet is turned neatly, press the piece well and press the 2” opening seam together in readiness for stitching.
Top sewing and stitch the opening at the same time
Start at the centre point at the opening, and top stitch (increase stitch length slightly for this part), around the whole outside, finishing at the centre point. Pivot the needle and run a stitch up the centre and back again to create two pockets.

Related Articles
Editor's Picks Articles
Top Ten Articles
Previous Features
Site Map
Content copyright © 2023 by Judie Bellingham. All rights reserved.
This content was written by Judie Bellingham. If you wish to use this content in any manner, you need written permission. Contact Judie Bellingham for details.

