
Pressed Flowers Paper

Today we'll look at a classic technique for preserving pressed flowers and leaves that can also be used to make paper for cards, tags, envelopes and small gift bags. You can substitute pressed leaves and flowers with thin paper like mulberry paper, or color-fast tissue paper that doesn't bleed when wet. Let's begin!
You will need:
* Leaves and flowers, pressed overnight
* Mulberry paper or color-fast tissue paper
* Wax paper
* Facial tissues
* White glue or decoupage medium like Mod Podge
* Water
* Container for mixing glue
* Wide brush
* Scissors
* Die cut machine and dies (optional)
* Dry flat iron and ironing surface
* Large plastic sheet, garbage bag or newspaper to protect your work surface
If you will use pressed leaves and flowers, you will need to prepare them beforehand. Press them between the pages of a book or magazine (a telephone directory works fine) overnight and weigh this down with a heavy object.
If you will use mulberry or tissue paper instead of pressed flowers and leaves, cut out shapes using scissors or a die cut machine. Craft punches may work, but it's tricky to get them to punch cleanly through thin paper.
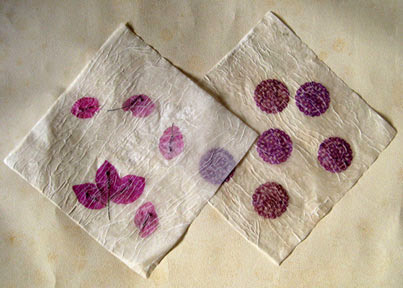
Cut a sheet of wax paper that‘s slightly larger than a sheet of facial tissue. Lay this down with the waxy side up on your work surface. Arrange the pressed flowers and leaves or paper shapes on the wax paper. Separate a sheet of facial tissue and take a single ply. Lay this over the wax paper, sandwiching the flowers or paper shapes between the sheets.
In a small container, mix together 60 percent glue and 40 percent water or, if you're using decoupage medium, 50 percent decoupage medium and 50 percent water. Carefully brush this mixture over the facial tissue, enough to wet it without forming puddles. Take care not to tear the tissue as much as possible; there will be wrinkles, but that's OK. Set the paper aside to dry. When dry, use a warm iron to flatten the sheet and melt the wax. Let this cool a bit before using it for your projects.
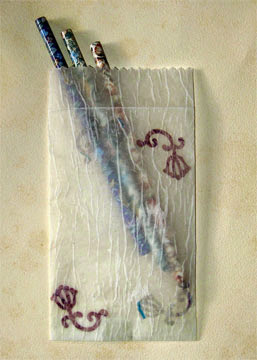
To make a gift bag: Trim off any excess wax paper from the finished sheet. Fold the sheet approximately into thirds, with the two edges overlapping by 3/8 inch. Adhere the overlapping edges using white glue or double sided adhesive tape. Apply a thin line of glue on the inner bottom edge of the bag, and press together; fold the bottom about ¾ of an inch from the edge and glue to the back side of the bag. Let dry. Trim the opening of the bag with decorative scissors.
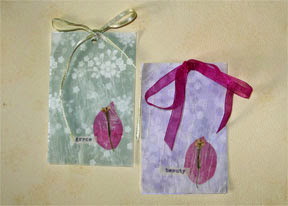
To make a tag: Cut a piece of wax paper and facial tissue to size. Sandwich a pressed flower petal and some text between the sheets, then apply the glue mixture. Allow to dry and then iron. Trim off any excess paper. Cut a piece of patterned paper or cardstock in the same size and stack the two pieces. Punch a hole at one end of both pieces and then thread on a ribbon. You may want to write a sentiment on the patterned paper if you will attach the tag to a gift.
You will need:
* Leaves and flowers, pressed overnight
* Mulberry paper or color-fast tissue paper
* Wax paper
* Facial tissues
* White glue or decoupage medium like Mod Podge
* Water
* Container for mixing glue
* Wide brush
* Scissors
* Die cut machine and dies (optional)
* Dry flat iron and ironing surface
* Large plastic sheet, garbage bag or newspaper to protect your work surface
If you will use pressed leaves and flowers, you will need to prepare them beforehand. Press them between the pages of a book or magazine (a telephone directory works fine) overnight and weigh this down with a heavy object.
If you will use mulberry or tissue paper instead of pressed flowers and leaves, cut out shapes using scissors or a die cut machine. Craft punches may work, but it's tricky to get them to punch cleanly through thin paper.
Cut a sheet of wax paper that‘s slightly larger than a sheet of facial tissue. Lay this down with the waxy side up on your work surface. Arrange the pressed flowers and leaves or paper shapes on the wax paper. Separate a sheet of facial tissue and take a single ply. Lay this over the wax paper, sandwiching the flowers or paper shapes between the sheets.
In a small container, mix together 60 percent glue and 40 percent water or, if you're using decoupage medium, 50 percent decoupage medium and 50 percent water. Carefully brush this mixture over the facial tissue, enough to wet it without forming puddles. Take care not to tear the tissue as much as possible; there will be wrinkles, but that's OK. Set the paper aside to dry. When dry, use a warm iron to flatten the sheet and melt the wax. Let this cool a bit before using it for your projects.
To make a gift bag: Trim off any excess wax paper from the finished sheet. Fold the sheet approximately into thirds, with the two edges overlapping by 3/8 inch. Adhere the overlapping edges using white glue or double sided adhesive tape. Apply a thin line of glue on the inner bottom edge of the bag, and press together; fold the bottom about ¾ of an inch from the edge and glue to the back side of the bag. Let dry. Trim the opening of the bag with decorative scissors.
To make a tag: Cut a piece of wax paper and facial tissue to size. Sandwich a pressed flower petal and some text between the sheets, then apply the glue mixture. Allow to dry and then iron. Trim off any excess paper. Cut a piece of patterned paper or cardstock in the same size and stack the two pieces. Punch a hole at one end of both pieces and then thread on a ribbon. You may want to write a sentiment on the patterned paper if you will attach the tag to a gift.

Related Articles
Editor's Picks Articles
Top Ten Articles
Previous Features
Site Map
Content copyright © 2023 by Mia C. Goloy. All rights reserved.
This content was written by Mia C. Goloy. If you wish to use this content in any manner, you need written permission. Contact Mia C. Goloy for details.
