How to Make a Showgirl Costume
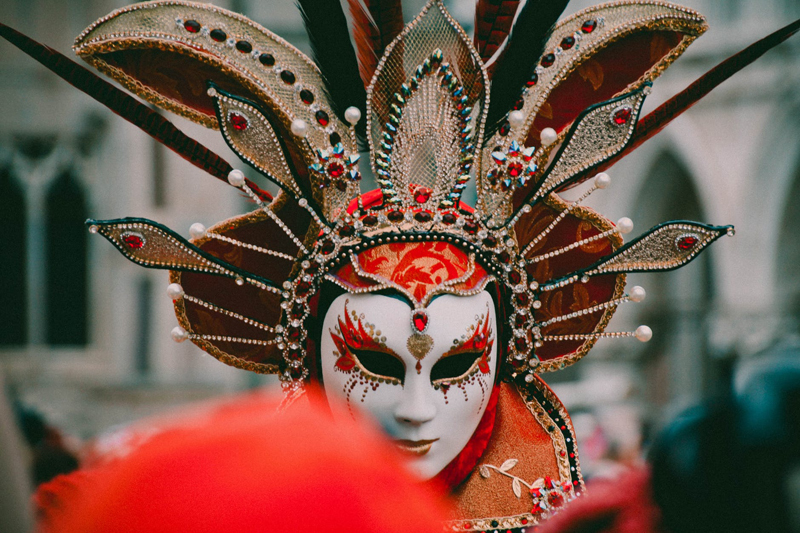
 A few weeks ago, a local producer commissioned me to make two "real" showgirl costumes for a Rat Pack tribute show he was doing. I decided to write an article on how to build these elaborate beauties and took lots of photos along the way.
 The costumes look like they'd be hard to sew, but we're going to take it one step at a time. And you'll see it's not that difficult. Let's break it down into sections. I'll give you a brief overview, and then we'll get into the details.
Ready? Let's go!
Bra: To make the bra, I started with a hard cup pushup bra in the correct size for the person wearing the costume. I removed the straps, covered the cups, decorated the bra and then added new straps back on.
Panty: Using the same fabric I used to cover the bra, I sewed a bikini bottom using a commercial pattern (Kwik Sew 2082). Then I added removable decorations.
Fantail: I made a back plate and added a long strap that attaches to the panty in front with hooks & eyes. The whole thing was covered in the same gold fabric as the bra and panty. Then I attached feather boas and beads to decorate.
Headpiece: This part was genius. The base is a tennis visor turned upside down. I decorated it, added loops to secure it to the head, and added ostrich feathers.
Accessories: The ladies also wore purchased opera gloves, fishnet hose and heels to complete the look.
How to make the bra
This is the same technique I use to sew belly dance costumes all the time. You'll want to purchase a hard cup bra with an underwire. Just get the cheapest one you can find in your size. You're going to cut the straps off and cover the entire thing, so the design doesn't really matter. You'll also need a base fabric to cover the cups with. I prefer to use a knit fabric for this because I don't have to worry about tucking all the edges under. Nothing will fray.
Here are the steps:
1) Cut the straps and back band off the bra. You should have two cups and a middle joining piece left. If you want to reorient the cups, you can cut the middle part off, too.

2) Using your base fabric, cut a square several inches larger than your cup. You should be able to drape the square over the cup and have lots of fabric extending beyond it all the way around.

3) Pin one corner of the square to the cup where the top strap used to be. Leave several inches extra hanging over the edge.
4) Pin the square to the cup across the top edge. Leave some fabric hanging over the edge.
5) Next, pin from one side of the cup down to the center bottom. And repeat from the other side. Try to keep the fabric as smooth as you can. Don't pull the fabric or you'll distort the shape of the cup.

6) At this point, there should be a fold of excess fabric from about the center of the cup down to the center bottom of the underwire. This is going to form a dart. Because every cup shape and square piece of fabric will be different, every dart will be different too. Your goal is to have both darts in approximately the same place on each cup. If you don't have enough fabric to keep at least a one-inch border of excess fabric around the entire cup, unpin it and re work until you do.
The first time you cover a bra, a lot of things can go wrong. You can pull the fabric too tight and distort the cup. You can end up with tons of extra fabric. You can end up with not enough fabric. Don't worry if you have to unpin and repin several times. It takes practice.
7) At this point, if you have more than a couple of inches hanging over the edge of the cup, go ahead and trim it back to 1 or 2" beyond the pins at the edge.
8) Now we're going to make the dart. There should be a folded triangle of extra fabric. All you have to do is fold the triangle over to one side or the other and stitch it down. You may need to unpin some of the bottom edge to make it fit smoothly. If your fabric is too thick and the fold leaves an unsightly bulge where the dart is, you can trim the bottom layers out.
Depending on the shape and size of the cup, you may end up with more than one dart. That's okay. Just stitch them all down.
9) Next you're going to fold the extra fabric under and stitch it down to the back of the bra cup all the way around. You may have to do some creative folding and clipping as you go, especially around the curves.

Now, repeat these steps with the other cup. When you're finished, wrap and stitch a thin piece of fabric around the center join. Now you have a completely covered bra ready for decorating.

Decorating the bra
For the showgirl costumes, I used a combination of appliques and hand beading. I started with some beaded trim I had lying around and I cut the individual motifs apart. One word of caution--when you cut apart a premade beaded applique, you should paint the back with watered down white glue. This will secure any loose threads you cut.
First, I sewed the appliques across the top edge.

Next, I basted some beading lines in dark thread. I didn't knot either end, so once I got the beads on I could just pull the end and the thread came right out. Pencil marks are permanent, thread lines aren't.

Once I had the lines where I wanted them, I couched down long strings of beads.
Finally, I added a beaded swag hanging down the center.

Attaching new straps to the bra
The final step for the bra was making new straps and attaching them. I use nylon belt webbing as the strap base and covered it with the same fabric I used to cover the bra. This time I made a halter style strap across the neck, sewing down both ends. The back band was just one strap attached securely on one side with a hook & eye closure on the other side. Larger cup sizes will need more elaborate support systems, but for this costume one strap was enough.
How to make the panty
You could purchase a bikini bottom and decorate it. But I wanted the bottom fabric to match the top. So, I just made a bikini bottom from a commercial swimsuit pattern (Kwik Sew 2082). The base fabric I was using didn't have a lot of stretch required by the pattern, so I just made one size larger and it fit just fine.
The director wanted to be able to reuse the costumes with different people, which meant the bottoms would need to be washed occasionally. So, rather than beading directly onto the fabric, I made another beaded swag and attached it to the panty with hooks. Now the beads can be removed for laundering.
How to make the fantail
Showgirl costumes often have elaborate feather decorations across the backside. This took a little research to figure out how they are attached. At first, I thought the piece was hooked to the panty, but that's not how it's done. There is a back plate that the feathers are attached to. The back plate has straps that come around front and hook to the panty at the hips. Piece of cake!
First I cut out the shape I wanted for the tail out of buckram, 2 pieces of felt, and the cover fabric I used for the bra.

Then I stitched the base together with the buckram and 1 piece of felt sandwiched together. Then I stitched on some florist wire to give it stability. The more feathers you're using, the more wire you need. Be sure to round over the ends so you don't poke your actress in the back!

Next, I stitched on the front cover and back piece of felt. Covered another nylon webbing strap and attached it to the back plate. And finally, I added 7 feather boas to the back. I folded them each in half and stitched them down to the back plate in a fan shape.


There was no need to decorate the back plate because it was completely hidden by feathers, but you may decide to do it anyway. I did decorate the ends of the straps with beads and rhinestones to add some extra sparkle.
How to make the headpiece
Showgirl headpieces usually start with a wire frame, but we used a tennis visor turned upside down for the base. Our showgirls said they were much more comfortable than the wire ones, and stayed on better, too.
The first thing I did was decorate the front with hot glue and beads. I also placed a piece of glittered lace across the top of the head, so there was no sign that this was once a visor.
I made decorative spikes by adding a few beads to straight pins and sticking them in the edge of the visor. By adding a swag of beads to the pins, too, it looked like I had an elaborate wired headdress, but it's all illusion.

Now to add the feathers....
We wanted to be able to store this headpiece easily, so I made the feathers removable. To do this, I simply hot glued two rows of elastic onto the back of the visor. Every place I wanted a feather, I left a gap where the elastic was not glued down. So, we ended up with elastic loops to hold the feathers in place. When we need to store them, we just pull the feathers out from the bottom and store them separately from the visors.


I used ostrich feathers for the headpiece, and they stand up all on their own. For this piece, I used 11 feathers. They can be expensive, so it was great to be able to store the feathers separately to preserve their beauty. Plus, now the director can use the headpiece as a crown or Tudor headdress without the feathers if he wants to.
You could make the fantail with the same technique to save the feather boas from wear and tear during storage. I just didn't think of it in time, so mine are stitched down.
Here's a hint for working with feathers--strip the bottom 1 or 2 inches of feathers off the shaft for easier handling. Also, if you use the elastic loop technique I described, you'll need to use a small crochet hook or pencil to help open the loops when sticking the feathers in. Finally, if the hot glue gets out of hand and leaves tiny strings of glue all over everything...a hot hair dryer will melt them out of the way.
Oh, and a foam dressmaker's dummy will help immensely with the decorating and the fitting.
Here are a few more backstage pictures:


I hope you'll try making one of these showgirl costumes sometime. It was great fun, and not nearly as complicated as I feared it would be.
How to be a Pinup Model - Release your Inner Bombshell!
If you enjoyed this article, please consider sharing it with others by linking to it on your blog, website, Facebook or other social media. Thank you.

Related Articles
Editor's Picks Articles
Top Ten Articles
Previous Features
Site Map
Content copyright © 2023 by Julie Anne Eason. All rights reserved.
This content was written by Julie Anne Eason. If you wish to use this content in any manner, you need written permission. Contact Brandi Ford for details.