
Progress on My Reborn Doll

I am so excited, I haven't had so much fun in a long time. So far my doll is turning out as well as I had hoped. After looking at the good, the bad and the ugly reborn babies online, I was a little anxious that I may not be able to create a baby that I would be proud to claim as my own work. While it certainly isn't perfect, I am very pleased with the results, so far.
This is a very time consuming process, but it certainly doesn't feel like work, this is all play! Surprisingly, it is much easier than I was expecting. I was very nervous, after reading the descriptions of the work that went into the dolls available for auction. Of course, if you've never painted anything, it could be daunting, but if you have any experience with craft painting of any kind you can do this.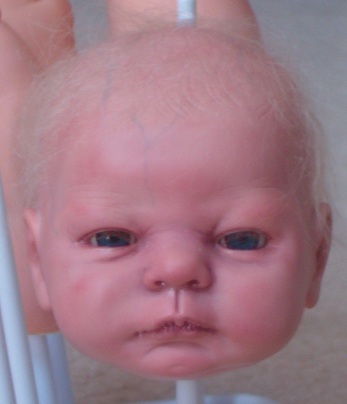
It is somewhat expensive to get started. You need the specific paints that will work for dolls. These are oil paints. There are air dry paints available for dolls, but I chose to use Genesis Heat Set Paints, for two reasons. First, most reborn dolls available on the web have been done with them, that gave me a feeling that it was a safe choice. Second, with heat set paint, drying time is MUCH shorter so you can keep working on your doll.
There are also brushes, makeup sponges, paint thinner and a drying rack to buy, just to do the painting, if you don't already have these supplies. The drying rack that is shown at right is available for sale on a doll supply website for about $17. I found it (the very same one) at my local discount department store for $7 in the baby department, it's a baby bottle drying rack! So look around, some of the equipment you need might already be in a cabinet used for something else.
Since this is my first reborn project, I ordered the paint from an online source that offered them in colors already premixed for this particular use. I thought this would be a paint and time saver, and it is. They come in very tiny jars, but it is way more than you need for several dolls.
To add hair, you'll also need some hair, generally mohair, a rooting tool and some rooting needles. The hair is available in any human hair color or degree of curl you want. I chose light blond with a curve, between straight and curly. The needles are felting needles which are cut to fit into a mushroom shape hand tool. I chose size 38 needles with one barb on each of the three sides of the needle. This means that the most hairs that can be rooted in each hole is 3, so you don't end up with clumps of hair which don't look very realistic. The top photo is of my doll with some hair, but I intend to add more. Rooting the hair is a very time consuming process, but when it's done well it really makes a big difference in the realism of the doll.
So there you have it, gather some supplies, get a doll that needs reborning, and join me in this great process.
Making and Dressing Cloth Dolls
Ebook with patterns and instructions to make 5 cloth dolls as well as chapters on general doll making techniques.The book includes 21 inch Lalena Doll, 21 inch David Doll, Bear Dolls, 9 inch Destiny Doll and 15 inch Annie Doll, all together in one handy book. 53 pages.Making and Dressing Cloth Dolls.
This is a very time consuming process, but it certainly doesn't feel like work, this is all play! Surprisingly, it is much easier than I was expecting. I was very nervous, after reading the descriptions of the work that went into the dolls available for auction. Of course, if you've never painted anything, it could be daunting, but if you have any experience with craft painting of any kind you can do this.
It is somewhat expensive to get started. You need the specific paints that will work for dolls. These are oil paints. There are air dry paints available for dolls, but I chose to use Genesis Heat Set Paints, for two reasons. First, most reborn dolls available on the web have been done with them, that gave me a feeling that it was a safe choice. Second, with heat set paint, drying time is MUCH shorter so you can keep working on your doll.
There are also brushes, makeup sponges, paint thinner and a drying rack to buy, just to do the painting, if you don't already have these supplies.
The drying rack that is shown at right is available for sale on a doll supply website for about $17. I found it (the very same one) at my local discount department store for $7 in the baby department, it's a baby bottle drying rack! So look around, some of the equipment you need might already be in a cabinet used for something else.Since this is my first reborn project, I ordered the paint from an online source that offered them in colors already premixed for this particular use. I thought this would be a paint and time saver, and it is. They come in very tiny jars, but it is way more than you need for several dolls.
To add hair, you'll also need some hair, generally mohair, a rooting tool and some rooting needles. The hair is available in any human hair color or degree of curl you want. I chose light blond with a curve, between straight and curly. The needles are felting needles which are cut to fit into a mushroom shape hand tool. I chose size 38 needles with one barb on each of the three sides of the needle. This means that the most hairs that can be rooted in each hole is 3, so you don't end up with clumps of hair which don't look very realistic. The top photo is of my doll with some hair, but I intend to add more. Rooting the hair is a very time consuming process, but when it's done well it really makes a big difference in the realism of the doll.
So there you have it, gather some supplies, get a doll that needs reborning, and join me in this great process.
Making and Dressing Cloth Dolls
Ebook with patterns and instructions to make 5 cloth dolls as well as chapters on general doll making techniques.The book includes 21 inch Lalena Doll, 21 inch David Doll, Bear Dolls, 9 inch Destiny Doll and 15 inch Annie Doll, all together in one handy book. 53 pages.Making and Dressing Cloth Dolls.
You Should Also Read:
Starting to Reborn Dolls

Related Articles
Editor's Picks Articles
Top Ten Articles
Previous Features
Site Map
Content copyright © 2023 by Helen B. Wharton. All rights reserved.
This content was written by Helen B. Wharton. If you wish to use this content in any manner, you need written permission. Contact Helen B. Wharton for details.
