
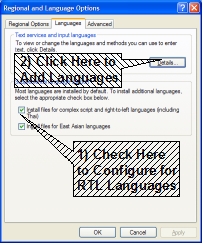
 Windows XP's standard installation includes everything you need to support Middle Eastern languages, all you have to do is set it up. You do this from the Regional and Language Options in the Control Panel. If you aren't familiar with the control panel, you get to the control panels by going to the Start menu and then choosing Control Panel. If you use the Windows Classic Start Menu, you first pick Settings and then choose on Control Panel. From the Control Panel, pick Regional and Language Options, which has an icon that looks like a globe. Click on the Languages tab and you will see a window similar to Exhibit A.
 First you need to configure your computer for right-to-left languages. Right-to-left or rtl languages are languages written from right to left, such as most Middle Eastern Languages. (Although it isn't used here, as you start using programs with built-in language support, you may see references to ltr languages, these are languages written from left to right, such as English.) Make sure you check the check box in the second half marked Install files for complex script and right-to-left languages (including Thai) and press apply. Press OK on the pop up window for installing supplemental language support and then press “Apply” on the original window. If all you want to do is read Middle Eastern Languages, you are done, but I suggest you go on so that if you find something you want to take notes on, you are ready to go.
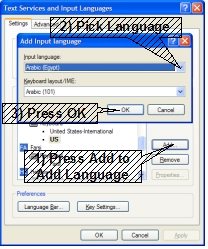 Next, you need to add the additional languages. Click the details tab (marked 2 on Exhibit A.) A new window will pop up similar to Exhibit B, but without the pop-up window. You add languages one at a time from this window. Press Add (marked 1 on Exhibit B) to get the pop-up window marked “Add Input Languages.” From the drop down menu on the top (marked 2 on Exhibit B), pick the language you want to add. You can also choose a keyboard from the second drop down menu, but my experience with Middle Eastern languages is that I'm happy with the default choice. Press OK (Marked 3 on Exhibit B) to add the languages. Repeat these 3 steps if you wish to add additional languages. When you are done, press OK until all the pop-up windows go away.
Your computer should now show the language bar on the upper right corner of your screen. If you press the little bar to minimize it, it will move to a smaller view at the lower right on the bottom bar; which I prefer. It will initially show the 2 letter code for your default language (probably EN for English, since it's likely that anyone reading articles in their non-native language has already figured out how to use the language bar.) When you want to type in a different language, click on the 2 letter code and you will see a menu of installed languages, select the language you wish to use and you are ready to type in that language.
This is just a basic introduction to configuring your computer to use Middle Eastern languages. There are a number of further steps that you can take to make it easier to switch between languages, determine what type of numbers are used (i.e. Arabic-Latin or Arabic-Arabic numbers in Arabic), and have your computer handle multiple language support for older programs that don't support it.
Be sure to check out my article on Learning Another Alphabet for information on learning to type in Middle Eastern languages.
