We will learn how to import stencils into Rebelle's Stencils panel and how to resize, rotate and position the stencil on the canvas. We will also paint the stencil with the Watercolor tool and learn how to draw lines freehand with the Ink Pen tool.
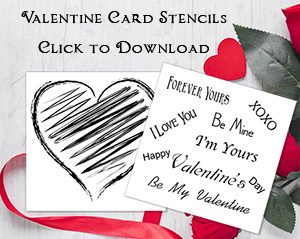
Our Valentine card will be a standard size at 5.5 x 4.25 inches and printable at 300 dpi resolution. The two stencils are .png files, which we will import into Rebelle's Stencil panel. The first stencil is for a heart balloon and the second stencil has several Valentine phrases in varying fonts.
Valentine Card
- Start a new project in Rebelle. Click File - New to open the New Artwork window. Set the following (see screenshot).
Width 5.5 inches
Height 4.25 inches
Resolution 300 dpi - Click the Canvas button on the right to open the Select Canvas window (see screenshot). Set the Canvas Texture to Aquarelle and the Color to White. Click OK.
- Open the menu in the Stencils panel, and choose Create Stencil from Image File. (see screenshot) Select the dCStencil_0005s_ValentineHeart.png file.
- Click on the Heart stencil thumbnail in the Stencils panel to add the stencil to the canvas.
- Use the controls in the small menu attached to the stencil to resize, rotate and position the Heart stencil in the upper right area of the card (see screenshot). Use the Rebelle Speedpaint video below as a guide.
Let's use the Watercolor tool to paint the heart. We will paint the outside lines of the heart in black and the center lines in red. - In the Color panel, click the Color Square and set the color to black (#000000) in the Color window (see screenshot).
- Select the Watercolor tool and set the properties to the following (see screenshot).
Size 30
Pressure 20
Loading 65
Water 100
Flat Brush - Paint the outside lines of the heart.
- Change the paint color to red (#f10c0c) and paint the center lines of the heart (see screenshot).
- In the Layers panel, rename the default layer to Balloon 1. Add a new layer and name it Balloon 2. (see screenshot)
- Go back to the Heart stencil on the canvas. From the Stencil Menu, click Flip Horizontally (see screenshot). Resize, rotate and position the second heart to the right of the first with the edges overlapping (see screenshot). Use the Rebelle Speedpaint video below as a guide.
- With the paint color still set to red, paint the center lines of the second heart. Switch to black and paint the outside lines.
- From the Stencil menu, click Remove to remove the stencil from the canvas.
Now we will add the strings to the balloons, using the Ink Pen tool. - Add a new layer in the Layers panel and name it lines (see screenshot).
- Select the Ink Pen tool and set the following properties (see screenshot).
Size 15
Pressure 70
Water 1
Fountain Pen - Draw a string hanging from each balloon (see screenshot). See Rebelle Speedpaint video below as a guide.
Now we will add the Be My Valentine message to the card. You can use one of the other Valentine phrases in the stencil if you wish. - Add a new layer to the Layers panel and name it text (see screenshot).
- Open the menu in the Stencils panel, and choose Create Stencil from Image File. Select the dCStencil_0004s_ValentinePhrases.png file.
- Click on the new thumbnail in the Stencils panel to add the second stencil to the canvas.
- Size and position the Be My Valentine phrase to the side of the strings (see screenshot). See Rebelle Speedpaint video below for a guide.
- With the paint color still set to black, switch back to the Watercolor tool and paint the letters.
- From the Stencil menu, click Remove to remove the stencil from the canvas.
Now we can save the project both as a .psd Photoshop and .reb Rebelle file. - Click File - Save As to open the window (see screenshot). Give your project a name and save the image in the Rebelle .reb format. Click File - Save As again, change the file format to Photoshop .psd and save again.

Zip Contents
dCProduct_0010s_ValentineCardKit2.zipdCStencil_0005s_ValentineHeart.png
dCStencil_0004s_ValentinePhrases.png
dCipollo_RebelleValentineSettings.jpg
dCProduct_0010s_ValentineCardKitPreview.jpg
HelpDoc.txt
Screenshots used by permission of Escape Motions, s.r.o.


