
 Sharp Dressed Cat- 6" Quilt Block
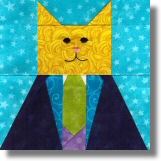
The third block in our Fashion Cats quilt block series is all dressed up! This is a 6" foundation paper pieced quilt block pattern. Have fun choosing coordinating fabrics for his coat, lapels, vest, tie, and shirt.
Cutting Instructions:
Note: When paper-piecing, I cut larger pieces than I actually need to ensure that I won't have problem covering an area if I don't place it in exactly the right spot. The cutting instructions below are for larger pieces. If you'd rather cut smaller, more exact pieces, feel free to do so.
Fabric: | Size & Shape: | For: |
Background | 2-1/2" x 4" (Cut 2) | B5, B6 |
Background | 2" x 4" (Cut 1) | B1 |
Background | 2-1/2" x 4-1/2" (Cut 2) | A13, A14 |
Yellow (Cat) | 3" x 4" (Cut 1) | B4 |
Yellow (Cat) | 2-1/2" Square (Cut 2). Cut each one once diagonally for four triangles. (You will have one triangle left over.) | B2, B3 |
Light Green (Tie) | 2" x 3" (Cut 1) | A1 |
Light Green (Tie) | 1-1/2" x 2" (Cut 1). | A2 |
Purple (Vest) | 2-1/2" Square (Cut 1). Cut once diagonally for two triangles. | A5, A6 |
White (Collar) | 1-1/2" Square (Cut 1). Cut once diagonally for two triangles. | A3, A4 |
Medium Blue (Lapels) | 1-1/2" x 4" (Cut 2) | A7, A8 |
Dark Blue (Coat) | 3-1/2" x 4" (Cut 2) | A9, A10 |
Dark Blue (Coat) | 1" x 4" (Cut 2) | A11, A12 |
Instructions:
Step 1: Print out the paper foundation pattern. Cut out each of the two paper-piecing units just outside of the dashed lines of the seam allowance.
Step 2: Using a VERY short stitch length setting on your sewing machine, paper-piece each unit following the numbers on the printed foundation.
Step 3: When both of the two units have been pieced, carefully trim away the excess paper and fabric by cutting on the dashed lines of the seam allowance.
Step 4: With right sides together, layer Unit B on Unit A. Pin in place, then stitch together using a 1/4" seam allowance. Remove the paper from the seam allowance (on both sides) and press this seam open.
Step 5: Carefully remove the paper from the back of the block.
Step 6: Lightly trace the face pattern on the right side of the cat's face. Using 2 strands of embroidery floss, outline stitch the mouth and satin stitch the nose and eyes.
For More Cat Block Patterns:
Books With Cat Patterns:
