
Sharp Dressed Cat Foundation Paper-Pieced Quilt Block Pattern

 Sharp Dressed Cat- 6" Quilt Block
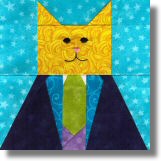
The third block in our Fashion Cats quilt block series is all dressed up! This is a 6" foundation paper pieced quilt block pattern. Have fun choosing coordinating fabrics for his coat, lapels, vest, tie, and shirt.
Cutting Instructions:
Note: When paper-piecing, I cut larger pieces than I actually need to ensure that I won't have problem covering an area if I don't place it in exactly the right spot. The cutting instructions below are for larger pieces. If you'd rather cut smaller, more exact pieces, feel free to do so.
Fabric: | Size & Shape: | For: |
Background | 2-1/2" x 4" (Cut 2) | B5, B6 |
Background | 2" x 4" (Cut 1) | B1 |
Background | 2-1/2" x 4-1/2" (Cut 2) | A13, A14 |
Yellow (Cat) | 3" x 4" (Cut 1) | B4 |
Yellow (Cat) | 2-1/2" Square (Cut 2). Cut each one once diagonally for four triangles. (You will have one triangle left over.) | B2, B3 |
Light Green (Tie) | 2" x 3" (Cut 1) | A1 |
Light Green (Tie) | 1-1/2" x 2" (Cut 1). | A2 |
Purple (Vest) | 2-1/2" Square (Cut 1). Cut once diagonally for two triangles. | A5, A6 |
White (Collar) | 1-1/2" Square (Cut 1). Cut once diagonally for two triangles. | A3, A4 |
Medium Blue (Lapels) | 1-1/2" x 4" (Cut 2) | A7, A8 |
Dark Blue (Coat) | 3-1/2" x 4" (Cut 2) | A9, A10 |
Dark Blue (Coat) | 1" x 4" (Cut 2) | A11, A12 |
Instructions:
Step 1: Print out the paper foundation pattern. Cut out each of the two paper-piecing units just outside of the dashed lines of the seam allowance.
Step 2: Using a VERY short stitch length setting on your sewing machine, paper-piece each unit following the numbers on the printed foundation.
Step 3: When both of the two units have been pieced, carefully trim away the excess paper and fabric by cutting on the dashed lines of the seam allowance.
Step 4: With right sides together, layer Unit B on Unit A. Pin in place, then stitch together using a 1/4" seam allowance. Remove the paper from the seam allowance (on both sides) and press this seam open.
Step 5: Carefully remove the paper from the back of the block.
Step 6: Lightly trace the face pattern on the right side of the cat's face. Using 2 strands of embroidery floss, outline stitch the mouth and satin stitch the nose and eyes.
For More Cat Block Patterns:
Books With Cat Patterns:
You Should Also Read:
Fashion Cats Quilt Block Series

Editor's Picks Articles
Top Ten Articles
Previous Features
Site Map
Content copyright © 2023 by Kim Noblin. All rights reserved.
This content was written by Kim Noblin. If you wish to use this content in any manner, you need written permission. Contact Judie Bellingham for details.

