
 This Christmas ornament is made from circles of patterned paper that are folded into triangles and glued together. I chose scrapbook paper with Christmas-themed designs, but you can use plain cardstock in Christmas colors like red, green, gold and silver.
You will need:
* Circle template (around 1 to 1-1/2 inches in diameter; adjust this to your liking)
* Christmas themed patterned paper, enough to fit 20 circles
* Ribbon in a matching color
* Pencil
* Scissors
* Craft glue
* Hot glue gun
Trace and cut 20 circles from the patterned paper. Take one circle and find the center. You’ll be folding this circle into a triangle. With the patterned side facing up, fold the paper so that the edge of the circle touches its center. This is the first side of the triangle. Make two more such folds (at 60 degree angles to each other) to complete the triangle. When you unfold the paper, you’ll have a triangle with curved flaps. Repeat with the rest of the circles.
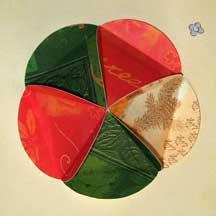
To make the bottom of the ornament, arrange five pieces in a circle like the slices of a pie. Stick the tabs together with craft glue to form a pentagon with a raised center. Set this aside.
Prepare the hanger for the ornament. Cut a length of ribbon and tie the ends into a large overhand knot (You may have to make a double knot).
The top of the ornament is made in the same way as the bottom, except that you should insert the looped ribbon through the center of the pentagon “pie” before you glue the last piece. Secure the ribbon to the top of the ornament by gluing the knot in place with a hot glue gun.
To make the middle part of the ornament, arrange the remaining 10 pieces in a row with alternating right-side-up and upside-down triangles, like this:
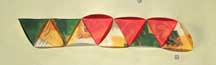
Glue the tabs together to form a strip, and then glue the tabs of the end pieces together to form a ring.
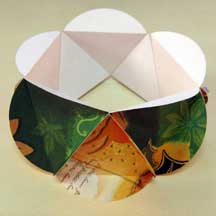
Now to assemble the ornament. You will first glue the bottom part of the ornament to the middle part of the ornament. Match up the tabs of the bottom and middle parts and glue them together; you’ll end up with something like a bowl. Next, match up the tabs of the top ornament with the tabs of the ring, and glue them together. You should now have a ball with a ribbon sticking out of the top. You’re almost done. Use a small, fine tipped scissors to trim away any unsightly, excess paper from the tabs’ edges. Finish off by tying a bow around the hanger.
