
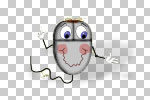
- Open your character into Photoshop. If you haven't done so already, go to the Layers Palette and name the layer that contains the character. In the example, I named the layer Character.
-
 Magic Wand Tool. Click on the empty area around your character with the Magic Wand Tool. This will select everything except the character. You can use the default settings for the Magic Wand Tool in the Options bar. To select all of the character, we will reverse the current selection. Click Select, Inverse from the Menu bar.
 -
 New Layer Icon. We will put the shadow on its own layer. Click on the New Layer Icon at the bottom of the Layers Palette. Name this new layer Shadow.
  Layer Visibility Icon. We can work better if we hide the character. While still at the Layers Palette, click on the Layer Visibility Icon on the Character layer. You will no longer see the character, but he is still there. You should now see only the empty selection in the shape of your character.
 -
 Default Foreground and Background Colors Icon. We are ready to draw the shadow. We could use a solid color but, it will look more realistic if we us a gradient based on two colors such as black and white. Click on the Default Foreground and Background Colors Icon in the Toolbox to set the active colors to the default black and white.
Copyright 2018 Adobe Systems Incorporated. All rights reserved. Adobe product screen shot(s) reprinted with permission from Adobe Systems Incorporated. Adobe, Photoshop, Photoshop Album, Photoshop Elements, Illustrator, InDesign, GoLive, Acrobat, Cue, Premiere Pro, Premiere Elements, Bridge, After Effects, InCopy, Dreamweaver, Flash, ActionScript, Fireworks, Contribute, Captivate, Flash Catalyst and Flash Paper is/are either [a] registered trademark[s] or a trademark[s] of Adobe Systems Incorporated in the United States and/or other countries.
