
21 Inch Lalena Doll

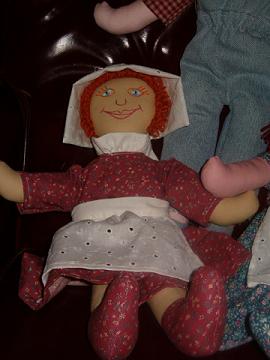
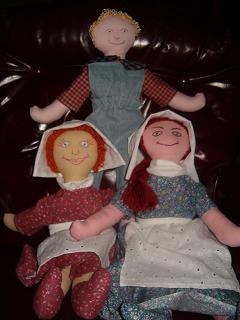
This pattern will make a 21 inch cloth doll. I reduced the original pattern by 50%,twice, to post it. It is a compatible size to wear newborn size clothing if you wish but it is more of a primitive style cloth doll and I feel it looks better dressed as an older child or adult. Prairie style clothing works particularly well on this doll, as you can see in the picture. This pattern is free for your personal use but you may not use it commercially.

In this article I will give you the pattern and instructions to make the cloth doll body. In following articles I will add patterns and instructions for clothing.
Materials needed are:
1/3 yard of plain fabric
matching thread
polyester stuffing
embroidery floss or paints and brushes for the face
1/2 yard of fabric for the dress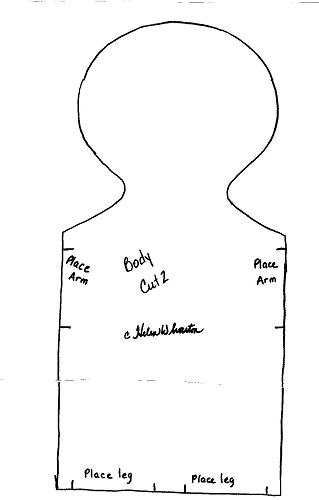
The body pattern is the same one I used in my article: Painting Faces on Cloth Dolls. Please read that article before cutting the fabric if you want to paint the doll's face. Whether you intend to paint or embroider the face, you can trace around the pattern piece for the body with pencil on your fabric. Then put the face on before you cut it out.
It's a good idea to buy the fabric you want to make the dress with when you buy the fabric for the body because I like to make the shoes to match the dress. You can also use scraps of black, brown or the same fabric as the body of your cloth doll.
All the pattern pieces include a quarter inch seam allowance. Make sure your fabric is folded before pinning the pattern to assure the pieces will match when sewn.
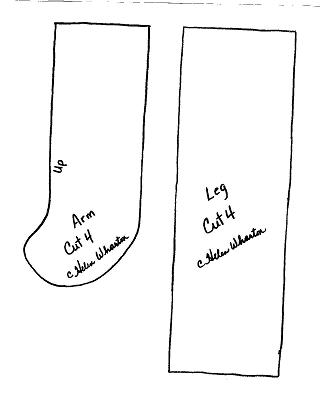
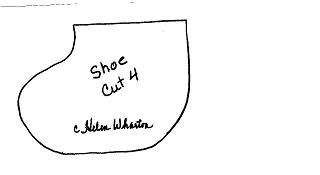
Start making your cloth doll by stitching the shoes to the legs, right sides together, and press the seam allowance open. Once all 4 shoes are attached, stitch the legs together, 2 pieces at a time, right sides facing. Make sure the shoe seams line up. Trim the seam allowances to 1/8 inch and clip curves, turn right sides out. Stuff feet firmly and continue to stuff legs to about 1 inch from the top.
Stitch arms, right sides facing, trim seams ans clip curves. Turn right sides out. Stuff hands firmly, stuff the arms to within 1 inch of the top.
Press the leg tops flat with your fingers, so the front and back seams line up in the center of the leg. Make sure the toes are pointing to the face and stitch them in place, on the body front, where indicated on the pattern. Stitch each arm to the body front with "thumbs" up and hands pointing to the opposite side of the body.
Carefully pin and stitch the body back to the front with right sides facing. Keep the arms inside th body as you stitch. Leave the bottom open for turning and stuffing. Trim seam allowances and clip curves. Turn right side out and stuff the head and neck firmly. Stuff the body, being sure to stuff shoulders well. Leave about 3/4 inch unstuffed at bottom. Fold 1/4 inch of fabric at the bottom of back (seam allowance) inside, pin back to front across the bottom and hand stitch closed.
To add hair please read:Sewing on Yarn Doll Wigs
You've now made a large cloth Doll which is ready to dress and enjoy.
Making and Dressing Cloth Dolls
Ebook with patterns and instructions to make 5 cloth dolls as well as chapters on general doll making techniques.The book includes 21 inch Lalena Doll, 21 inch David Doll, Bear Dolls, 9 inch Destiny Doll and 15 inch Annie Doll, all together in one handy book. 53 pages.Making and Dressing Cloth Dolls.
 |
In this article I will give you the pattern and instructions to make the cloth doll body. In following articles I will add patterns and instructions for clothing.
Materials needed are:
1/3 yard of plain fabric
matching thread
polyester stuffing
embroidery floss or paints and brushes for the face
1/2 yard of fabric for the dress
The body pattern is the same one I used in my article: Painting Faces on Cloth Dolls. Please read that article before cutting the fabric if you want to paint the doll's face. Whether you intend to paint or embroider the face, you can trace around the pattern piece for the body with pencil on your fabric. Then put the face on before you cut it out.
It's a good idea to buy the fabric you want to make the dress with when you buy the fabric for the body because I like to make the shoes to match the dress. You can also use scraps of black, brown or the same fabric as the body of your cloth doll.
All the pattern pieces include a quarter inch seam allowance. Make sure your fabric is folded before pinning the pattern to assure the pieces will match when sewn.
Start making your cloth doll by stitching the shoes to the legs, right sides together, and press the seam allowance open. Once all 4 shoes are attached, stitch the legs together, 2 pieces at a time, right sides facing. Make sure the shoe seams line up. Trim the seam allowances to 1/8 inch and clip curves, turn right sides out. Stuff feet firmly and continue to stuff legs to about 1 inch from the top.
Stitch arms, right sides facing, trim seams ans clip curves. Turn right sides out. Stuff hands firmly, stuff the arms to within 1 inch of the top.
Press the leg tops flat with your fingers, so the front and back seams line up in the center of the leg. Make sure the toes are pointing to the face and stitch them in place, on the body front, where indicated on the pattern. Stitch each arm to the body front with "thumbs" up and hands pointing to the opposite side of the body.
Carefully pin and stitch the body back to the front with right sides facing. Keep the arms inside th body as you stitch. Leave the bottom open for turning and stuffing. Trim seam allowances and clip curves. Turn right side out and stuff the head and neck firmly. Stuff the body, being sure to stuff shoulders well. Leave about 3/4 inch unstuffed at bottom. Fold 1/4 inch of fabric at the bottom of back (seam allowance) inside, pin back to front across the bottom and hand stitch closed.
To add hair please read:Sewing on Yarn Doll Wigs
You've now made a large cloth Doll which is ready to dress and enjoy.
Making and Dressing Cloth Dolls
Ebook with patterns and instructions to make 5 cloth dolls as well as chapters on general doll making techniques.The book includes 21 inch Lalena Doll, 21 inch David Doll, Bear Dolls, 9 inch Destiny Doll and 15 inch Annie Doll, all together in one handy book. 53 pages.Making and Dressing Cloth Dolls.
You Should Also Read:
How to Knot on Yarn Doll Wigs
Painting Faces on Cloth Dolls

Related Articles
Editor's Picks Articles
Top Ten Articles
Previous Features
Site Map
Content copyright © 2023 by Helen B. Wharton. All rights reserved.
This content was written by Helen B. Wharton. If you wish to use this content in any manner, you need written permission. Contact Helen B. Wharton for details.
