
Sewing instructions For 15 Inch Annie Doll

To see a photo of the 15 inch Annie Doll look here.
For the pattern of the 15 inch Annie Doll look here.
All pattern pieces include a 1/4 inch seam allowance and are shown on a 1/2 inch grid. To copy the pattern by hand you can create a 1/2 inch grid by measuring every half inch and making a pencil dot all the way down and across, on both sides of a piece of 8 1/2 by 11 inch paper. Then use your ruler or straight edge to connect the dots with your pencil. Then draw the pattern lines into each square of your grid, exactly as they are shown in my design.
Materials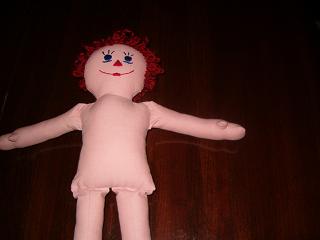
For solid color body: 1/3 yard cotton fabric, color of your choice.
For striped legs and black shoes: 1/4 yard solid color cotton fabric for body and arms, 1/4 yard red and white striped fabric, scraps of black fabric for shoes.
1/4 bag polyester stuffing.
small amount of red and blue 6 strand embroidery floss for facial features.
red worsted weight yarn for hair.
To begin pin and stitch feet to legs, if necessary, with right sides together. Pin and stitch arms and legs together with right sides together.Crease the arms and legs at the top so that the seam is in the center front and back of each arm and leg. Stuff firmly, leaving the top inch unstuffed.
Pin and baste the arms and legs to the body front with the tops of the legs and the front of the arms facing the right side of the body front. You can see in the picture that the seams on the arms and legs are facing front as well as the thumbs on the hand.
Keep the arms and legs in the same position and stitch the body back to the front at sides and around the head, with right sides together, leaving the bottom open to stuff. Clip the curves, turn right side out and stuff the body softly. Stitch the bottom closed using ladder stitch.
For instructions on how to put hair on your doll's head look here.
Making and Dressing Cloth Dolls
Ebook with patterns and instructions to make 5 cloth dolls as well as chapters on general doll making techniques.The book includes 21 inch Lalena Doll, 21 inch David Doll, Bear Dolls, 9 inch Destiny Doll and 15 inch Annie Doll, all together in one handy book. 53 pages.Making and Dressing Cloth Dolls.

Related Articles
Editor's Picks Articles
Top Ten Articles
Previous Features
Site Map
Content copyright © 2023 by Helen B. Wharton. All rights reserved.
This content was written by Helen B. Wharton. If you wish to use this content in any manner, you need written permission. Contact Helen B. Wharton for details.
