
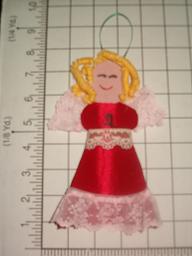
Angel Ornament Paper Doll

This is an easy project that you can make with scraps of fabric and trims that you have left over from other sewing and craft projects. You can make this with children, but the children will need some help with the iron and hot glue gun, for safety. I used a brown paper grocery bag and Stitch Witchery bonding web, but freezer paper would work just as well, for those of you who use the paper piecing technique to make quilts. The heavy paper gives the doll sturdiness.
Materials Needed
1 brown paper grocery bag; large, heavy weight
Stitch Witchery bonding web
1 six inch square of red satin fabric (or brightly colored fabric of your choice)
1 three inch square of pink cotton fabric (or color of your choice)
12 inches of 1 or 1 1/2 inch wide pre-gathered lace trim
4 inches of 1 inch wide flat lace trim
approximately three yards of yarn, I used yellow for the hair
one size 6 (American) knitting needle or a new pencil
hair spray
brown, black and red fine point markers
6 inches of 1/8 inch wide satin ribbon
hot glue gun and glue stick
 Begin by cutting a rectangle of brown paper from a flat, unfolded area of the bag, that measures 10 inches by 8 inches. Center the pink square on one of the sides of the satin squares and, using the bonding web and your iron, fuse the fabric to the paper. The pink and red squares should meet with no gaps between; don't overlap them, either.
Place the pattern over the fabric and paper so that the head is on the pink fabric and the arms and dress are on the red. Trace around the pattern with a pencil and cut it out.
Cut the yarn into 12 inch long pieces and wrap them tightly around the knitting needle or pencil. Spray the yarn with the hairspray to wet it and then let it dry in place. You can use a blow dryer to speed the drying process. When dry, carefully slide the yarn off the needle. Using the glue gun, glue one end of each "ringlet" to the top of the head, on the back and the other end to the side of the head, also on the back.
Cut two pieces of the pre-gathered lace about 2 1/2 inches long and fold them in half. Glue them to the back of the arms to form the wings.
Measure across the bottom of the dress and add 2 inches. Cut another piece of pre-gathered lace to this size. Fold the ends behind the dress about 1 inch on each side and glue in place.
lay the flat lace just under the arms, fold the ends to the back and glue in place.
Using the markers, trace in the facial features and the lines for the arms and hands.
Fold the ribbon in half to form a loop and glue the ends to the back of the head, at the top to make the hanger.
You can add any other decorations you like, such as sequins, buttons, small flowers. Use your imagination and have fun!
Making and Dressing Cloth Dolls
Ebook with patterns and instructions to make 5 cloth dolls as well as chapters on general doll making techniques.The book includes 21 inch Lalena Doll, 21 inch David Doll, Bear Dolls, 9 inch Destiny Doll and 15 inch Annie Doll, all together in one handy book. 53 pages.Making and Dressing Cloth Dolls.
Materials Needed
1 brown paper grocery bag; large, heavy weight
Stitch Witchery bonding web
1 six inch square of red satin fabric (or brightly colored fabric of your choice)
1 three inch square of pink cotton fabric (or color of your choice)
12 inches of 1 or 1 1/2 inch wide pre-gathered lace trim
4 inches of 1 inch wide flat lace trim
approximately three yards of yarn, I used yellow for the hair
one size 6 (American) knitting needle or a new pencil
hair spray
brown, black and red fine point markers
6 inches of 1/8 inch wide satin ribbon
hot glue gun and glue stick
Begin by cutting a rectangle of brown paper from a flat, unfolded area of the bag, that measures 10 inches by 8 inches. Center the pink square on one of the sides of the satin squares and, using the bonding web and your iron, fuse the fabric to the paper. The pink and red squares should meet with no gaps between; don't overlap them, either. Place the pattern over the fabric and paper so that the head is on the pink fabric and the arms and dress are on the red. Trace around the pattern with a pencil and cut it out.
Cut the yarn into 12 inch long pieces and wrap them tightly around the knitting needle or pencil. Spray the yarn with the hairspray to wet it and then let it dry in place. You can use a blow dryer to speed the drying process. When dry, carefully slide the yarn off the needle. Using the glue gun, glue one end of each "ringlet" to the top of the head, on the back and the other end to the side of the head, also on the back.
Cut two pieces of the pre-gathered lace about 2 1/2 inches long and fold them in half. Glue them to the back of the arms to form the wings.
Measure across the bottom of the dress and add 2 inches. Cut another piece of pre-gathered lace to this size. Fold the ends behind the dress about 1 inch on each side and glue in place.
lay the flat lace just under the arms, fold the ends to the back and glue in place.
Using the markers, trace in the facial features and the lines for the arms and hands.
Fold the ribbon in half to form a loop and glue the ends to the back of the head, at the top to make the hanger.
You can add any other decorations you like, such as sequins, buttons, small flowers. Use your imagination and have fun!
Making and Dressing Cloth Dolls
Ebook with patterns and instructions to make 5 cloth dolls as well as chapters on general doll making techniques.The book includes 21 inch Lalena Doll, 21 inch David Doll, Bear Dolls, 9 inch Destiny Doll and 15 inch Annie Doll, all together in one handy book. 53 pages.Making and Dressing Cloth Dolls.

Related Articles
Editor's Picks Articles
Top Ten Articles
Previous Features
Site Map
Content copyright © 2023 by Helen B. Wharton. All rights reserved.
This content was written by Helen B. Wharton. If you wish to use this content in any manner, you need written permission. Contact Helen B. Wharton for details.
