
Easy, No Sew, Doll Blanket

This week we will work on making a blanket for your doll, but unlike most of my designs, this one requires no sewing at all. The secret to this easy blanket is the fabric. It is made with fleece, which does not unravel the way normal, woven fabric does, so there is no sewing needed.
I wanted to make a blanket for one of my smaller dolls, with a finished size of about 12 inches by 16 inches, but you can make your blanket any size you wish. Once you've decided what size blanket you want, add about 3 inches in all directions. So, for example, if you want a 12 X 16 blanket, cut your fleece to 18 X 22 inches. Then cut a 3 inch square out of all four corners, as in the photo at right.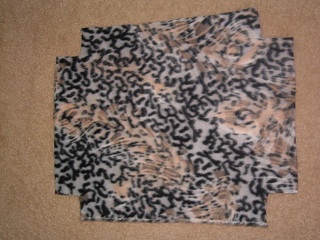
Fleece is available at any fabric store, online, and even at some large discount stores. Depending on the size of the blanket you want, a scrap may work. The fabric I used was left over from a pair of fleece pajamas that were made for a gift.
Starting at any corner, make 3 inch cuts into the fabric, every 3/8 to 1/2 inch along all edges. The way this is supposed to look can be seen in the second photo. If you are making a larger blanket, such as a crib size, make the cuts about every 1/2 to 5/8 inch. I did not bother to measure every cut line, I just eyeballed it, but you certainly can measure and mark each line if you wish.
Once you have all the cuts made along one entire edge, tie a knot in each little strip formed by the cuts. Be sure to push the knot to the base of the strip as you pull it tight.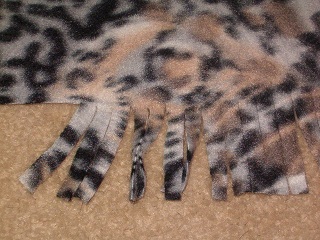 This forms a fringe all the way around the blanket and will prevent your blanket from rolling up at the edges after it is washed.
Continue to cut strips and tie them into knots all the way around the blanket. You have made a no sew doll blanket!
At right is a photo of my finished blanket.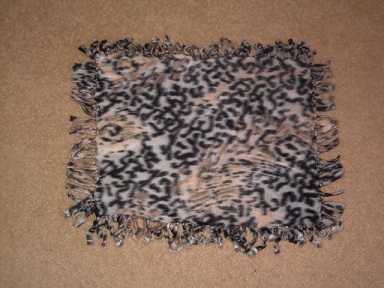
Make Clothes for 18 Inch Dolls The most popular dress on the Doll Making Site, The Spring Dress for 18 Inch Dolls, is included as well as 5 other outfits, underwear, and accessories such as jewelry, a bag, a knitted hat and scarf, and the new scrub suit. There are also patterns for slender Magic Attic type dolls as well as full-bodied American Girl dolls and an antique Saucy Walker doll from the 1950's.
If you love 18 inch dolls, and want a collection of patterns for a wardrobe, all in one handy Ebook, this is for you! All these patterns are available on the Doll Making site, but I have brought them all together in one book for ease of finding and using them.
I wanted to make a blanket for one of my smaller dolls, with a finished size of about 12 inches by 16 inches, but you can make your blanket any size you wish. Once you've decided what size blanket you want, add about 3 inches in all directions. So, for example, if you want a 12 X 16 blanket, cut your fleece to 18 X 22 inches. Then cut a 3 inch square out of all four corners, as in the photo at right.
Fleece is available at any fabric store, online, and even at some large discount stores. Depending on the size of the blanket you want, a scrap may work. The fabric I used was left over from a pair of fleece pajamas that were made for a gift.
Starting at any corner, make 3 inch cuts into the fabric, every 3/8 to 1/2 inch along all edges. The way this is supposed to look can be seen in the second photo. If you are making a larger blanket, such as a crib size, make the cuts about every 1/2 to 5/8 inch. I did not bother to measure every cut line, I just eyeballed it, but you certainly can measure and mark each line if you wish.
Once you have all the cuts made along one entire edge, tie a knot in each little strip formed by the cuts. Be sure to push the knot to the base of the strip as you pull it tight.
Continue to cut strips and tie them into knots all the way around the blanket. You have made a no sew doll blanket!
At right is a photo of my finished blanket.
Make Clothes for 18 Inch Dolls The most popular dress on the Doll Making Site, The Spring Dress for 18 Inch Dolls, is included as well as 5 other outfits, underwear, and accessories such as jewelry, a bag, a knitted hat and scarf, and the new scrub suit. There are also patterns for slender Magic Attic type dolls as well as full-bodied American Girl dolls and an antique Saucy Walker doll from the 1950's.
If you love 18 inch dolls, and want a collection of patterns for a wardrobe, all in one handy Ebook, this is for you! All these patterns are available on the Doll Making site, but I have brought them all together in one book for ease of finding and using them.
You Should Also Read:
knitted doll blanket
cigar box doll bedding

Related Articles
Editor's Picks Articles
Top Ten Articles
Previous Features
Site Map
Content copyright © 2023 by Helen B. Wharton. All rights reserved.
This content was written by Helen B. Wharton. If you wish to use this content in any manner, you need written permission. Contact Helen B. Wharton for details.
