
Designing a Striped Latch Hook Rug

Who needs a pattern when you can design your own latch hook rug?
Creating a striped pattern is easy and a little planning up front will save you from any unexpected problems later.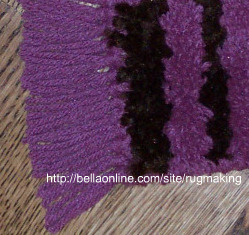
Start by deciding what size and shape you would like to make the rug and how you would like to use and display the rug.
Next, decide what colors you would like to see in the rug.
Decide how you would like the stripes to appear on the rug. Stripes can be one row wide, they can be 10 rows wide, or they can be various sizes. For example, you could have one color 10 rows wide, another color could be 5 rows wide. If the rug does not have to be a specific size, the size of the rug can be adjusted to fit the design.
When designing a two color striped rug, I like to start and end with the same color. If I’m using more than one color or if I’m using different widths of stripes, I like to take the pattern from the first half of the rug, reverse it and repeat it on the second half of the rug with the middle stripe being the stripe in common to both sides of the rug. This gives the rug symmetry. With that being said, this is not a hard fast rule. In fact, if you are making a wall hanging, you may decide that you would rather have an asymmetrical design. For example, you may decide that you would like to make a rug in different shades of the same color, starting with the darkest and ending with the lightest with stripes of different widths. Remember, this is your design - you can do anything you want.
Drawing your pattern on a piece of graph paper before starting will help give you an idea of what the finished project will look like. Another option is to make a small sample, as I have done in the picture above. A sample is a good way to get a visual idea of what the rug will look like without spending a lot of time and money on materials.
This is a good time to think about how long you would like the yarn lengths to be. Do you want the standard size that can be purchased pre-cut, or would you like the lengths to be a little longer? What about making one or two of the colors slightly different lengths?
Next you’ll need to decide how you want to finish the project. Decisions about finishing depend of how you plan to display the rug. Are you making a pillow, covering a bench, hanging it on the wall or placing it on the floor next to the bed? Finishing can be as simple as hemming and ironing on a binding or you can whipstitch the edging and add fringe. This is where the sample comes in handy, because you can try different methods of finishing to see which one you like best without worrying about damaging the rug.
Once you’ve decided on the size, the colors, and the design, the next step is calculating how much yarn you will need. If you are planning to whipstitch the edging or add fringe, yarn will need to be purchased in skeins, otherwise, the remaining yarn can be purchased precut.
Now that your planning is complete, it’s time to go shopping. You’ll need:
Latch Hook
Rug canvas slightly larger than your project to allow for hemming.
Yarn (Don’t rule out yarn that is thinner than normal latch hook rug yarn. You can always hook two pieces into each hole of the canvas, note that you will need to purchase twice as much.)
Curved Sewing Needle and Thread for hemming.
Darning Needle if you plan to whipstitch the edge.
Other supplies as needed depending on how you plan to display the rug.
More information about latch hooking can be found at the links below. If you have any questions or have additional tips for rug design that you would like to share with the Bella Rugmaking community, please leave a message in the forum. We would love to hear from you!
This site needs an editor - click to learn more!
You Should Also Read:
Latch Hook Articles
Rug Design and Decorating
Tools and Supplies
Related Articles
Editor's Picks Articles
Top Ten Articles
Previous Features
Site Map
Content copyright © 2023 by Christine Dux. All rights reserved.
This content was written by Christine Dux. If you wish to use this content in any manner, you need written permission. Contact
BellaOnline Administration
for details.
