
Putting Hair on a Reborn Doll

In this article I am continuing my series of articles about the making of my first reborn doll. We will be adding hair, and this is a touch that adds a lot of realism to your doll.
By this time you should have completed painting the doll to your satisfaction. Some reborn doll artists, when using a previously loved doll, sand the texture of the head, if "hair" was molded into the dolls head at the factory. I did not do that with my first one, so she still has the hair pattern on her head. But it is an option to think about after you remove the factory paint, but before you start applying your paint.
One way to put hair on your baby's head is to paint it on. I have seen this on some dolls and, depending on your technique, can yield very realistic results. In fact, I plan to use both paint and hair in my next reborn baby, but in this one I used only hair.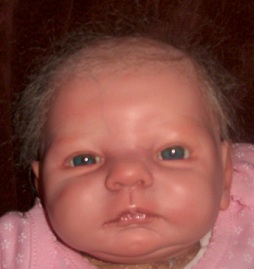
Materials I will explain each item below.
Hair - this can be purchased in any color or texture.
Needles - Yes, you'll need more than one, they break easily. I used 38 gauge Crown Needles.
One Micro-Root Hair Tool
E-6000 Multipurpose adhesive glue
Disposable foam brush
The hair is mohair. I chose a light blond color in a "wave" texture. It is available in all hair colors and textures from straight or wave to curly.
The needles required are felting needles. Crown needles have 3 sides and 1 barb on each side, so you can only place a maximum of 3 hairs at a time. Regular needles have 2 barbs on each side. Needles can be ordered precut or not. To put hair on a doll you do not need the full length of the felting needle so they are cut to about 1 inch long. If you already have this type of needle, a good wire cutter should be able to cut them to size.
The Micro Root tool looks like a wood mushroom and the needle is inserted into it to work with. It fits comfortably in the palm of your hand as you insert the needle into the doll's head.
E-600 adhesive is painted on the inside of the doll's head, with the foam brush, to help keep the hair from coming out. I did this a few times while working on my doll, it not only prevents the hair you've worked on from coming out while working on another section, but it can also help the hair to root, in the first place by "grabbing" it better than the head alone.
At right is a side view of my reborn baby. If you look closely you can also see some of the vein detail on her hand and temple.
Once you have assembled the tools it's time to start rooting. Start at the crown of the head, take a small amount of the hair and lay it flat over the section of head you will be working on. Push the needle through the hair and the head in the direction you wish the hair to go. Look at the way hair grows from the crown of a baby's head, it forms a swirl appearance. That is the way you want your needle to penetrate the head. Also, hold the needle at a shallow angle to the head, very few babies have hair that sticks straight out from their head. It tends to be flat on the head and to achieve that effect you need to put the hair in at that angle.
Continue around the head, one section at a time, until the hair is satisfactory to you. Don't rush, this is a very time consuming part of your doll's creation and well worth the time it takes.
When you are satisfied, add a last coat of adhesive to the entire inside of the head. This will also allow you to gently dampen and style the hair. If you wish, you can trim the hair so it is about the length of hair a normal newborn has. Also remember, less is more in this step. Most newborn babies have wispy hair, not a full, thick head of hair.
Making and Dressing Cloth Dolls
Ebook with patterns and instructions to make 5 cloth dolls as well as chapters on general doll making techniques.The book includes 21 inch Lalena Doll, 21 inch David Doll, Bear Dolls, 9 inch Destiny Doll and 15 inch Annie Doll, all together in one handy book. 53 pages.Making and Dressing Cloth Dolls.
You Should Also Read:
Starting to Reborn Dolls
Starting the Reborning Process
Painting Your Reborn Doll

Related Articles
Editor's Picks Articles
Top Ten Articles
Previous Features
Site Map
Content copyright © 2023 by Helen B. Wharton. All rights reserved.
This content was written by Helen B. Wharton. If you wish to use this content in any manner, you need written permission. Contact Helen B. Wharton for details.
