
Building the Digital Planner Inside Page Master
At this point in the Design a Digital Planner in Affinity Suite tutorial series, we are ready to build the Inside Page master for the Full Digi Planner PDF Template. We will start with the Front Cover master page and make a few changes. As with the previous master pages, this master will have Picture Frame placeholders, with generic placeholder graphics. When creating your designer graphics for the inside pages, you will get the best results by using the resolution, width and height dimensions listed on each placeholder graphic. Use the links below to download the placeholder graphics for this tutorial.
Inside Page Placeholder
Endpaper (Inside Cover) Placeholder
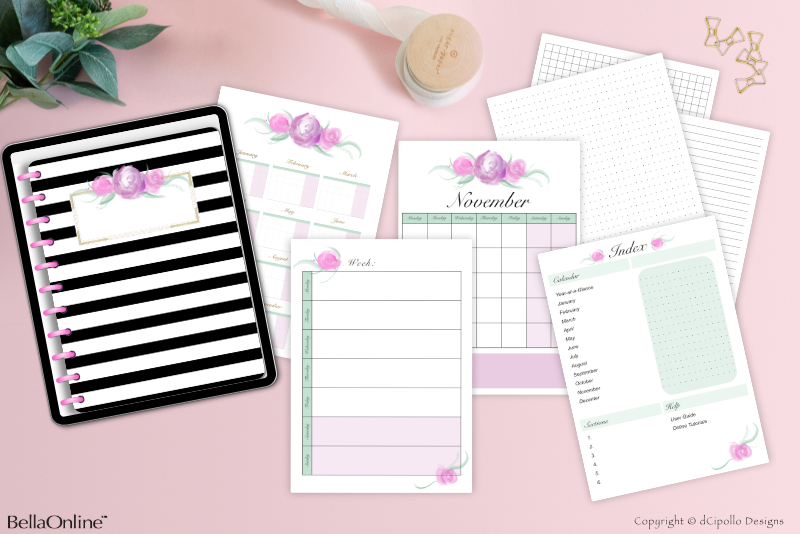
The second Picture Frame placeholder will be for the Inside Page design, which can be anything you wish from a calendar page to an intricate mind map. This Picture Frame will be a little smaller than the front and back covers, to create an empty area for the binder rings, top and right side tabs.
Let's start building our inside page master.
Design a Digital Planner in Affinity Suite - Tutorial Series Index
More Affinity Suite Tutorials
Screenshots used by permission of Serif (Europe) Ltd. This article is not endorsed by Serif Ltd.
Inside Page Placeholder
Endpaper (Inside Cover) Placeholder
Picture Frame Placeholders and Master Pages
The first Picture Frame will be for the endpaper design. In a physical planner, the endpaper is the patterned paper on the reverse side of the front and back covers. As we are building an inside page for a vertical layout, the endpaper will show along the edges from under the rings and tabs (see screenshot).The second Picture Frame placeholder will be for the Inside Page design, which can be anything you wish from a calendar page to an intricate mind map. This Picture Frame will be a little smaller than the front and back covers, to create an empty area for the binder rings, top and right side tabs.
Creating Your Designer Pages
You have several options for creating your page designs. Most of the time, I create my designs in Affinity Designer because I love to use the Artboards and the Artifex Forge Fine Liner brushes. For other page designs, I work in Publisher, to make use of the Table feature. If you are using one of the Affinity apps to create your layouts, you can save your designs in the default Affinity file formats (.afdesign and .afpub) and it will be very easy to place the designer graphics in to the Picture Frames. However, if you are using another software, such as Procreate, to create your page designs, you may want to save the designs in the PNG format.Vector vs Raster
You also have the option to create your page designs in vector or raster format. On some planner pages, such as a monthly calendar, the user might zoom in closer in order to write inside one of those tiny daily squares. I prefer to create vector graphics because the image can be enlarged (zoom in) without any loss of image quality. However, when raster images are enlarged, the images become pixelated resulting in poor image quality. A PNG image is a raster image. Graphics that you export from Affinity Designer and Publisher in the native formats are vector images.Repurpose Your Page Designs in to Inserts
Although we are concentrating on building a digital planner template, there is another option for selling your designer pages. Many designers sell their page designs, as digital planner inserts, independently from their planners (see screenshot). Many fans of digital planners purchase these inserts, which are usually packaged together by theme or purpose, and use them to customize digital planners as needed. Also consider selling your page designs for print. You can get inspiration for your own insert products by searching Etsy for digital planner inserts.Hyperlinked Tabs
Once we have the Picture Frame placeholders in place, it's time to add the tabs along the top and right side of the inside page. We will add 13 tabs on the right for the year-at-a-glance and monthly calendar pages. The tabs along the top will be for custom sections of your choice, such as a section for stickers or filler pages. Although we could have used the Symbols feature again for the tabs, I wanted you to have the option to set a different color for each individual tab (see screenshot), based on your planner's color palette. Of course, we will be adding labels and hyperlinks to these tabs as well. Finally, you will export your planner PDF with Affinity Publisher's (digital - high quality) export setting, which will maintain your hyperlinks, layers and sRGB color space.Let's start building our inside page master.
Design a Digital Planner in Affinity Suite - Tutorial Series Index
More Affinity Suite Tutorials
Screenshots used by permission of Serif (Europe) Ltd. This article is not endorsed by Serif Ltd.
Powered by Creative Market

Related Articles
Editor's Picks Articles
Top Ten Articles
Previous Features
Site Map
Content copyright © 2023 by Diane Cipollo. All rights reserved.
This content was written by Diane Cipollo. If you wish to use this content in any manner, you need written permission. Contact Diane Cipollo for details.


