
Quilt Top Prepartion in readiness for Quilting

We quilters love the journey. The collecting of fabrics, deciding on the pattern, the cutting out of those fabulous fabrics and the wonderful rhythm of piecing together these tiny bits of fabric and then taadaa! It’s finished and ready for quilting. Well…. Almost ready for quilting. Many quilters tend to skip the next and final phase of completing the quilt top, and this is often one of the most important phases prior to quilting. It’s all ensuring the finally pieced quilt top is in tiptop condition ready for you to quilt it personally or to outsource it to a professional quilter.
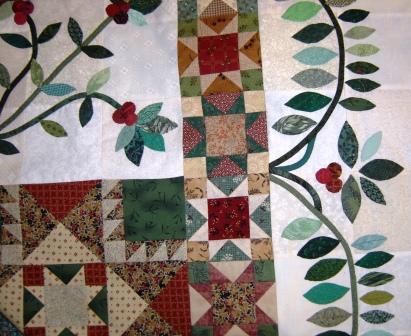
I’ve just reached that process with my latest quilt I call “Taken Leaf of my Senses”. It’s a very big quilt (82” x 82”) and there have been lots and lots of fine machine piecing and appliqué performed to create this beauty. That means lots and lots of threads on the wrong side that have frayed and strayed from their position. Just handling the blocks and borders prior to piecing can cause the wrong side of your piecing or appliqué to become rather tatty and messy looking. The last thing you want is for these threads to show through, especially after the top is quilted. Not much you can do after, so prevention is the answer.
So what needs to be done? I have developed a four step plan to preparing my quilt top wrong side in readiness for machine quilting.
Step 1. The very first thing that is essential for the quilt top to keep its integrity and stay together, is to run a “stay stitch” just on the edge, inside the ¼” mark around the entire quilt. This stitch line will not only discourage any stretching whilst handling the top, it will also stop the seam from opening up and coming apart. We so often hold up our quilt tops to show others and it’s this pulling and holding up that causes the seams to open up.
Step 2. The next thing to do is to press all of the seams in the same direction where possible. At times the seams will flip-flop from one direction to another, but generally speaking it’s very important to have as many seams as possible facing the same direction, especially the border seams. If the majority of the seam faces into the border, press the seams to make all of the seams face that way. These seams will sit flatter and neater.
Step 3. This is the most time consuming phase, but the most important. Where you have light colored fabrics, it is important to make sure that there are no stray threads that show through from the wrong side to the quilt top. If you can see them now, before the batting and backing go together, you’ll REALLY will see them after the quilting has been completed. So how do you go about it, especially with a monster 82” x 82”?
 Set a portable ironing board up and lay the quilt, wrong side facing up, over the ironing board. Position the centre of the quilt on the left hand side of the board, thus having the right side of the quilt hanging equally over the board. Then start from the centre and working on the right hand side of the quilt top and moving from the centre up to the top edge, use a pair of blunt tipped scissors and cut away any stray threads that are encountered. The blunt tipped scissors have less opportunity to accidentally snip the quilt top. Also the idea of using the ironing board, makes the quilt top sit very flat and again lessens the opportunity to accidentally to snip the quilt top. Do the same from the centre to the bottom edge, then turn the quilt top around, thus having the left side of the quilt hanging equally over the board. Now check the centre to top and centre to bottom of the remaining side.
Step 4. The last step to perform after cutting all the stray threads from the back, is to place the quilt on the ironing board as before, only this time with right side. Carefully peruse the quilt top and any threads that are sticking through from the wrong side should be gently pulled out (most will come out pretty easily), and if they’re a bit more stubborn, gently use your scissors to remove. I like to use a lint brush, that you can gently sweep over your quilt top without damaging the piecing. This gentle brushing will lift most of the stray threads. Sometimes you may find that the threads are stubborn and won't budge. You may sometimes have to get to the wrong side and see what’s happening. Don’t be tempted to yank the thread from the right side if it’s not budging. There’s a good reason for it being stuck, usually that it’s part of a pieced seam. So go gently.
After completing the above steps, you will have a well prepared quilt top, that will be a work of art once quilted. It was worth the effort don't you think?
I’ve just reached that process with my latest quilt I call “Taken Leaf of my Senses”. It’s a very big quilt (82” x 82”) and there have been lots and lots of fine machine piecing and appliqué performed to create this beauty. That means lots and lots of threads on the wrong side that have frayed and strayed from their position. Just handling the blocks and borders prior to piecing can cause the wrong side of your piecing or appliqué to become rather tatty and messy looking. The last thing you want is for these threads to show through, especially after the top is quilted. Not much you can do after, so prevention is the answer.
So what needs to be done? I have developed a four step plan to preparing my quilt top wrong side in readiness for machine quilting.
Step 1. The very first thing that is essential for the quilt top to keep its integrity and stay together, is to run a “stay stitch” just on the edge, inside the ¼” mark around the entire quilt. This stitch line will not only discourage any stretching whilst handling the top, it will also stop the seam from opening up and coming apart. We so often hold up our quilt tops to show others and it’s this pulling and holding up that causes the seams to open up.
Step 2. The next thing to do is to press all of the seams in the same direction where possible. At times the seams will flip-flop from one direction to another, but generally speaking it’s very important to have as many seams as possible facing the same direction, especially the border seams. If the majority of the seam faces into the border, press the seams to make all of the seams face that way. These seams will sit flatter and neater.
Step 3. This is the most time consuming phase, but the most important. Where you have light colored fabrics, it is important to make sure that there are no stray threads that show through from the wrong side to the quilt top. If you can see them now, before the batting and backing go together, you’ll REALLY will see them after the quilting has been completed. So how do you go about it, especially with a monster 82” x 82”?
Set a portable ironing board up and lay the quilt, wrong side facing up, over the ironing board. Position the centre of the quilt on the left hand side of the board, thus having the right side of the quilt hanging equally over the board. Then start from the centre and working on the right hand side of the quilt top and moving from the centre up to the top edge, use a pair of blunt tipped scissors and cut away any stray threads that are encountered. The blunt tipped scissors have less opportunity to accidentally snip the quilt top. Also the idea of using the ironing board, makes the quilt top sit very flat and again lessens the opportunity to accidentally to snip the quilt top. Do the same from the centre to the bottom edge, then turn the quilt top around, thus having the left side of the quilt hanging equally over the board. Now check the centre to top and centre to bottom of the remaining side.Step 4. The last step to perform after cutting all the stray threads from the back, is to place the quilt on the ironing board as before, only this time with right side. Carefully peruse the quilt top and any threads that are sticking through from the wrong side should be gently pulled out (most will come out pretty easily), and if they’re a bit more stubborn, gently use your scissors to remove. I like to use a lint brush, that you can gently sweep over your quilt top without damaging the piecing. This gentle brushing will lift most of the stray threads. Sometimes you may find that the threads are stubborn and won't budge. You may sometimes have to get to the wrong side and see what’s happening. Don’t be tempted to yank the thread from the right side if it’s not budging. There’s a good reason for it being stuck, usually that it’s part of a pieced seam. So go gently.
After completing the above steps, you will have a well prepared quilt top, that will be a work of art once quilted. It was worth the effort don't you think?

Related Articles
Editor's Picks Articles
Top Ten Articles
Previous Features
Site Map
Content copyright © 2023 by Judie Bellingham. All rights reserved.
This content was written by Judie Bellingham. If you wish to use this content in any manner, you need written permission. Contact Judie Bellingham for details.

