
Make a Collaged Art Tag

Gel medium is used by collage artists as an adhesive and a sealant. It's archival, waterproof, and doesn't discolor with time. Plus, gel medium doesn't get tacky, unlike some decoupage mediums that require a separate sealant to prevent a finished project from becoming sticky. In this project we'll use gloss gel medium to make a collaged art tag, which can also be used as a bookmark.
You will need:
* Cardboard, 2-1/8 inches by 5 inches
* Metallic green cardstock, 2-1/2 inches by 5-1/2 inches
* Page of text from a discarded book, newspaper or magazine
* Piece of brown pattern paper or a brown paper bag, 3 inches by 6 inches
* Yellow or light colored patterned paper, 3 inches by 6 inches
* White tissue paper, around 3 inches by 6 inches
* Scrap of brown tissue paper, 1 inch by 2 inches,
* Copy of a vintage photo, 1-3/4 inches by 2 inches
* Cutout of a yellow butterfly
* Green velvet ribbon, 8 inches
* Gel medium, gloss
* Brown gel pen
* Ink pad (black, brown or red orange)
* Orange acrylic paint
* Water
* Paint palette or discarded jar lid for mixing paint
* Wide paint brush
* Scissors
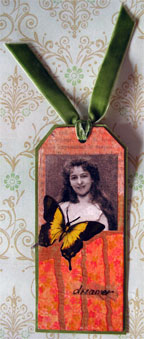
Cut the cardboard to the indicated size and cut off the corners to form a tag shape. Brush a coat of gel medium onto the front of the tag and adhere the text paper. Let dry and trim off the excess paper.
Crumple the white tissue paper and flatten it out again. Apply a coat of gel medium on the tag and adhere the tissue paper to it. Let dry and trim off the excess.
Tear the brown pattern paper at an angle so that it's about two-thirds the length of the tag. Stick it to the tag with gel medium so that the lower part of the tag is covered.
Tear the decorative paper in half at an angle, then tear it into vertical strips. Apply a coat of gel medium onto the entire tag, and stick the strips on top of the brown paper, leaving a space between the strips. Let dry and trim off the excess paper.
Dilute a little orange acrylic paint with water, and brush it onto the front of the tag. Let dry.
Apply another coat of gel medium onto the tag, and stick the photo about 3/4 of an inch from the top. Let dry.
On a piece of brown tissue paper, write the word "dreamer" with a brown gel pen and tear around the text. Apply a bit of gel medium about an inch from the bottom of the tag, and attach the tissue paper. Since the tissue paper is rather thin, it's easier to apply the glue to the tag than to the tissue paper.
Apply another coat of gel medium to the tag, and stick the butterfly on the lower left corner of the photo. Let dry. Apply a final coat of gel medium on the front of the tag and let dry.
Ink the edges of the tag and let dry. Attach the tag to the metallic green cardstock with gel medium. When dry, trim the cardstock, leaving a narrow border around the tag.
Punch a hole at the top of the tag, thread the ribbon through the hole, and knot it. Trim the ends of the ribbon.
You will need:
* Cardboard, 2-1/8 inches by 5 inches
* Metallic green cardstock, 2-1/2 inches by 5-1/2 inches
* Page of text from a discarded book, newspaper or magazine
* Piece of brown pattern paper or a brown paper bag, 3 inches by 6 inches
* Yellow or light colored patterned paper, 3 inches by 6 inches
* White tissue paper, around 3 inches by 6 inches
* Scrap of brown tissue paper, 1 inch by 2 inches,
* Copy of a vintage photo, 1-3/4 inches by 2 inches
* Cutout of a yellow butterfly
* Green velvet ribbon, 8 inches
* Gel medium, gloss
* Brown gel pen
* Ink pad (black, brown or red orange)
* Orange acrylic paint
* Water
* Paint palette or discarded jar lid for mixing paint
* Wide paint brush
* Scissors
Cut the cardboard to the indicated size and cut off the corners to form a tag shape. Brush a coat of gel medium onto the front of the tag and adhere the text paper. Let dry and trim off the excess paper.
Crumple the white tissue paper and flatten it out again. Apply a coat of gel medium on the tag and adhere the tissue paper to it. Let dry and trim off the excess.
Tear the brown pattern paper at an angle so that it's about two-thirds the length of the tag. Stick it to the tag with gel medium so that the lower part of the tag is covered.
Tear the decorative paper in half at an angle, then tear it into vertical strips. Apply a coat of gel medium onto the entire tag, and stick the strips on top of the brown paper, leaving a space between the strips. Let dry and trim off the excess paper.
Dilute a little orange acrylic paint with water, and brush it onto the front of the tag. Let dry.
Apply another coat of gel medium onto the tag, and stick the photo about 3/4 of an inch from the top. Let dry.
On a piece of brown tissue paper, write the word "dreamer" with a brown gel pen and tear around the text. Apply a bit of gel medium about an inch from the bottom of the tag, and attach the tissue paper. Since the tissue paper is rather thin, it's easier to apply the glue to the tag than to the tissue paper.
Apply another coat of gel medium to the tag, and stick the butterfly on the lower left corner of the photo. Let dry. Apply a final coat of gel medium on the front of the tag and let dry.
Ink the edges of the tag and let dry. Attach the tag to the metallic green cardstock with gel medium. When dry, trim the cardstock, leaving a narrow border around the tag.
Punch a hole at the top of the tag, thread the ribbon through the hole, and knot it. Trim the ends of the ribbon.

Related Articles
Editor's Picks Articles
Top Ten Articles
Previous Features
Site Map
Content copyright © 2023 by Mia C. Goloy. All rights reserved.
This content was written by Mia C. Goloy. If you wish to use this content in any manner, you need written permission. Contact Mia C. Goloy for details.
