
Photoshop Animation - Customizing a Template
In this Photoshop tutorial, we will learn how easy it is to customize a Photoshop design template. We will learn how to change the placeholder graphics with our client's photographs and how to change the placeholder text with our client's information.
As our example, we will use the Facebook video cover template, which we made in the previous tutorials (see links below). Open your template file in to Photoshop CC. As this file is a template file with .psdt extension, you will really open a copy of the file, which you can save for your client.
Copyright 2018 Adobe Systems Incorporated. All rights reserved. Adobe product screen shot(s) reprinted with permission from Adobe Systems Incorporated. Adobe, Photoshop is/are either [a] registered trademark[s] or a trademark[s] of Adobe Systems Incorporated in the United States and/or other countries.
As our example, we will use the Facebook video cover template, which we made in the previous tutorials (see links below). Open your template file in to Photoshop CC. As this file is a template file with .psdt extension, you will really open a copy of the file, which you can save for your client.
- The Fonts
- If you do not have the Adobe fonts used in the template already installed, a window will open telling you to install the fonts (see screenshot). Click Resolve Fonts to synch these fonts or click Cancel to tell Photoshop to use the best installed font.
- Change the default name of the new file from Untitled-1 to the name you wish to give to your client's template.
- You should have several Smart Object graphic layers and a group of text layers in the Layers panel (see screenshot).
- Move the Playhead to the first frame on the Timeline.
The Placeholder Graphics
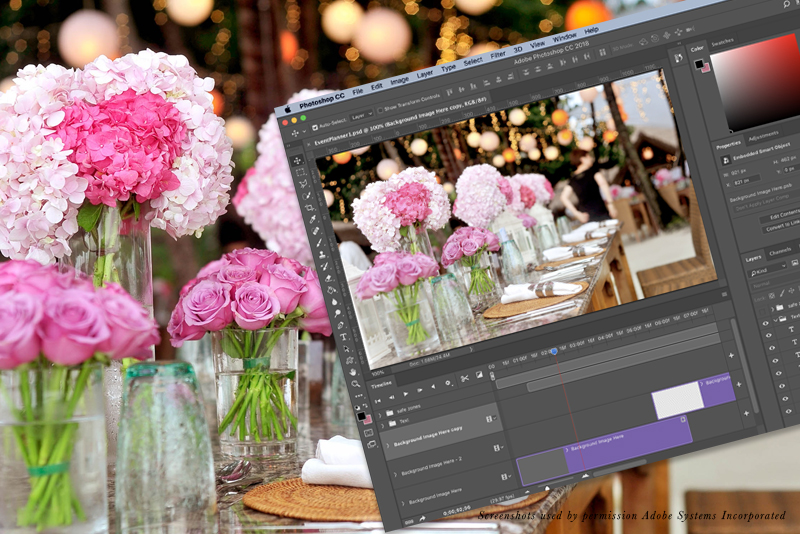
On this frame, we need to replace the bottom layer [Background Image Here] placeholder graphic for the Smart Object. - Double-click on the Smart Object thumbnail on the bottom layer to open the Smart Object in to a .psb temp file (see screenshot).
In the temp file, we have already added a Clipping Mask to the graphic layer. You know this because you can see the upside down triangle cut out area on the left edge of the graphic. To maintain the Clipping Mask, we cannot just add another graphic above the [Background Image Here] layer. We need to replace the placeholder graphic in the [Background Image Here] layer above the clipping mask with your client's photo. - Open your client's photo in to Photoshop and copy the photo to the Clipboard.
- Go back to the temp file and select the [Background Image Here] graphic layer. Click Select - All and next click Edit - Clear to remove the placeholder graphic.
- With the layer still selected, click Edit - Paste to add the new photo in to the empty layer.
The photo should automatically have the Clipping Mask applied (see screenshot). If the photo is larger than the screen, you can resize and/or move the photo as needed. - Save the temp file.
When you go back to the template, the bottom [Background Image Here] Smart Object layer and it's linked layer [Do Not Edit] now contain your client's photo. - Repeat the previous steps to replace the placeholder graphic on the other Smart Object layer [Background Image Here - 2] (see screenshot).
The Placeholder Text
Now we can customize the placeholder text. You may want to set the text color and style for your client's brand. - Move the Playhead to about Timecode (0:00:03:00), so that you can see the first two lines of text.
- In the Layers panel, click on the T for the [Business Name Here] layer to select the text on the screen. Replace the placeholder text with your client's business name (see screenshot).
- Repeat the previous steps for the [Type of Business Here] text layer.
- Move the Playhead to about Timecode (0:00:16:00), so that you can see the six lines of text.
- Replace the placeholder text with your client's information (see screenshot).
Test the animation and save your file.
Now, let's export the video for our client in the .mp4 video format. - Click File - Export - Render Video.
- In the Render Video window, set the name and folder for saving your video.
- In the Adobe Media Encoder section, set the following (see screenshot).
Format: H.264
Preset: High Quality
Size: Document Size
Frame Rate: Document Frame Rate - Click the Render button.
Now you can upload your .mp4 video file as your page's video cover on Facebook.
Copyright 2018 Adobe Systems Incorporated. All rights reserved. Adobe product screen shot(s) reprinted with permission from Adobe Systems Incorporated. Adobe, Photoshop is/are either [a] registered trademark[s] or a trademark[s] of Adobe Systems Incorporated in the United States and/or other countries.

Related Articles
Editor's Picks Articles
Top Ten Articles
Previous Features
Site Map
Content copyright © 2023 by Diane Cipollo. All rights reserved.
This content was written by Diane Cipollo. If you wish to use this content in any manner, you need written permission. Contact Diane Cipollo for details.


