
Photoshop Animation - Animating Graphics
In this Photoshop tutorial, we will continue to build the animation for our Facebook video cover template. We will animate a second photograph on to the screen.
At this point, we have the first photograph on the screen, as well as two lines of text. In Scene 2, we will move a second photograph on to the screen. Because this image will be on a layer above the first photograph, it will cover the first photo completely.
Once the first photo is covered, we don't need it any longer. So, we will trim this photograph's track, and therefore remove the photo from the screen. To end this scene, we will fade out the text, in preparation for the second group of text to fade in.
Scene 2 Frame by Frame
Timecode (0:00:05:00) At five seconds on the Timeline, the second placeholder graphic will slide on to the screen. (duration: .5 sec)
Timecode (0:00:07:00) At seven seconds on the Timeline, the two lines of text will fade out. (duration: .5 sec)
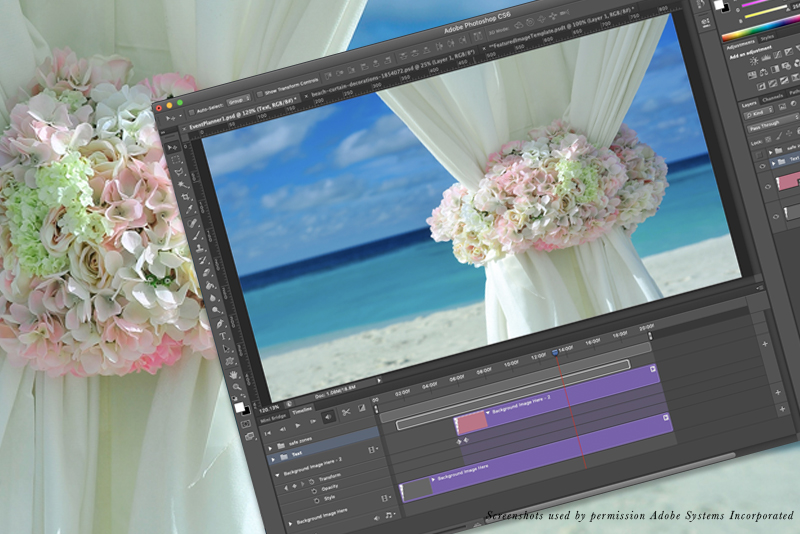
Open your project in to Photoshop and go to the Timeline. As you can see, the second placeholder graphic is on the layer above the first graphic. At this point, the tract extends the entire duration of the Timeline. But we don't need this image visible until five seconds on the Timeline. So let's trim the track at Timecode (0:00:05:00). This will be the starting position for the slide in animation.
Back | Next
Copyright 2018 Adobe Systems Incorporated. All rights reserved. Adobe product screen shot(s) reprinted with permission from Adobe Systems Incorporated. Adobe, Photoshop is/are either [a] registered trademark[s] or a trademark[s] of Adobe Systems Incorporated in the United States and/or other countries.
At this point, we have the first photograph on the screen, as well as two lines of text. In Scene 2, we will move a second photograph on to the screen. Because this image will be on a layer above the first photograph, it will cover the first photo completely.
Once the first photo is covered, we don't need it any longer. So, we will trim this photograph's track, and therefore remove the photo from the screen. To end this scene, we will fade out the text, in preparation for the second group of text to fade in.
Scene 2 Frame by Frame
Timecode (0:00:05:00) At five seconds on the Timeline, the second placeholder graphic will slide on to the screen. (duration: .5 sec)
Timecode (0:00:07:00) At seven seconds on the Timeline, the two lines of text will fade out. (duration: .5 sec)
Open your project in to Photoshop and go to the Timeline. As you can see, the second placeholder graphic is on the layer above the first graphic. At this point, the tract extends the entire duration of the Timeline. But we don't need this image visible until five seconds on the Timeline. So let's trim the track at Timecode (0:00:05:00). This will be the starting position for the slide in animation.
- If needed, turn on the visibility of the [Background Image Here - 2] layer in the Layers panel.
- Move the Playhead to Timecode 0:00:05:00 (see screenshot).
- Click the left edge of the placeholder graphic track and drag to the right to five seconds on Timeline.
We need to move the photo completely off of the right edge of the screen. This will be the starting position for animating the photo on to the screen (see screenshot). - To move the graphic to the starting position for the animation, select the layer, click Edit - Free Transform and drag the graphic until it is completely off the screen.
- Expand the [Background Image Here - 2] layer and click the Stop Watch for the Transform property to set the starting position keyframe (see screenshot).
Now let's animated the second graphic back on to the screen. - Move the Playhead to Timecode 0:00:05:15. Move the graphic back on to the screen, matching the right edges.
You should see the second keyframe added to the Transform property. - Finally, let's shorten the track duration of the original [Background Image Here] bottom layer. Drag the right edge of the track to Timecode 0:00:07:00.
Ok, now let's fade out the text. At this point, the text layers still end at the default five seconds. Our first step is to expand the tracks. - Move the Playhead to Timecode (0:00:07:15), which is the end of the fade out animation (see screenshot).
- Drag the right edge of each text track to expand the tracks to Timecode (0:00:07:15).
This will be the ending frame for the fade out animation. But first we need to set the beginning frame. - Move the Playhead to Timecode (0:00:07:00).
- Open the Properties list for the Business Name and Type of Business text layers.
- For both text layers, click the Stop Watch icon for the Opacity property, to set the starting opacity for the animation, which at this point is 100% (see screenshot).
- Move the Playhead back to Timecode (0:00:07:15) and reduce the Opacity of the two text layers in the Layers panel to 0%.
You should see the two ending keyframes add to the Timeline (see screenshot).
Back | Next
Copyright 2018 Adobe Systems Incorporated. All rights reserved. Adobe product screen shot(s) reprinted with permission from Adobe Systems Incorporated. Adobe, Photoshop is/are either [a] registered trademark[s] or a trademark[s] of Adobe Systems Incorporated in the United States and/or other countries.

Related Articles
Editor's Picks Articles
Top Ten Articles
Previous Features
Site Map
Content copyright © 2023 by Diane Cipollo. All rights reserved.
This content was written by Diane Cipollo. If you wish to use this content in any manner, you need written permission. Contact Diane Cipollo for details.


