
Crazy Patchwork Block piecing Demystified

Let's take the mystery out of the Crazy Patchwork Block piecing.
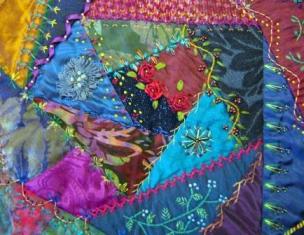
Most quilters find embellishing a crazy patchwork block a whole lot of fun and thoroughly enjoy the process. But making the crazy patchwork block can be a challenge to say the least. In fact it’s making the block that I believe gave the name to Crazy Patchwork!! Just joking! It can sometimes drive us a little “crazy”. Quilters often find that whilst creating the crazy patchwork block, it is quite easy to sew themselves into a corner and be boxed in, with no where to go to complete the block.
Here are my instructions for making the crazy patchwork block. This method that I describe is a very simple and easy method, and hopefully it will demystify the creation of the Crazy Patchwork Block.
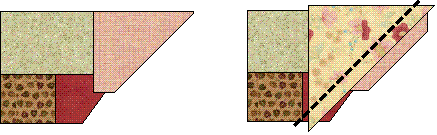
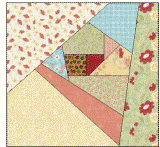
Is there a solution to avoid the boxed in blues? Yes!! The good new is there is a simple solution to the Crazy Patchwork boxed in blues. And it starts with the first fabric shape which happens to be the centre shape. The simple solution is the use of an odd sided piece for the centre. A 5 sided shape is probably best. It is also usual to use a dark solid fabric for that centre piece. I guess a 7 or even 9 sided shape will work, as long as it is an odd sided fabric shape.
So here we go…
The theory is that we place the odd sided shape in the centre of the block. It doesn’t need to be dead centre, in fact that might give it a very contrived look and the genre of crazy patchwork is “random” to say the least.
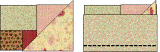
Once the centre fabric is placed, the quilter will work in a clock-wise direction adding a strip of fabric to each edge, flipping it over and pressing it before adding the next strip. This method is repeated until the desired sized block is created.
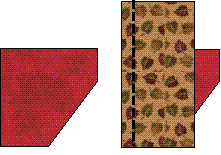
Step 1. The centre piece is ready. The first strip is laid on top of the centre piece (right sides together), on the first edge going in a clockwise direction. The strip is stitched to the centre piece.
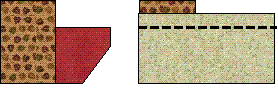
Step 2. The first strip is flipped over and pressed open. The second strip is laid in place on the second edge going in a clockwise direction (right sides together). The strip needs to be big enough to cover the previous strips. The second strip is then stitched in place. It is advised to cut the excess fabric from the first strip, before flipping and pressing the second strip. This will avoid a bulky buildup of fabric.
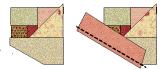
Step 3. The second strip is flipped over and pressed open. The third strip is laid in place on the third edge going in a clockwise direction (right sides together) and stitched in place. Cut the excess fabric from the previous strip.
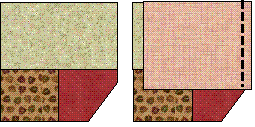
Step4. The third strip is flipped over and pressed open. The next strip is then cut to fit in with the fourth edge of the centre block. The fourth strip is laid in place on the next edge (right sides together). Again the strip needs to be big enough to cover the previous strips. Cut the excess fabric away and then stitch in place.
Step 5 & 6. Continue in the same manner, working in a clockwise direction and adding strips to each side until your block is the required size plus two inches. This allows for neatening of the edge and inclusion of the seam allowance for your block
Step 7. Once the block is the required size, using a rotary cutter, resize the block to the required unfinished size (ie. Plus seam allowance).
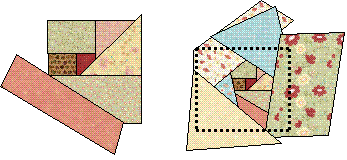
Congratulations! You've made a great Crazy Patchwork Block. Now it's time to embellish. Hooray!

Related Articles
Editor's Picks Articles
Top Ten Articles
Previous Features
Site Map
Content copyright © 2023 by Judie Bellingham. All rights reserved.
This content was written by Judie Bellingham. If you wish to use this content in any manner, you need written permission. Contact Judie Bellingham for details.

