
Treat Bag Silhouette Cut File
In this Silhouette Studio® tutorial, we will create a simple Halloween or Fall treat bag. We will draw the cut lines in Silhouette Studio and cut the bag with the Cameo® cutting machine.
Open Silhouette Studio and let's get started.
First, we will add some guides to the workspace.
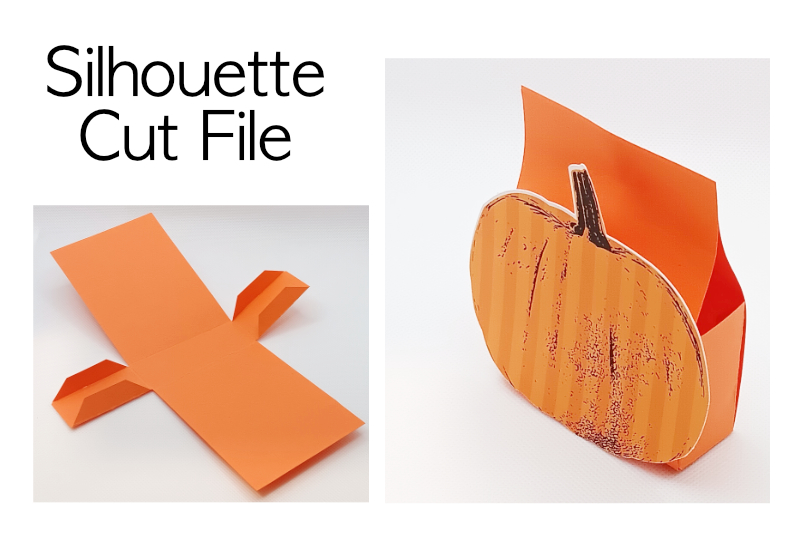
Fold the front and back sections upward so that the bag can sit flat on the one inch bottom piece (see screenshot). Fold the four tabs inward and glue in place. Fill the treat bag and glue the top pieces together to close the bag.
Extra: Attach a print and cut pumpkin decoration to the front of the bag. (see screenshot)
Silhouette Print and Cut Pumpkin
How to Make Halloween Pattern Papers
The Silhouette Cameo 5 was supplied to me by Silhouette America.
Silhouette, Silhouette Studio, Silhouette Connect, PixScan, Silhouette CAMEO and Silhouette Portrait are either registered trademarks or trademarks of Silhouette America, Inc. Product screen shot(s) reprinted with permission from Silhouette America®, Inc
Open Silhouette Studio and let's get started.
First, we will add some guides to the workspace.
- Click the DESIGN tab at the top of the workspace.
- From the top and right side rulers, drag a guide line to the vertical and horizontal center of the cutting/drawing area.
- With the Rectangle drawing tool, draw a rectangle that is 9 inches tall and 3 inches wide. (see screenshot)
- From the Quick Access Toolbar, set the Fill color to white. (see screenshot)
- Select the rectangle and center it on the drawing area, using the guides.
- Draw a second rectangle that is 1 inch tall and 7 inches wide. Fill with white. (see screenshot)
- Place the second rectangle over the vertical and horizontal center of the first rectangle.
- Select both rectangles.
- From the Quick Access Toolbar, click the Weld tool to weld the two rectangles into one. (see screenshot)
- Select the 5 sided Flexishape (second row and fifth from left). (see screenshot)
- Draw a tab that is 2 inches wide and .5 inch tall. Place the tab above the bottom strip and touching the strip. (see screenshot)
- From the top menu, click Edit - Duplicate to duplicate the first tab.
- Place the second tab on the other side and above the bottom strip.
- Repeat the previous steps for the third and fourth tabs and place them under the bottom strip. (see screenshot)
- Select all of the pieces on the workspace.
- From the Quick Assess Toolbar, click the Weld icon.
- Still on the DESIGN tab, set the Machine to Cameo 5 or your machine type. (see screenshot)
- Set the Feed Type to Auto/Manual.
- Set the Cutting Mat to 12 x 12 inches.
- Set the Media Size to 12 x 12 inches.
- Turn on your cutting machine.
- Click the SEND tab at the top of the workspace.
- Set the paper type to Cardstock, Plain or the type of paper you are using. (see screenshot)
- Set to Auto Cut and AutoBlade.
- Click the SEND button to cut your treat bag. (see screenshot)
- To save your cut file, click File - Save As - Save to Hard Drive.
This is not necessary but does make it easier to see what we are drawing.
This give us the bag that is 4 inches tall, 3 inches wide and has a 1 inch bottom. Now we will add the small tabs to the sides of the bottom strip, for glueing the bag together. (see screenshot)
Now we need to create the cut line for the bag.
All the pieces should weld to become one piece. (see screenshot)
Now we can send the project to your Cameo for cutting. Let's use a 12 x 12 inch cutting mat with a 12 x 12 inch media sheet of colored cardstock paper.
You should see the red cutting line for the treat bag.
Fold the front and back sections upward so that the bag can sit flat on the one inch bottom piece (see screenshot). Fold the four tabs inward and glue in place. Fill the treat bag and glue the top pieces together to close the bag.
Extra: Attach a print and cut pumpkin decoration to the front of the bag. (see screenshot)
Silhouette Print and Cut Pumpkin
How to Make Halloween Pattern Papers
The Silhouette Cameo 5 was supplied to me by Silhouette America.
Silhouette, Silhouette Studio, Silhouette Connect, PixScan, Silhouette CAMEO and Silhouette Portrait are either registered trademarks or trademarks of Silhouette America, Inc. Product screen shot(s) reprinted with permission from Silhouette America®, Inc

Related Articles
Editor's Picks Articles
Top Ten Articles
Previous Features
Site Map
Content copyright © 2023 by Diane Cipollo. All rights reserved.
This content was written by Diane Cipollo. If you wish to use this content in any manner, you need written permission. Contact Diane Cipollo for details.


