
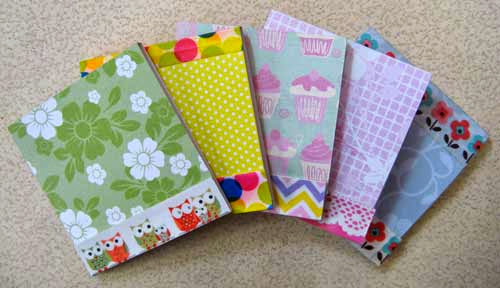
Matchbook Notepads

Matchbook notepads are useful little things to always have in your purse or pocket, along with a pen. They’re handy when you need to dash off a note while on the go, or maybe doodle while waiting in line at the supermarket. Matchbook notepads also make adorable giveaways, party favors or souvenirs. Once you see how easy they are to make, you’d want to make more than one! Here’s how.
You will need:
* One sheet copy paper
* Lightweight patterned cardstock
* Washi tape
* Craft glue
* Pencil
* Ruler
* Craft knife
* Cutting mat
* Stapler
* Paper trimmer (optional)
* Sewing machine (optional)
To make the cover, measure, mark and cut a piece of cardstock measuring 5-3/4 by 2-1/4 inches. Using the template as a guide, with the wrong side of the cardstock face up on your work surface, mark the long side of the cardstock at the following points: ½ inch, 1 inch, 1-1/4 inches, 3-1/2 inches, 3-5/8 inches, and 3-3/4 inches. Draw light pencil lines across the cardstock at these points, then score and fold along the lines. Note that the first fold from the bottom is a mountain fold, that is, the cardstock is folded towards you. Set aside.
Cut the copy paper into 2 by 2-1/4 inch pieces; you will need around 16 pieces, depending on the thickness of the paper and the size of the staple wire. Use a paper trimmer if you have one to speed things up. Run the sheets through an unthreaded sewing machine to make perforations across them half an inch from one of the short sides. This will make it easier to tear off the sheets later. Stack the sheets with the perforations all on the same end of the stack, then insert the stack into the cover so that the perforations are more or less in line with the first fold at the bottom.

With the end flap unfolded, staple through the front cover, paper, and back cover such that the prongs of the staple are at the front of the matchbook. (Variation: Instead of stapling the paper, you can machine- or hand-stitch the paper to the cover.) Glue the flap down to hide the staple. Cut a strip of washi tape and cover the front tab with it; trim off any excess tape. Tuck the cover into the bottom flap of the matchbook. You’re done!
If you’re using plain cardstock, you can further decorate the matchbook with more washi tape, stickers, punched shapes, and rubber stamps. You can also use embossed cardstock or collaged paper for the cover.
You will need:
* One sheet copy paper
* Lightweight patterned cardstock
* Washi tape
* Craft glue
* Pencil
* Ruler
* Craft knife
* Cutting mat
* Stapler
* Paper trimmer (optional)
* Sewing machine (optional)
To make the cover, measure, mark and cut a piece of cardstock measuring 5-3/4 by 2-1/4 inches. Using the template as a guide, with the wrong side of the cardstock face up on your work surface, mark the long side of the cardstock at the following points: ½ inch, 1 inch, 1-1/4 inches, 3-1/2 inches, 3-5/8 inches, and 3-3/4 inches. Draw light pencil lines across the cardstock at these points, then score and fold along the lines. Note that the first fold from the bottom is a mountain fold, that is, the cardstock is folded towards you. Set aside.
Cut the copy paper into 2 by 2-1/4 inch pieces; you will need around 16 pieces, depending on the thickness of the paper and the size of the staple wire. Use a paper trimmer if you have one to speed things up. Run the sheets through an unthreaded sewing machine to make perforations across them half an inch from one of the short sides. This will make it easier to tear off the sheets later. Stack the sheets with the perforations all on the same end of the stack, then insert the stack into the cover so that the perforations are more or less in line with the first fold at the bottom.
With the end flap unfolded, staple through the front cover, paper, and back cover such that the prongs of the staple are at the front of the matchbook. (Variation: Instead of stapling the paper, you can machine- or hand-stitch the paper to the cover.) Glue the flap down to hide the staple. Cut a strip of washi tape and cover the front tab with it; trim off any excess tape. Tuck the cover into the bottom flap of the matchbook. You’re done!
If you’re using plain cardstock, you can further decorate the matchbook with more washi tape, stickers, punched shapes, and rubber stamps. You can also use embossed cardstock or collaged paper for the cover.

Related Articles
Editor's Picks Articles
Top Ten Articles
Previous Features
Site Map
Content copyright © 2023 by Mia C. Goloy. All rights reserved.
This content was written by Mia C. Goloy. If you wish to use this content in any manner, you need written permission. Contact Mia C. Goloy for details.
