
Silhouette Print and Cut Pumpkin
In this tutorial, we will create a stamped effect of a pumpkin for a Halloween print and cut project. The photo of the pumpkin that is our starting point was downloaded from Unsplash.com and we will print and cut the pumpkin in the Silhouette Cameo®.
What You Will Need
Our first step is to download the pumpkin image (see link below). You will also need your favorite Halloween pattern fill paper. If you don't have any, use the link below to make own. You will also need Illustrator®, Affinity® Designer and the Silhouette Studio® software. Finally, you will need a printer and the Cameo to cut the final pumpkin image.
Now we will use one of the filters in Illustrator to create our stamp effect.
Treat Bag Silhouette File
How to Make Halloween Pattern Papers
Pumpkin Photo on Unsplash
https://unsplash.com/@personal_graphic
The Silhouette Cameo 5 was supplied to me by Silhouette America.
Silhouette, Silhouette Studio, Silhouette Connect, PixScan, Silhouette CAMEO and Silhouette Portrait are either registered trademarks or trademarks of Silhouette America, Inc. Product screen shot(s) reprinted with permission from Silhouette America®, Inc.
© 2024 Adobe Systems Incorporated. All rights reserved. Adobe® product screen shot(s) reprinted with permission from Adobe Systems Incorporated. Adobe, Photoshop, Illustrator, InDesign is/are either [a] registered trademark[s] or a trademark[s] of Adobe Systems Incorporated in the United States and/or other countries.
Affinity® Designer screenshots used by permission of Serif® (Europe) Ltd. This article is not endorsed by Serif Ltd.
What You Will Need
Our first step is to download the pumpkin image (see link below). You will also need your favorite Halloween pattern fill paper. If you don't have any, use the link below to make own. You will also need Illustrator®, Affinity® Designer and the Silhouette Studio® software. Finally, you will need a printer and the Cameo to cut the final pumpkin image.
Now we will use one of the filters in Illustrator to create our stamp effect.
- Open the pumpkin .jpg image into Illustrator.
- Reduce the size of the photo to fit on the canvas.
- From the top menu, click Effect - Sketch - Stamp. (see screenshot)
- Use the sliders to set the Light/Dark Balance and Smoothness to your liking.
- From the top menu, click the Image Trace button.
- Use the Default settings and click Expand.
- That's it. Export your image as an .pdf.
Now we will use the Image Trace feature to vectorize the results.
- Open the .pdf into Affinity Designer.
- In the Layers panel, delete any layers that contain white.
- Select the remaining layers. Right-click and choose Group.
- Name the group layer Pumpkin 1.
- Use the Pen tool to trace the outside edge of the pumpkin.
- Fill the traced pumpkin shape with black. (see screenshot)
- Click File - Open to open the pattern paper into Affinity Designer.
- Click Edit - Copy to make a copy of the paper.
- Go back to the pumpkin document and click Edit - Paste to add the paper on a new layer.
- Reduce the paper to the size of the pumpkin.
- Drag the paper below the black pumpkin.
- . Right-click on the black pumpkin layer and choose Mask to Below.
- Name this new layer Pumpkin 2.
- Drag the Pumpkin 1 layer above the Pumpkin 2 layer. (see screenshot)
- Save your work as an .afdesign file.
- Export your work as a .png file.
The .pdf will have many layers. We just need the black layers.
Now we will replace the black fill with the patterned paper.
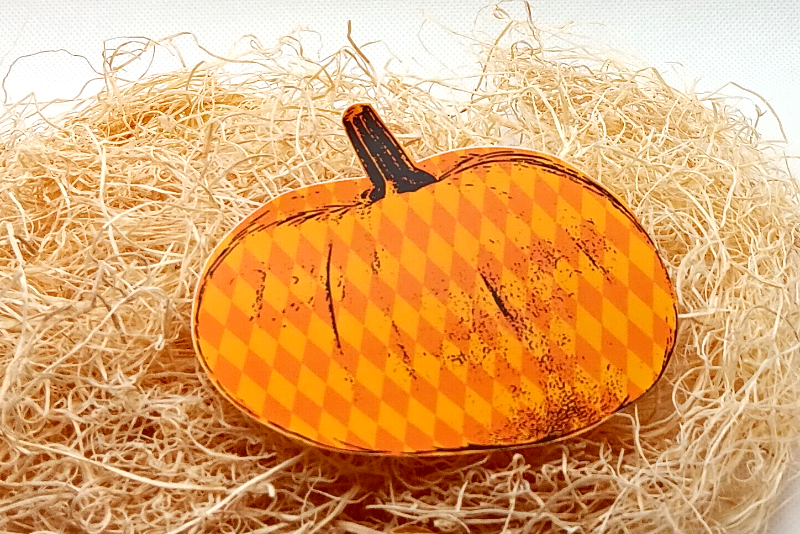
The pumpkin should become filled with the pattern. (see screenshot)
- Open Silhouette Studio.
- Select the DESIGN tab to go to the design area.
- Click File - Open and open the .png pumpkin image.
- Resize the pumpkin to be about 4 inches in height and width. If you want the pumpkin a different size that's fine. (see screenshot)
- On the PAGE SETUP panel, set the Machine to Auto Cameo 5, the Feed Type to Auto, the Cutting Mat to Cameo 12 x 12 in and the Media Size to 8.5 x 11 in. (see screenshot)
- Click the Registration icon at the top of the panel and turn on the Registration Marks. Keep the default settings. (see screenshot)
- Move the pumpkin inside the registration marks on the cutting area. (see screenshot)
- Click the SEND tab to go to the SEND panel.
- From the top menu, click the Send to Printer icon. When the print window opens, click the PRINT button. (see screenshot)
- Place the printed pumpkin on the cutting mat and place the mat in the Cameo for cutting.
- Going back to the Silhouette Studio, you should see the SEND button active. (see screenshot)
- Click the SEND button to cut out the pumpkin.
Now we are ready to print and cut.
Notice the red line around the outer edge of the pumpkin. This is the cutting line that the Cameo will use to cut out our pumpkin. But first we need to print the pumpkin.
This will print a copy of the pumpkin along with the registration marks.
Treat Bag Silhouette File
How to Make Halloween Pattern Papers
Pumpkin Photo on Unsplash
https://unsplash.com/@personal_graphic
The Silhouette Cameo 5 was supplied to me by Silhouette America.
Silhouette, Silhouette Studio, Silhouette Connect, PixScan, Silhouette CAMEO and Silhouette Portrait are either registered trademarks or trademarks of Silhouette America, Inc. Product screen shot(s) reprinted with permission from Silhouette America®, Inc.
© 2024 Adobe Systems Incorporated. All rights reserved. Adobe® product screen shot(s) reprinted with permission from Adobe Systems Incorporated. Adobe, Photoshop, Illustrator, InDesign is/are either [a] registered trademark[s] or a trademark[s] of Adobe Systems Incorporated in the United States and/or other countries.
Affinity® Designer screenshots used by permission of Serif® (Europe) Ltd. This article is not endorsed by Serif Ltd.

Related Articles
Editor's Picks Articles
Top Ten Articles
Previous Features
Site Map
Content copyright © 2023 by Diane Cipollo. All rights reserved.
This content was written by Diane Cipollo. If you wish to use this content in any manner, you need written permission. Contact Diane Cipollo for details.


