Scatter Brush Confetti in Illustrator CS6

One trend in styled photography is the use of confetti. It is an easy way to add a little color to any scene. Well, why not use the same technique in your vector mock-ups. Let's make a scatter brush in Illustrator® and create some confetti.
Of course, confetti can be in any shape but let's just use a circle. This circle will be the "cell" for our scatter brush.
If you wish to change the color of the confetti, change the Stroke color for the path.
If you wish to control each circle individually, select the path and choose Object - Expand Appearance from the top Menubar. This will release the circles from the path.
Copyright 2018 Adobe Systems Incorporated. All rights reserved. Adobe product screen shot(s) reprinted with permission from Adobe Systems Incorporated. Adobe, Illustrator is/are either [a] registered trademark[s] or a trademark[s] of Adobe Systems Incorporated in the United States and/or other countries.
Of course, confetti can be in any shape but let's just use a circle. This circle will be the "cell" for our scatter brush.
- With the Ellipse tool, draw a circle about 20 x 20 px.
- Set the Stroke to null and the Fill to the color of your choice.
Now we can turn this circle into our scatter brush. - With the circle selected, choose New Brush from the Brushes panel menu.
- In the New Brush window, select the Scatter Brush and click OK.
Let's keep the default settings for the Scatter Brush Options. - Click OK to close the Scatter Brush Option window.
- Draw a path with the Pen tool.
- Apply the new scatter brush to the path. You should see a row of circles along the path.
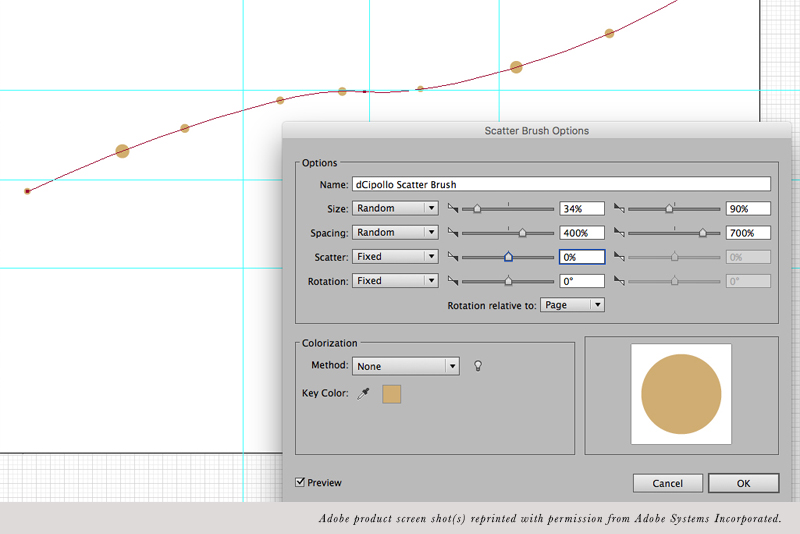
Now we can adjust the brush options to create our confetti. - Double-click on the new brush icon in the Brushes pane to open the Scatter Brush Options window. Check the box next to Preview, so that we can see the result of our new settings in real time.
The first setting is for Size. At Fixed and 100% the circles are all the same size. Let's change the setting to Random and use the sliders to set the size variation. - Now, set the Size menu to Random.
- Adjust the sliders until you get a nice variation in the size of the circles.
The Spacing setting controls the amount of space between circles. - Set the Spacing menu to Random and adjust the slider controls until you get a spacing variation that you like.
The Scatter setting controls the amount of space between the circles and the path. - Set the Scatter menu to Random and adjust the sliders.
The Rotation setting controls the amount the circles will rotate. Of course, a circle will look the same at any rotation. So we can keep the default setting for this. However, if your beginning shape is something like a star, you will want to set the Rotation to Random and adjust the sliders. - In the Colorization section, we will use the Method menu to set this option.
- Click OK to close the window. When prompted, choose Apply to Strokes in the next window.
- Delete the original circle shape.
If you wish to change the color of the confetti, change the Stroke color for the path.
If you wish to control each circle individually, select the path and choose Object - Expand Appearance from the top Menubar. This will release the circles from the path.
Copyright 2018 Adobe Systems Incorporated. All rights reserved. Adobe product screen shot(s) reprinted with permission from Adobe Systems Incorporated. Adobe, Illustrator is/are either [a] registered trademark[s] or a trademark[s] of Adobe Systems Incorporated in the United States and/or other countries.

Related Articles
Editor's Picks Articles
Top Ten Articles
Previous Features
Site Map
Content copyright © 2023 by Diane Cipollo. All rights reserved.
This content was written by Diane Cipollo. If you wish to use this content in any manner, you need written permission. Contact Diane Cipollo for details.


