
Wix Website from Scratch - The Header Menu
In this tutorial, we will continue to work on our Wix website that we have started from a blank template. We will add a main menu in the header section.
Our first task is to add a color background to the Header.
Our first task is to add a color background to the Header.
- Select the Header and click the Change Header Design button.
At this point, the Header is set to No color. Let's change that to white. - Click the Header design just below the No color.
- Click the Customize Design button at the bottom of the window.
- Set the Fill Color & Opacity setting to 100% white for the Background and Center Background.
- For the Border settings, set the Top Border and Bottom Border Width to 0.
- Set the Corners Radius to 0 and turn off the Enable Shadow.
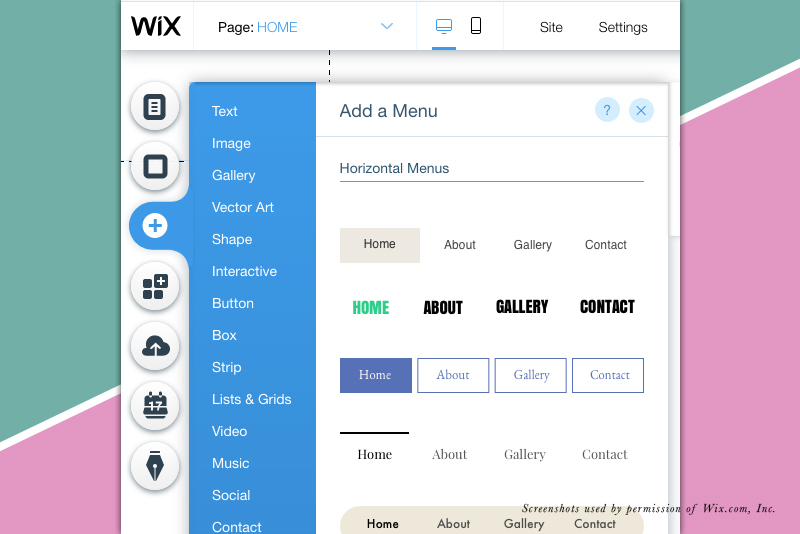
- From the left menu, click the Plus icon and choose Menu from the list.
- Click on one of the Horizontal menus to add it to the page.
You will see a new menu on the page with the link for our one page - Home. - Click and drag the menu to the header section. When you see the text Attach to Header, release the menu.
Because we will be centering our menu on the page, we will extend the menu box across the 980 px width. - With the menu box selected, drag the ends of the box to fill the 980 area. Use the left and right guidelines as a guide.
The menu should be already set to center by default. You can see this because the Home link is in the center of the box. Now, we can customize the menu. - With the menu still selected, click the Design icon (paint brush) to open the Horizontal Menu Design window. Click the Customize Design button at the bottom of the window.
If you click on Fill Color & Opacity, you will see that the menu background is already set to 100% white. Let's keep this setting and move on to the text.
In the previous tutorial, we set the font to Futura Light for the main text theme. Let's do the same for the menu. - Click on the T icon to open the Text settings section.
- Click the arrow at the right of the Font section and choose Futura Light from the list.
Let's keep the default color setting for the Regular menu text. But we will change the Hover and Clicked menu text color to gold. - Click the Hover link in the window. Click the color box to open the Color Picker. Click the Add Color link, change the Color setting to # bc9b5d and click the Add button. Close the Color Picker.
- Repeat the previous step for the Clicked setting. But this time, you can choose the gold color from the My Colors area.
Finally, we want to change the default text for the page link from HOME to the name of the website. - With the menu still selected, click the Manage Menu button from the pop up menu.
- From the Pages menu, find the HOME page and click the link to the right. Choose Rename from the list. Add the new link title and click Done.
Our next task is to resize the header section to just a little more than the height of the menu. - Select the menu and drag it upwards to the top of the header area.
- Click an empty area of the header to see the Stretch handle. Drag the handle upwards.

Related Articles
Editor's Picks Articles
Top Ten Articles
Previous Features
Site Map
Content copyright © 2023 by Diane Cipollo. All rights reserved.
This content was written by Diane Cipollo. If you wish to use this content in any manner, you need written permission. Contact Diane Cipollo for details.


