
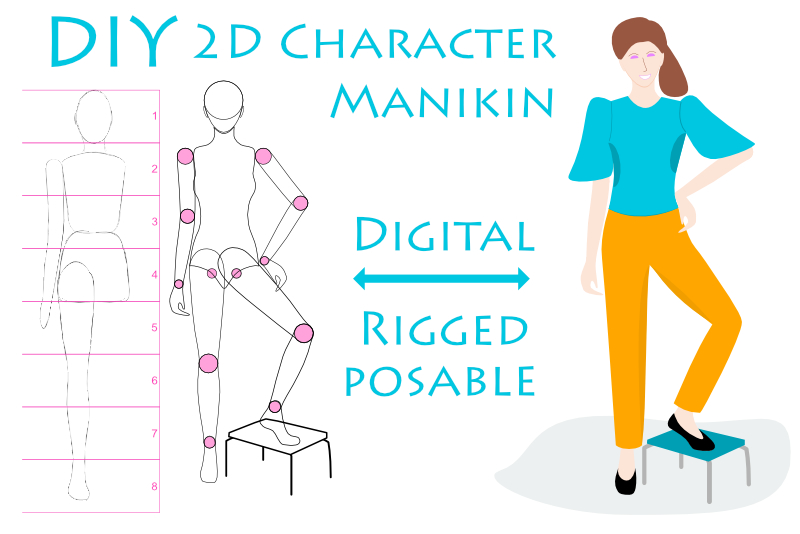
Digital Manikin Body Proportions
In this second Affinity Designer tutorial in the series, we will continue to work on our digital manikin. At this point, you have a rough sketch of your manikin. Let's take a look at the body proportions for your manikin and make any adjustments needed before we draw the final line art. We will learn how to use the Heads Count method for testing the body proportions.
Our first step is to measure the height of the head of the manikin. We will do this by drawing a three sided rectangle around the head. Let's use a different color for the stroke lines, so that we can easily see them. Then we will duplicate this three sided rectangle several times and stack them vertically. We will use this stack of rectangles as a "measuring stick", to make adjustments to the body proportions of the manikin.
In our next tutorial, we will take a closer look at the head of the manikin.
Our first step is to measure the height of the head of the manikin. We will do this by drawing a three sided rectangle around the head. Let's use a different color for the stroke lines, so that we can easily see them. Then we will duplicate this three sided rectangle several times and stack them vertically. We will use this stack of rectangles as a "measuring stick", to make adjustments to the body proportions of the manikin.
- Turn off the visibility of your reference image layer, by unchecking the box on the right.
- Select the Pen tool and set the Mode to Polygon in the Context Toolbar (see screenshot). Set the Stroke color to red or your color choice.
- To draw a straight line above the manikin's head, hold down the Shift key and click once on the Canvas next to the top and right side of the manikin's head with the Pen tool and again at the top of the other side of the head (see screenshot).
- Continuing to draw the rectangle, move down to the bottom of the manikin's chin and click on the left side of her chin.
- Finally, finish the three-sided rectangle by clicking at the bottom of the right side of her chin.
- In the Layers panel, name this new layer head.
- In the Layers panel, right-click on the head layer and choose Duplicate from the popup menu.
- Select the bottom head layer. On the Canvas, drag the rectangle downward until the top of the second rectangle overlaps the bottom of the rectangle above it (see screenshot).
- Repeat the previous steps until you have 8 rectangles stacked vertically on the Canvas.
- Optional: If you wish, you can number the rectangles on the Canvas.
- In the Layers panel, select all of the head and number layers. Right-click and choose Group. Name this new Group layer proportions (see screenshot).
Now that we have the head measurement, we can build our "measuring stick" (see screenshot).
- The bottom line of the second rectangle should stop at the breast line.
- The bottom line of the third rectangle should be at the navel line.
- The bottom line of the fourth rectangle should end at the groin.
- The bottom line of the fifth rectangle should end slightly above the knee.
- The bottom line of the sixth rectangle should end below the knee and at the wider part of the lower leg.
- The bottom line of the seventh rectangle should end just above or at the ankle.
- The wrist should be aligned with the groin.
- The elbow should be almost at the waistline.
- The width of the shoulders should be slightly more than double the width of the head.
- Save your work.
Some other things to check are the following.
In our next tutorial, we will take a closer look at the head of the manikin.
INDEX - Artist Manikin in Affinity Designer
Screenshots used by permission of Serif (Europe) Ltd. This article is not endorsed by Serif Ltd.
Related Articles
Editor's Picks Articles
Top Ten Articles
Previous Features
Site Map
Content copyright © 2023 by Diane Cipollo. All rights reserved.
This content was written by Diane Cipollo. If you wish to use this content in any manner, you need written permission. Contact Diane Cipollo for details.


