
Sewing Instructions for Bitty Baby Blouse

Here are sewing directions to make the Bitty Baby blouse. For the pattern pieces Click here. To see a photo of the blouse Click here.
This pattern is my own design. You may use the pattern for yourself or gifts but you may not use it commercially.
To begin, sew the front pieces to the back piece at the shoulders. Then hem one long side of the collar. Gather the unfinished long side of the collar, using a long basting stitch, to fit the neck edge of the blouse and stitch it in place with both right sides facing up.
Turn under the center front edge of both front pieces, 1/4 inch, twice, and hem in place. Turn both short edges of the collar (the center front) toward the inside, 1/4 inch, twice, and stitch it to the inside of the blouse front. The collar should now be laying flat against the blouse front. Refer to the photo below to see what the collar and trim should look like when completed.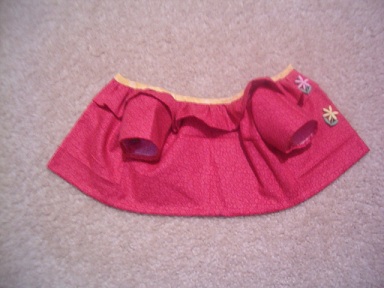
Take the piece of contrasting fabric and turn both long sides to the wrong side, 1/4 inch. Then fold it in half, the long way, with the right side on the outside. This should look like a piece of double fold bias tape. Line up one of the long,raw edges with the neck edge of the blouse and collar and stitch in place, easing the trim to fit around the curve of the neck, using the fold as a stitching line, having the right side of the trim facing the right side of the collar. Fold the trim up at the stitching line and over the raw neck edge. The neck edge should be at the center fold of the trim. Turn under the edge fold and using a hem stitch, sew the trim to the wrong side of the blouse front and back. If you are familiar with using double fold bias tape, this is the same technique. To finish off the center front trim and collar edge, turn the edges of the trim to the inside and stitch closed using Ladder Stitch.
Using a long basting stitch, gather the curved, shoulder edge of both sleeves and ease to fit them to the shoulders of the dress, matching the center fold line of the sleeves with the shoulder seams. Stitch in place with right sides together and clip curves. Hem the sleeves by turning up the bottom edge 1/8 inch, twice, and stitch in place. Pin and stitch side seams and sleeve seams.
Hem the bottom of the blouse and attach the Velcro dots to close the blouse. Place the decorative buttons directly over the dots, on the top side of the blouse.
Making and Dressing Cloth Dolls
Ebook with patterns and instructions to make 5 cloth dolls as well as chapters on general doll making techniques.The book includes 21 inch Lalena Doll, 21 inch David Doll, Bear Dolls, 9 inch Destiny Doll and 15 inch Annie Doll, all together in one handy book. 53 pages.Making and Dressing Cloth Dolls.

Related Articles
Editor's Picks Articles
Top Ten Articles
Previous Features
Site Map
Content copyright © 2023 by Helen B. Wharton. All rights reserved.
This content was written by Helen B. Wharton. If you wish to use this content in any manner, you need written permission. Contact Helen B. Wharton for details.
