
Decoupaged Craft Box

 Decoupage is a popular Victorian craft, and comes from the French term “decouper” which means “to cut out”. Traditionally, a perfect decoupage would make it look like the image is painted on or inlaid, rather than glued on. To achieve this look, several coats of varnish are laid onto the surface, with each layer sanded between coats. Pains are also taken to cut out the image very neatly, leaving no borders around it. Today we’ll try our hand at decorating an ordinary craft box using basic decoupage techniques. Let’s start!
You will need:
* Craft box
* Image cutout
* Acrylic paint
* Decoupage medium like Mod Podge
* Acrylic sealer
* Dimensional paint
* Wax paper
* Fine grit sandpaper
* Paint brush or foam brush
* Sharp, fine tipped scissors
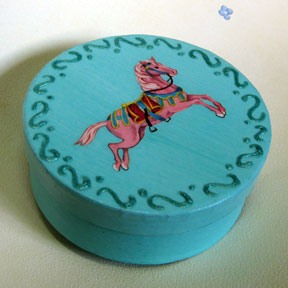
Choose an image that will fit on the surface of your box, and choose a paint color to match it. I've cut out an image of a horse from a discarded vintage schoolbook, but you can also use images from gift wrapper, greeting cards, or calendars. If the paper is thin, you may need to coat it first with acrylic sealer.
Carefully cut out the shape using sharp fine tipped scissors, cutting as close as you can to the edge of the image. Set the cutout aside.
Paint the craft box with a base coat of acrylic paint. Let dry, then apply one to two more coats of paint, allowing the paint to dry thoroughly between coats. Lightly sand the painted surface with fine grit sandpaper to smoothen it. Wipe off the dust with a clean rag.
Apply a medium coat of Mod Podge to the back of the cutout. Stick the cutout in place, put a piece of wax paper over it waxy side down, and burnish the cutout with your fingers to flatten it (you can also use a brayer). The wax paper keeps your fingers from getting messy and sticking to the cutout. Remove the wax paper, and brush a medium coat of Mod Podge onto the entire surface and sides of the box lid. Set this aside to dry for at least 15 minutes. When dry, apply two more coats of Mod Podge, allowing a drying time of 15 minutes between coats.
When completely dry, sand the surface lightly and wipe off the dust. Coat the box lid with acrylic sealer to remove the tackiness and allow it to dry. Draw some S-shaped swirls and dots around the lid with dimensional paint and let it dry completely.
Since the base of the box isn't decoupaged, it needs only a final coat of acrylic sealer.

Related Articles
Editor's Picks Articles
Top Ten Articles
Previous Features
Site Map
Content copyright © 2023 by Mia C. Goloy. All rights reserved.
This content was written by Mia C. Goloy. If you wish to use this content in any manner, you need written permission. Contact Mia C. Goloy for details.
