
Paper-thin Paper Pendants

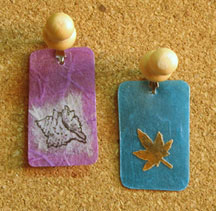 Today, let’s make some paper jewelry with a twist: paper-thin pendants! At first glance these paper pendants may seem flimsy, but they’re actually sturdy enough to withstand accidental folding or tearing. The secret is a piece of acetate from packaging material or an overhead transparency, which is sandwiched between two pieces of paper. These pendants are made with thin paper like vellum and mulberry, which makes them translucent when you hold them up to the light, giving them a light, airy look, but you can make them using other kinds of paper. Have fun experimenting, as I’ve had with these!
You will need:
* Scraps of acetate
* Scraps of mulberry paper
* Scraps of colored vellum
* Gloss gel medium
* Bails or jump rings (one for each pendant)
* Scissors
* Rubber brayer or similar object
* Craft punch
* Rubber stamp with small image
* Solvent stamp pad
* Awl or puncher
With a pair of scissors, cut acetate shapes for the pendants. Round any sharp corners. Don’t worry if the shapes aren’t perfectly square, rectangular or round – this actually adds to the pendants’ charm!
For each pendant, cut out two pieces of paper for the background – either (a) vellum or (b) mulberry – that are larger than the acetate shape. Apply a thin coat of gloss gel medium to one side of the acetate, and adhere one piece of paper to it. Flatten the paper with a brayer or similar object. Apply gel medium to the other side of the acetate, adhere the other piece of paper, and flatten it with a brayer. When dry, trim off the excess paper.
(a) For the vellum pendant, punch a shape from another piece of vellum using a craft punch. Apply gloss gel medium to the back of the punched shape. Note that the vellum will curl; you’ll have to carefully flatten it out with your fingers when attaching it to the pendant. Flatten it further with a brayer to make sure it sticks well. Let dry
(b) For the mulberry pendant, stamp an image onto a different color scrap of mulberry paper. Carefully tear around the image. Apply gel medium to the back of the image and attach it to the pendant. Flatten the paper with a brayer. When dry, trim off any excess paper.
Coat both sides of the pendant with gloss gel medium to seal it. Let it dry completely. Using an awl or small puncher, make a hole at the top of the pendant, then insert the bail or jump ring. Add the pendant to a necklace of your choosing, although a fine chain or a floating necklace made with tiger tail beading wire (very fine steel cable enclosed in nylon) will complete the light, delicate look.

Related Articles
Editor's Picks Articles
Top Ten Articles
Previous Features
Site Map
Content copyright © 2023 by Mia C. Goloy. All rights reserved.
This content was written by Mia C. Goloy. If you wish to use this content in any manner, you need written permission. Contact Mia C. Goloy for details.
