
Easy Butterfly Embellishment

Perhaps the easiest way to make paper butterflies is to punch them out of patterned paper using a craft punch or die cut machine, but if you don’t have either of these tools, cutting out butterflies with a scissors can be tedious work. One way to easily make paper butterflies without the help of a die cut machine or craft punch – and without doing a lot of cutting – is to use twisted paper cord and twist ties. With a few snips and twists, you’ll have a bunch of butterflies in no time!
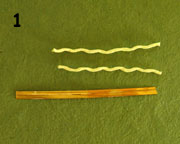
You will need (for one butterfly; see photo 1):
* Paper cord, 5 inches (The one used here is about ¾ inch wide when untwisted)
* Twist tie (around 3 inches in length)
* Scissors
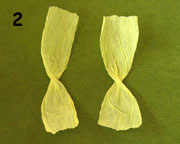
Cut two pieces of paper cord, each measuring 2-1/2 inches. Untwist or unroll the paper. Twist each piece once, about a third of the way from one end, to form a bow shape. Set aside (photo 2).
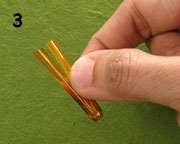
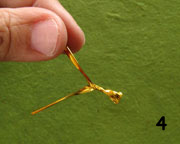
Bend the twist tie in half (photo 3), then twist the wire into a Y shape until the twisted portion (the tail of the Y) is about half an inch long (photo 4). Set aside.
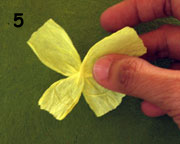
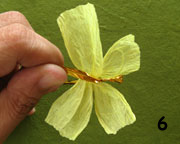
Take the paper and cross the pieces at the twisted point (photo 5). Now take the twisted wire, and insert the crossed paper between the prongs of the Y such that the shorter sections of the paper are towards the tail of the Y (photo 6).
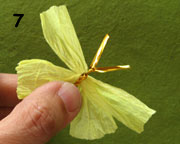
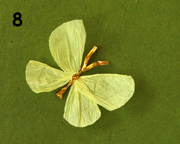
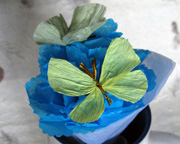
Twist the ends of the wire to secure the paper, leaving about ¼ to ½ inch untwisted for the antennae (photo 7). Adjust the paper and wire so that the whole thing resembles a butterfly, and then trim the ends of the paper to make them resemble butterfly wings (photo 8). Trim the antennae if they’re too long.
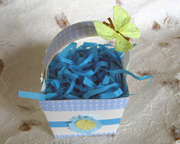
There you have it – an easy way to make a butterfly! Make several and use them to decorate gift boxes, frames or cards. Attach them to your project with hot glue or an all-purpose household glue like Duco Cement.
You will need (for one butterfly; see photo 1):
* Paper cord, 5 inches (The one used here is about ¾ inch wide when untwisted)
* Twist tie (around 3 inches in length)
* Scissors
Cut two pieces of paper cord, each measuring 2-1/2 inches. Untwist or unroll the paper. Twist each piece once, about a third of the way from one end, to form a bow shape. Set aside (photo 2).
Bend the twist tie in half (photo 3), then twist the wire into a Y shape until the twisted portion (the tail of the Y) is about half an inch long (photo 4). Set aside.
Take the paper and cross the pieces at the twisted point (photo 5). Now take the twisted wire, and insert the crossed paper between the prongs of the Y such that the shorter sections of the paper are towards the tail of the Y (photo 6).
Twist the ends of the wire to secure the paper, leaving about ¼ to ½ inch untwisted for the antennae (photo 7). Adjust the paper and wire so that the whole thing resembles a butterfly, and then trim the ends of the paper to make them resemble butterfly wings (photo 8). Trim the antennae if they’re too long.
There you have it – an easy way to make a butterfly! Make several and use them to decorate gift boxes, frames or cards. Attach them to your project with hot glue or an all-purpose household glue like Duco Cement.

Related Articles
Editor's Picks Articles
Top Ten Articles
Previous Features
Site Map
Content copyright © 2023 by Mia C. Goloy. All rights reserved.
This content was written by Mia C. Goloy. If you wish to use this content in any manner, you need written permission. Contact Mia C. Goloy for details.
