
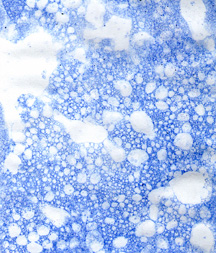
Make Decorative Paper with Soap Bubbles

Here's a fun way to make your own decorative paper: blow colored soap bubbles!
You will need:
* 1 tablespoon liquid tempera paint
* 1 tablespoon liquid dishwashing soap
* 1/4 cup water
* disposable plastic cup or similar container
* drinking straw
* white paper or cardstock
Mix the water, paint and soap in a container. Stick the straw into the solution, and blow bubbles so that they start to rise over the edge of the container. Remove the straw then lower the surface of the paper onto the bubbles to pick up the paint, and let the bubbles pop on their own. Blow more bubbles and make another print, repeating the process until the entire piece of paper is decorated. Let dry before using.
Tips:
You can use a second or even third color on the same piece of paper, as long as you mix each color in its own container. The overlapping colors and patterns can give beautiful results.
Vary the size of the bubbles for more interest. Big bubbles leave lots of white space, while frothy little bubbles caused by stirring the solution create a denser pattern.
You can use drawing ink instead of tempera. Mix one part ink to one part water, and add enough dishwashing soap to make it bubble.
You can also use food coloring. Mix ½ cup of water, ¼ cup of dishwashing soap, 1 teaspoon of sugar and a few drops of food coloring of your choice.
If a young child will be blowing bubbles, pierce a hole near the top of the straw to prevent him or her from drinking the solution.
Sample Project: Sailboat Card
Soap bubble paper can be used in just about any project - note paper, gift tags, greeting cards and bookmarks are popular examples. For the card below, you will need:
* Blue soap bubble cardstock, 8-1/2 x 5-1/2 inches
* Dark blue cardstock, 1 x 1 inch
* Dark blue cardstock, 4-1/4 inches x ½ inch
* Aqua vellum, 2-3/4 x 2-3/4 inches
* Light blue vellum, 1-1/4 x 1-1/4 inches
* Sailboat charm
* Ruler
* Craft knife and cutting mat or paper trimmer
* Scissors
* Glue
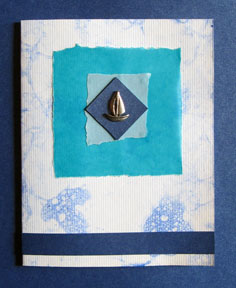
Measure and cut the soap bubble cardstock to the specified size. Score and fold it in half.
Measure and tear the aqua and light blue vellum to the specified sizes; they don’t need to be perfect squares. Glue the aqua vellum to the card, and glue the light blue vellum on top of it.
Measure and cut the dark blue cardstock to the specified sizes. Glue the sailboat charm to the square. Let dry completely before gluing the square to the light blue vellum.
Glue the strip of dark blue cardstock near the bottom of the card.
You will need:
* 1 tablespoon liquid tempera paint
* 1 tablespoon liquid dishwashing soap
* 1/4 cup water
* disposable plastic cup or similar container
* drinking straw
* white paper or cardstock
Mix the water, paint and soap in a container. Stick the straw into the solution, and blow bubbles so that they start to rise over the edge of the container. Remove the straw then lower the surface of the paper onto the bubbles to pick up the paint, and let the bubbles pop on their own. Blow more bubbles and make another print, repeating the process until the entire piece of paper is decorated. Let dry before using.
Tips:
You can use a second or even third color on the same piece of paper, as long as you mix each color in its own container. The overlapping colors and patterns can give beautiful results.
Vary the size of the bubbles for more interest. Big bubbles leave lots of white space, while frothy little bubbles caused by stirring the solution create a denser pattern.
You can use drawing ink instead of tempera. Mix one part ink to one part water, and add enough dishwashing soap to make it bubble.
You can also use food coloring. Mix ½ cup of water, ¼ cup of dishwashing soap, 1 teaspoon of sugar and a few drops of food coloring of your choice.
If a young child will be blowing bubbles, pierce a hole near the top of the straw to prevent him or her from drinking the solution.
Sample Project: Sailboat Card
Soap bubble paper can be used in just about any project - note paper, gift tags, greeting cards and bookmarks are popular examples. For the card below, you will need:
* Blue soap bubble cardstock, 8-1/2 x 5-1/2 inches
* Dark blue cardstock, 1 x 1 inch
* Dark blue cardstock, 4-1/4 inches x ½ inch
* Aqua vellum, 2-3/4 x 2-3/4 inches
* Light blue vellum, 1-1/4 x 1-1/4 inches
* Sailboat charm
* Ruler
* Craft knife and cutting mat or paper trimmer
* Scissors
* Glue
Measure and cut the soap bubble cardstock to the specified size. Score and fold it in half.
Measure and tear the aqua and light blue vellum to the specified sizes; they don’t need to be perfect squares. Glue the aqua vellum to the card, and glue the light blue vellum on top of it.
Measure and cut the dark blue cardstock to the specified sizes. Glue the sailboat charm to the square. Let dry completely before gluing the square to the light blue vellum.
Glue the strip of dark blue cardstock near the bottom of the card.
You Should Also Read:
Instant Gratification Cards - Book Review

Related Articles
Editor's Picks Articles
Top Ten Articles
Previous Features
Site Map
Content copyright © 2023 by Mia C. Goloy. All rights reserved.
This content was written by Mia C. Goloy. If you wish to use this content in any manner, you need written permission. Contact Mia C. Goloy for details.
