
How to Make a Stitched Book

Do you like jotting down your thoughts on paper, or sketching ideas for your next paper craft project? Then you might enjoy making a blank book for your own use. This handmade book consists of unlined pages stitched together between a soft cover, and it can be completed in less than an hour. Three books bundled together and tied with a pretty ribbon will make a lovely a gift for a special person!
You will need:
* Four sheets of letter size (or A4) text weight paper, cream or white
* One piece of colored cardstock, 8-1/2 by 5-1/2 inches (or A5 size)
* One piece decorative paper, 8-1/2 by 3 inches
* Thread, about 24 inches long
* Needle
* Ruler
* Craft knife and cutting mat
* Bone folder
* Pushpin, compass or awl for piercing holes
* Glue stick
Measure, mark and cut the colored cardstock to the specified size. Score and fold the cardstock in half crosswise using a bone folder. This will be the book's cover.
Cut the text weight paper in half crosswise to get eight sheets of paper. Fold each sheet in half crosswise, and then nest the pages. Insert the folded sheets into the cardstock cover. Open the pages to the centerfold so that the cover is under the stack. Pierce a hole in the middle of the fold, going all the way through to the cover. Pierce another hole on the fold about one inch from the first hole, and pierce a third hole one inch from the middle hole on the opposite side.
Thread the needle and double the thread. Starting from the inside of the book, push the needle through the middle hole, and leave about 6 inches of thread hanging. From outside the book, sew through the top hole, then through the bottom hole, and then sew back into the middle hole (the needle should be back inside the book). Make sure that the stitches are taut. With one end of the thread on each side of the inside stitch, knot the ends of the thread together with a square knot, and trim the thread ends to about 1/4 of an inch.
Close the book. With a ruler, a sharp craft knife and cutting mat, carefully trim the excess paper sticking out of the front edge of the book so that the pages are flush with the cover. It's best to trim the pages a little at time, to avoid tearing, going layer by layer until all the pages have been trimmed.
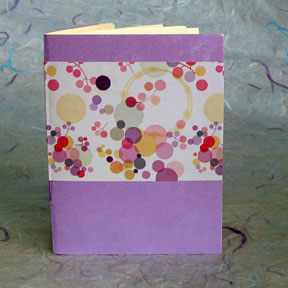
You now have a basic saddle-stitched book, which you can decorate as you please! To make a book like the one in the photo, for example, cut a strip of matching decorative paper measuring 8-1/2 by 3 inches, and stick it across the back and front covers. You may decorate the book further by adding a label or other embellishments on the cover, or by stamping images in the corner of individual pages.
You will need:
* Four sheets of letter size (or A4) text weight paper, cream or white
* One piece of colored cardstock, 8-1/2 by 5-1/2 inches (or A5 size)
* One piece decorative paper, 8-1/2 by 3 inches
* Thread, about 24 inches long
* Needle
* Ruler
* Craft knife and cutting mat
* Bone folder
* Pushpin, compass or awl for piercing holes
* Glue stick
Measure, mark and cut the colored cardstock to the specified size. Score and fold the cardstock in half crosswise using a bone folder. This will be the book's cover.
Cut the text weight paper in half crosswise to get eight sheets of paper. Fold each sheet in half crosswise, and then nest the pages. Insert the folded sheets into the cardstock cover. Open the pages to the centerfold so that the cover is under the stack. Pierce a hole in the middle of the fold, going all the way through to the cover. Pierce another hole on the fold about one inch from the first hole, and pierce a third hole one inch from the middle hole on the opposite side.
Thread the needle and double the thread. Starting from the inside of the book, push the needle through the middle hole, and leave about 6 inches of thread hanging. From outside the book, sew through the top hole, then through the bottom hole, and then sew back into the middle hole (the needle should be back inside the book). Make sure that the stitches are taut. With one end of the thread on each side of the inside stitch, knot the ends of the thread together with a square knot, and trim the thread ends to about 1/4 of an inch.
Close the book. With a ruler, a sharp craft knife and cutting mat, carefully trim the excess paper sticking out of the front edge of the book so that the pages are flush with the cover. It's best to trim the pages a little at time, to avoid tearing, going layer by layer until all the pages have been trimmed.
You now have a basic saddle-stitched book, which you can decorate as you please! To make a book like the one in the photo, for example, cut a strip of matching decorative paper measuring 8-1/2 by 3 inches, and stick it across the back and front covers. You may decorate the book further by adding a label or other embellishments on the cover, or by stamping images in the corner of individual pages.
You Should Also Read:
Accordion Book Project
Bookmaking

Related Articles
Editor's Picks Articles
Top Ten Articles
Previous Features
Site Map
Content copyright © 2023 by Mia C. Goloy. All rights reserved.
This content was written by Mia C. Goloy. If you wish to use this content in any manner, you need written permission. Contact Mia C. Goloy for details.
