
Make a Paper Cast Tag

 Molds designed specifically for paper casting are made from terra cotta, and can be baked in an oven to speed up drying. You can, however, use different everyday objects and still get beautiful results – rubber stamps, metal cookie cutters, plastic chocolate molds, wooden blocks, and seashells are just a few examples. In today’s project we’ll use a mold cut from foam board. Choose a design with simple lines, as you’ll be cutting the board with a craft knife.
You will need:
* Foam board
* Star template (Use this or make your own)
* Paper pulp
* Text (stamped, computer printed, or taken from a old book or magazine)
* Glitter
* Ribbon, floss or similar material
* Mod Podge or acrylic gel medium
* Pencil
* Craft knife
* Cutting mat
* Awl
* Wire or plastic screen
* Large bowl
* Sponge
* Paper towels
To make paper pulp:
Tear some uncoated paper (brown paper bags, note paper, handmade paper, junk mail, tissue paper, egg cartons, etc.) into small pieces and soak them in a container of water. Mix and mash the pulp by hand until you get a slurry mixture. A faster way is to use a blender – toss in the torn paper, add water, and blend until the mixture turns into pulp. Set aside.
To make the mold:
Using the template as a guide, trace the design onto a piece of foam board. Cut it out using a craft knife and cutting mat, leaving the negative (the outer part of the design). This will be your mold.
To make the cast:
Put the screen over a large bowl to catch the water, and then put the mold on the screen. Slowly pour some pulp into the mold to fill it, allowing the water to drain. Add more pulp if needed. Press the sponge against the pulp to absorb the rest of the water in the mold, squeeze out the sponge, and repeat as necessary. Use a paper towel to absorb any remaining water, and then set aside the mold and pulp to dry.
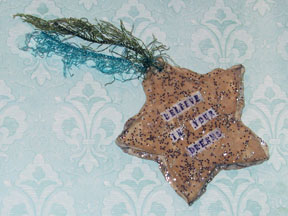
When thoroughly dry, carefully remove the paper cast from the mold. Cut some text and glue it on the middle of the paper cast. Brush on a coat of Mod Podge or acrylic gel medium, and sprinkle on some glitter if desired. When dry, use an awl to punch a hole on the paper cast. Thread a ribbon through the hole, and knot.
You Should Also Read:
The Basics of Paper Casting

Related Articles
Editor's Picks Articles
Top Ten Articles
Previous Features
Site Map
Content copyright © 2023 by Mia C. Goloy. All rights reserved.
This content was written by Mia C. Goloy. If you wish to use this content in any manner, you need written permission. Contact Mia C. Goloy for details.
