
"Live, Laugh, Love" Wall Plaque

 Reflecting on inspirational quotes is a wonderful way to keep yourself motivated when things don’t seem to be going your way. Why not make a wall plaque featuring your favorite saying and hang it where you can see it often?
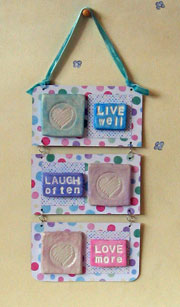
This wall plaque reminds us to live well, laugh often, and love more, but you can adapt this project to feature any short quote. The project uses stamped paper clay mounted on heavy cardboard. Our example uses a discarded board book cut down to size, but any thick cardboard will do – illustration board or double-wall corrugated cardboard will work just as well.
You will need:
* Heavy cardboard, three pieces each measuring 5 inches by 2-3/4 inches
* Decorative paper in coordinated designs
- Three pieces measuring 5 inches by 2-3/4 inches
- Three pieces measuring 2 inches by 2 inches
* White paper clay or any air-hardening clay
* Acrylic or poster paint
- White
- Other matching colors. Our example uses light blue, pink, and lavender.
* Paint brush
* Water-based metallic pastels, metallic paint or similar coloring medium in matching colors
* Heart stamp
* Alphabet stamps; letters are about 1/4-inch high
* 14 pieces of 5mm jump rings
* Ribbon, 12 inches
* Plastic wrap
* Cylindrical bottle or rolling pin to flatten the clay
* Ruler
* Pencil
* Craft knife and cutting mat
* Strong craft glue
* Paper punch or awl
* Heat gun (optional)
* Chain nose pliers (optional)
Protect your work surface with a piece of plastic wrap. Knead and roll out the paper clay to a thickness of about 1/8 inch. Using a craft knife, cut three squares or tiles measuring 1-7/8 inches. Stamp a heart on each square. Smooth out the edges of the squares with your fingers before setting them aside to dry. You may also want to use a heat gun to speed up the process.
When the heart tiles are dry, color them with metallic pastels by applying the color with your finger tips. This way the color is easier to control.
Knead and roll out another sheet of paper clay that's 1/8 inch thick. Leaving enough allowance between each phrase, stamp the following phrases: "Live well", "Laugh often" and "Love more". Cut around the phrases with a craft knife and smooth out the edges of the tiles before setting them aside to dry.
Paint the word tiles with white acrylic paint and let dry completely before painting the raised areas with color. Leave the letters white; if you happen to get color into them, simply wipe it off, and paint over the letters again with white paint. Set aside to dry.
Measure, mark and cut the cardboard to the specified size. You may want to round the top corners of the topmost panel and the bottom corners of the bottommost panel. Paint the edges of the cardboard with white acrylic paint and let dry.
Cover one side of the cardboard panels with decorative paper. Measure, mark and cut three 2-inch squares from the matching decorative paper. Using the photo as a guide, glue the paper squares on alternating sides of the cardboard panels: on the right side for the top and bottom panels, and on the left side for the middle panel.
Using strong glue, attach the word tiles to the paper squares. Attach the heart tiles beside them. Let dry completely.
Punch two holes about 1/8 of an inch from on the top and bottom edges of the first and middle panels, and on the top edge of the last panel. Attach a jump ring to each of the holes and close the ring; you may need to use a pair of chain nose pliers for this. Connect the panels by joining the jump rings with a third jump ring (there’s no need to add another jump ring to the topmost rings).
Thread a length of ribbon through the topmost jump rings, and secure the ends with knots. Now hang up your wall plaque and remember to live, laugh and love!

Related Articles
Editor's Picks Articles
Top Ten Articles
Previous Features
Site Map
Content copyright © 2023 by Mia C. Goloy. All rights reserved.
This content was written by Mia C. Goloy. If you wish to use this content in any manner, you need written permission. Contact Mia C. Goloy for details.
