
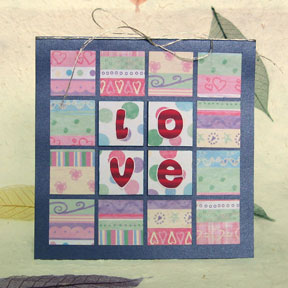
Tiled Greeting Card

Take a piece of cardstock and cover it with colorful squares to send cheerful greetings! This project shows one way to recycle scraps of patterned paper, and the card’s shape lends itself well to a number of variations. The card can have either a top fold or side fold, depending on the orientation of the letters. And because the grid is 4 x 4 in size, you can also have the letters in one row or in one column, instead of in a center block, or in a diagonal going down from left to right. You can even have the letters in a one quarter of the grid, if you choose.
You will need:
* Cardstock, 5 x 10 inches
* Onion skin paper or any lightweight writing paper, 4-1/2 x 9-1/2 inches
* Assorted patterned paper, cut into sixteen 1-inch squares. Scraps make perfect candidates for this!
* Chipboard, cut into four 1-inch squares
* Stickers or cut-out letters spelling "LOVE", a little less than an inch high. Rubber stamped and embossed letters work very well too!
* Metallic marker
* Metallic embroidery floss, 24 inches long
* Ruler
* Pencil
* Craft knife and cutting mat, or paper trimmer
* Scissors
* Craft glue or glue stick
Measure, mark and cut the cardstock to the specified size. Fold this in half crosswise to end up with a square card.
Measure, mark and cut the onion skin paper to the specified size and fold it in half crosswise.
Measure, mark and cut the patterned paper and chipboard into one-inch squares. Take four of the patterned paper squares, and stick each one to a chipboard square. Stick each of the letters onto the front of a covered chipboard square, and then color the edges of the chipboard with a metallic marker. Set the chipboard squares aside.
Using the photo as guide, arrange all the squares on the front of the card in a 4 x 4 grid, with the “LOVE” squares in the center. Try to make the spaces between the squares as equal as possible, with a slightly wider margin around the edges of the card. When you're happy with the arrangement of the squares, glue them down.
Nest the folded onion skin in the card, leaving equal margins. You may want to use a tiny dot of glue to keep the paper in place. Insert the metallic embroidery floss between the folds of the onion skin, bring the ends of the floss up around the fold of the card, and secure with a knot. Tie a bow and trim off the excess floss.

Related Articles
Editor's Picks Articles
Top Ten Articles
Previous Features
Site Map
Content copyright © 2023 by Mia C. Goloy. All rights reserved.
This content was written by Mia C. Goloy. If you wish to use this content in any manner, you need written permission. Contact Mia C. Goloy for details.
