
Purse Mini Book

Make this purse mini book as a party giveaway, as a tiny journal for your deepest thoughts, or as a handy place to jot down notes on the run. 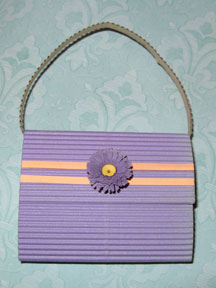
You will need:
* Craft corrugated board
* Colored copy paper, one letter size sheet (8-1/2 by 11 inches)
* Patterned paper
* Paper strip in complementing color, 1/8 inch by
* Paper flower or similar embellishment (instructions here)
* Needle and thread
* Craft glue
* Scissors
* Craft knife
* Cutting mat
* Ruler
* Pencil
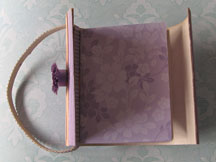
Prepare the pages. Cut a letter-size sheet of colored copy paper into eight equal pieces. Fold each piece in half crosswise, and then nest the pages. Cut a piece of patterned paper measuring 4-1/4 by 2-3/4 inches to make the endpapers. Fold this in half crosswise with the patterned side facing out, and then nest the folded pages inside it. Open the pages to the center spread, and use the needle to pierce two holes ¾ inch apart on the spine. Starting from inside the pages, sew through one hole and out the other. Making sure that the thread is taut, tie the ends of the thread securely with a double knot. Snip off the excess thread.
To make the cover, cut a piece of craft corrugated cardboard measuring around 5-1/2 by 2-7/8 inches, with the ridges parallel to the short side of the cardboard.
Measure and mark the following from one of the short ends: 1-5/16 inches and 1-1/2 inches, then 3-5/8 inches and 3-13/16 inches (If the measurement falls on a ridge, move the mark to the groove that’s right after it). The space between the two sets of measurements should be wide enough for the pages to fit (If it’s a tight fit, trim the front edge of the pages a bit). Score across the cardboard and fold. The wider flap will be the bottom of the purse; the slightly narrower one will be the top of the purse.
Glue the pages to the inside of the cover, so that spine of the pages is at the top. Cut a narrow strip of corrugated cardboard measuring 8-1/2x inches by 3/16 inch. Glue the ends of the strip inside the top spine of the cover, making the ends meet in the middle.
Cut two narrow strips of paper and glue them to the top flap of the purse. Trim off any excess. Glue the paper fringe flower to the strips to finish.
Variations: you can make the purse without the handle, or substitute the cardboard strip with a narrow ribbon. Instead of a paper flower, you can use other embellishments like a small button or flat-backed charm.

You will need:
* Craft corrugated board
* Colored copy paper, one letter size sheet (8-1/2 by 11 inches)
* Patterned paper
* Paper strip in complementing color, 1/8 inch by
* Paper flower or similar embellishment (instructions here)
* Needle and thread
* Craft glue
* Scissors
* Craft knife
* Cutting mat
* Ruler
* Pencil
Prepare the pages. Cut a letter-size sheet of colored copy paper into eight equal pieces. Fold each piece in half crosswise, and then nest the pages. Cut a piece of patterned paper measuring 4-1/4 by 2-3/4 inches to make the endpapers. Fold this in half crosswise with the patterned side facing out, and then nest the folded pages inside it. Open the pages to the center spread, and use the needle to pierce two holes ¾ inch apart on the spine. Starting from inside the pages, sew through one hole and out the other. Making sure that the thread is taut, tie the ends of the thread securely with a double knot. Snip off the excess thread.
To make the cover, cut a piece of craft corrugated cardboard measuring around 5-1/2 by 2-7/8 inches, with the ridges parallel to the short side of the cardboard.
Measure and mark the following from one of the short ends: 1-5/16 inches and 1-1/2 inches, then 3-5/8 inches and 3-13/16 inches (If the measurement falls on a ridge, move the mark to the groove that’s right after it). The space between the two sets of measurements should be wide enough for the pages to fit (If it’s a tight fit, trim the front edge of the pages a bit). Score across the cardboard and fold. The wider flap will be the bottom of the purse; the slightly narrower one will be the top of the purse.
Glue the pages to the inside of the cover, so that spine of the pages is at the top. Cut a narrow strip of corrugated cardboard measuring 8-1/2x inches by 3/16 inch. Glue the ends of the strip inside the top spine of the cover, making the ends meet in the middle.
Cut two narrow strips of paper and glue them to the top flap of the purse. Trim off any excess. Glue the paper fringe flower to the strips to finish.
Variations: you can make the purse without the handle, or substitute the cardboard strip with a narrow ribbon. Instead of a paper flower, you can use other embellishments like a small button or flat-backed charm.

Related Articles
Editor's Picks Articles
Top Ten Articles
Previous Features
Site Map
Content copyright © 2023 by Mia C. Goloy. All rights reserved.
This content was written by Mia C. Goloy. If you wish to use this content in any manner, you need written permission. Contact Mia C. Goloy for details.
