
Digital Planner Ring Template - Affinity Designer
When designing your digital planners, you can include the same features as physical planners. Your planner can have section tabs with hyperlinks, binder rings, elastic bands, section dividers and much more. In this tutorial, you will make your own digital binder rings in Affinity Designer.
This is a great tutorial for those learning how to use Affinity Designer. You will learn the following.
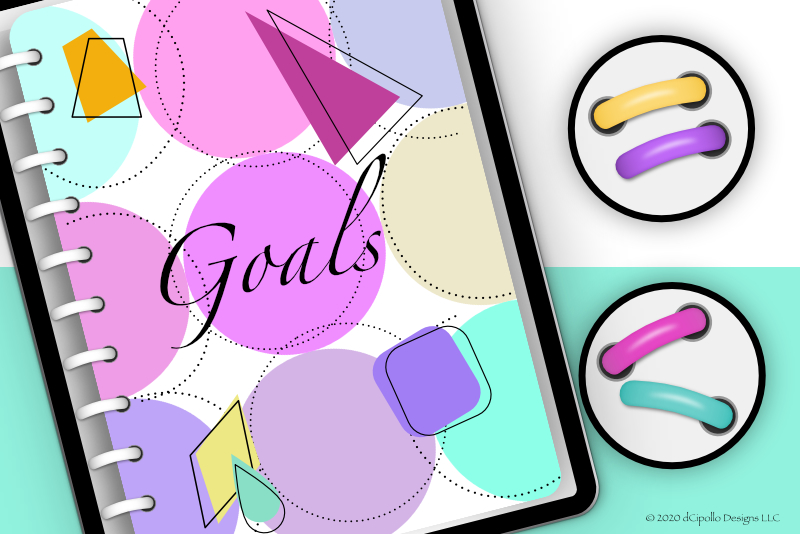
There are two types of binder rings for a digital planner (see screenshot). If your planner has a one page spread, such as the closed cover view, you will need binder rings that have one hole and half of each ring will expand beyond the left edge of the cover or page. If your planner has a two page spread, you will need binder rings with two holes and each ring will expand across the center of the two page spread.
Next
Design a Digital Planner in Affinity Suite - Tutorial Series Index
More Affinity Suite Tutorials
Screenshots used by permission of Serif (Europe) Ltd. This article is not endorsed by Serif Ltd.
This is a great tutorial for those learning how to use Affinity Designer. You will learn the following.
- Create and save custom preset
- Set Designer to work in whole pixels
- Set User Interface Preferences with pixels and points to zero
- Draw, edit and transform vector curves and shapes
- Organize your design assets in the Layers panel
There are two types of binder rings for a digital planner (see screenshot). If your planner has a one page spread, such as the closed cover view, you will need binder rings that have one hole and half of each ring will expand beyond the left edge of the cover or page. If your planner has a two page spread, you will need binder rings with two holes and each ring will expand across the center of the two page spread.
- Open Affinity Designer.
- Click the New Document button at the bottom of the Welcome screen, to start a new document with the following settings (see screenshot).
- Click the Plus icon at the top of the dialog.
- You will get a new untitled preset thumbnail in the My Presets list (see screenshot).
- Right-click on the thumbnail and choose Rename Preset.
- Name your new preset Digi Planner Ring and click OK (see screenshot).
- Go back to the Layout panel and click Create to open the new Artboard in to Designer.
- From the Toolbar, click the Snapping icon (Magnet), click the arrow to the right of the icon to open the menu and set the following options. Keep the other default settings (see screenshot).
- From the Affinity Designer menu, click Preferences - User Interface. In the Decimal Places for Unit Types section, set the Pixels and Points to zero (see screenshot).
- Now, go back to the workspace and rename the default Artboard to Planner Ring.
- Use the Rounded Rectangle tool to draw a rectangle to fill most of the Canvas. Leave just enough space for the holes (see screenshot).
- In the Layers panel, rename this layer to Ring.
- In the Transform panel, click on the upper left corner of the Anchor Point Selector. Set the Width to 240 pixels, Height to 48 pixels, X to 16 pixels and Y to 20 pixels (see screenshot).
- Select the Move tool and the Ring layer. From the Context Toolbar, set the Corner to Rounded and the Radius to 50% (see screenshot).
- Right-click on the shape with the Node tool and choose Convert to Curves (see screenshot).
- With the Node tool, click on the center point on the top and bottom paths. You will have two new blue Nodes (see screenshot).
- With the Shift key selected, click both of these center Nodes with the Node tool. Drag the Nodes upward (see screenshot).
- Select the top center Node and click the Smooth icon in the Context Toolbar. You will see the control handles attached to that Node. Drag both handles outward horizontally to create a smooth curve on the top path. Repeat this on the bottom path (see screenshot).
Layout Tab
Page Preset: Custom
Page Width: 272 pixels
Page Height: 88 pixels
DPI: 264
Document Units: Pixels
Orientation: Landscape
Create Artboard - Checked
Actual Size Zoom: iPad (Retina)
Color Tab
Color Format: RGB/8
Color Profile: sRGB IEC61966-2.1
Transparent Background - Checked
Let's save this as a custom preset.
Let's turn on snapping and set up Designer to work in whole pixels.
Enable Snapping - checked
Preset: UI Design
Move By Whole Pixels - checked
Let's make the ring's right and left edges more rounded.
Now we will add two Nodes to the top and bottom edges and give the ring a slight upward curve.
You will see the surrounding box turn to Nodes on the sides of the shape. But we need some nodes in the center.
Next
Design a Digital Planner in Affinity Suite - Tutorial Series Index
More Affinity Suite Tutorials
Screenshots used by permission of Serif (Europe) Ltd. This article is not endorsed by Serif Ltd.
Powered by Creative Market

Related Articles
Editor's Picks Articles
Top Ten Articles
Previous Features
Site Map
Content copyright © 2023 by Diane Cipollo. All rights reserved.
This content was written by Diane Cipollo. If you wish to use this content in any manner, you need written permission. Contact Diane Cipollo for details.


